Legacy experience: Updating, resolving, and reopening your case
After you create your support case, you can monitor the status of your case in Support Center. A new case begins in the Unassigned state. When a support agent begins work on a case, the status changes to Work in Progress. The support agent might respond to your case to ask for more information (Pending Customer Action) or to let you know that the case is being investigated (Pending Amazon Action).
When your case is updated, you receive an email with the correspondence and a link to the case in Support Center. Use the link in the email message to navigate to the support case. You can't respond to case correspondences by email.
Notes
-
You must sign in to the Amazon Web Services account that submitted the support case. If you sign in as an Amazon Identity and Access Management (IAM) user, you must have the required permissions to view support cases. For more information, see Manage access to Amazon Web Services Support Center.
-
If you don't respond to the case within a few days, Amazon Web Services Support resolves the case automatically.
-
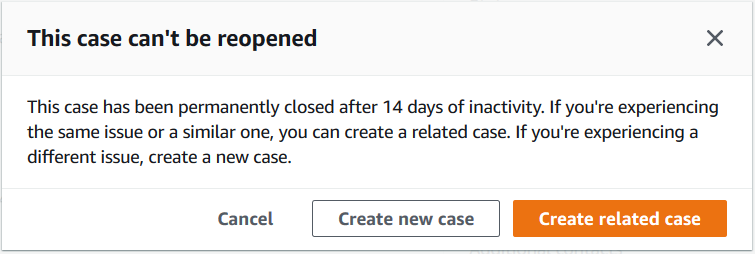
Support cases that have been in the resolved state for more than 14 days can't be reopened. If you have a similar issue that is related to the resolved case, you can create a related case. For more information, see Creating a related case.
Topics
Updating an existing support case
You can update your case to provide more information for the support agent. For example, you can reply to correspondences, start another live chat, add additional email recipients, and so on.
Note
If you have a Amazon Business Support+, Amazon Enterprise Support, or Amazon Unified Operations plan, you can reassign your support case severity level to reflect changes to urgency and business impact. If you don't have one of these support plans, then you can't update the severity of your case. For more information, see Choosing an initial support case severity level and Changing the severity level of your support case.
To update an existing support case
-
Sign in to the Amazon Support Center Console
. Tip
In the Amazon Web Services Management Console, you can also choose the question mark icon (
 ) and then choose Support Center.
 -
Under Open support cases, choose the Subject of the support case.
-
Choose Reply. In the Correspondence section, you can also make any of the following changes:
-
Provide information that the support agent requested
-
Upload file attachments
-
Change your preferred contact method
-
Add email addresses to receive case updates
-
-
Choose Submit.
Tip
If you closed a chat window and you want to start another live chat, add a Reply to your support case, choose Chat, and then choose Submit. A new pop-up chat window opens.
Resolving a support case
When you're satisfied with the response or your problem is solved, you can resolve the case in Support Center.
To resolve a support case
-
Sign in to the Amazon Support Center Console
. Tip
In the Amazon Web Services Management Console, you can also choose the question mark icon (
) and then choose Support Center. -
Under Open support cases, choose the Subject of the support case that you want to resolve.
-
(Optional) Choose Reply and in the Correspondence section, enter why you're resolving the case, and then choose Submit. For example, you can enter information about how you fixed the issue yourself in case you need this information for future reference.
-
Choose Resolve case.
-
In the dialog box, choose Ok to resolve the case.
Note
If Amazon Web Services Support resolved your case for you, you can use the feedback link to provide more information about your experience with Amazon Web Services Support.
Reopening a resolved case
If you're experiencing the same issue again, you can reopen the original case. Provide details about when the issue occurred again and what troubleshooting steps that you tried. Include any related case numbers so that the support agent can refer to previous correspondences.
Notes
-
You can reopen your support case up to 14 days from when your issue was resolved. However, you can't reopen a case that has been inactive for more than 14 days. You can create a new case or a related case. For more information, see Creating a related case.
-
If you reopen an existing case that has different information than your current issue, the support agent might ask you to create a new case.
To reopen a resolved case
-
Sign in to the Amazon Support Center Console
. Tip
In the Amazon Web Services Management Console, you can also choose the question mark icon (
) and then choose Support Center. -
Choose View all cases and then choose the Subject or the Case ID of the support case that you want to reopen.
-
Choose Reopen case.
-
Under Correspondence, for Reply, enter the case details.
-
(Optional) Choose Choose files to attach files to your case. You can attach up to 3 files.
-
For Contact methods, choose one of the following options:
-
Web – Get notified by email and the Support Center.
-
Chat – Chat online with a support agent.
-
Phone – Receive a phone call from a support agent.
-
-
(Optional) For Additional contacts, enter email addresses for other people that you want to receive case correspondences.
-
Review your case details and choose Submit.
Creating a related case
After 14 days of inactivity, you can't reopen a resolved case. If you have a similar issue that is related to the resolved case, you can create a related case. This related case will include a link to the previously resolved case, so that the support agent can review the previous case details and correspondences. If you're experiencing a different issue, we recommend that you create a new case.
To create a related case
-
Sign in to the Amazon Support Center Console
. Tip
In the Amazon Web Services Management Console, you can also choose the question mark icon (
) and then choose Support Center. -
Choose View all cases and then choose the Subject or the Case ID of the support case that you want to reopen.
-
Choose Reopen case.
-
In the dialog box, choose Create related case. The previous case information will be automatically added to your related case. If you have a different issue, choose Create new case.
-
Follow the same steps to create your case. See Creating a support case.
Note
By default, your related case has the same Type, Category, and Severity of the previous case. You can update the case details as needed.
-
Review your case details and choose Submit.
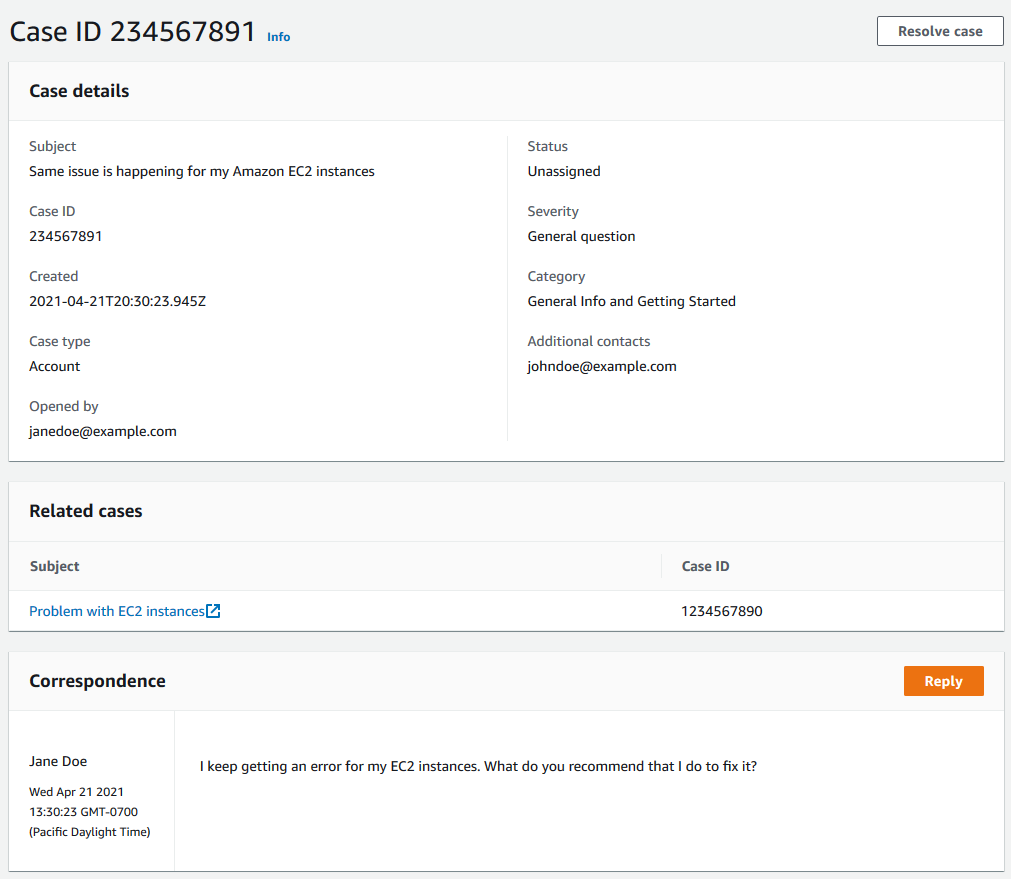
After you create your case, the previous case appears in the Related cases section, such as in the following example.
Case history
You can view case history information up to 24 months after you create a case.