Launching and connecting to an external Amazon RDS instance in a default VPC
The following procedures describe the process for connecting to an external Amazon RDS instance to a default VPC. The process is the same if you're using a custom VPC. The only additional requirements are that your environment and DB instance are in the same subnet, or in subnets that are allowed to communicate with each other. For more information about configuring a custom VPC to use with Elastic Beanstalk, see Using Elastic Beanstalk with Amazon VPC.
Note
-
An alternative to launching a new DB instance, is to start with a database that was previously created by Elastic Beanstalk and subsequently decoupled from a Beanstalk environment. For more information, see Adding a database to your Elastic Beanstalk environment. With this option, you don't need to complete the procedure for launching a new database. However, you do need to complete the subsequent procedures that are described in this topic.
-
If you’re starting with a database that was created by Elastic Beanstalk and subsequently decoupled from a Beanstalk environment, you can skip the first group of steps and continue with the steps grouped under To modify the inbound rules on your RDS instance's security group.
-
If you plan to use the database that you decouple for a production environment, verify the storage type that the database uses is suitable for your workload. For more information, see DB Instance Storage and Modifying a DB instance in the Amazon RDS User Guide.
To launch an RDS DB instance in a default VPC
-
Open the RDS console
. -
In the navigation pane, choose Databases.
-
Choose Create database.
-
Choose Standard Create.
Important
Do not choose Easy Create. If you choose it, you can't configure the necessary settings to launch this RDS DB.
-
Under Additional configuration, for Initial database name, type
ebdb. -
Review the default settings and adjust these settings according to your specific requirements. Pay attention to the following options:
-
DB instance class – Choose an instance size that has an appropriate amount of memory and CPU power for your workload.
-
Multi-AZ deployment – For high availability, set this to Create an Aurora Replica/Reader node in a different AZ.
-
Master username and Master password – The database username and password. Make a note of these settings because you will use them later.
-
-
Verify the default settings for the remaining options, and then choose Create database.
Next, modify the security group that's attached to your DB instance to allow inbound traffic on the appropriate port. This is the same security group that you will attach to your Elastic Beanstalk environment later. As a result, the rule that you add will grant inbound access permission to other resources in the same security group.
To modify the inbound rules on the security group that's attached to your RDS instance
-
Open the Amazon RDS console
. -
Choose Databases.
-
Choose the name of your DB instance to view its details.
-
In the Connectivity section, make a note of the Subnets, Security groups, and Endpoint that are displayed on this page. This is so you can use this information later.
-
Under Security, you can see the security group that's associated with the DB instance. Open the link to view the security group in the Amazon EC2 console.
-
In the security group details, choose Inbound.
-
Choose Edit.
-
Choose Add Rule.
-
For Type, choose the DB engine that your application uses.
-
For Source, type
sg-to view a list of available security groups. Choose the security group that's associated with the Auto Scaling group that's used with your Elastic Beanstalk environment. This is so that Amazon EC2 instances in the environment can have access to the database.
-
Choose Save.
Next, add the security group for the DB instance to your running environment. In this procedure Elastic Beanstalk re-provisions all instances in your environment with the additional security group attached.
To add a security group to your environment
-
Do one of the following:
-
To add a security group using the Elastic Beanstalk console
Open the Elastic Beanstalk console
, and in the Regions list, select your Amazon Web Services Region. -
In the navigation pane, choose Environments, and then choose the name of your environment from the list.
In the navigation pane, choose Configuration.
-
In the Instances configuration category, choose Edit.
-
Under EC2 security groups, choose the security group to attach to the instances, in addition to the instance security group that Elastic Beanstalk creates.
-
To save the changes choose Apply at the bottom of the page.
-
Read the warning, and then choose Confirm.
-
To add a security group using a configuration file, use the
securitygroup-addexisting.configexample file.
-
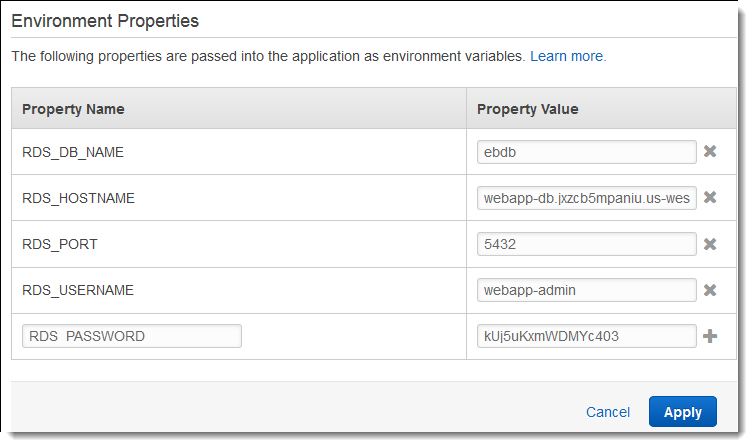
Next, pass the connection information to your environment by using environment properties. When you add a DB instance to your environment with the Elastic Beanstalk console, Elastic Beanstalk uses environment properties, such as RDS_HOSTNAME, to pass connection information to your application. You can use the same properties. By doing this, you use the same application code with both integrated DB instances and external DB instances. Or, alternatively, you can choose your own property names.
To configure environment properties for an Amazon RDS DB instance
Open the Elastic Beanstalk console
, and in the Regions list, select your Amazon Web Services Region. -
In the navigation pane, choose Environments, and then choose the name of your environment from the list.
In the navigation pane, choose Configuration.
-
In the Updates, monitoring, and logging configuration category, choose Edit.
-
In the Environment properties section, define the variables that your application reads to construct a connection string. For compatibility with environments that have an integrated RDS DB instance, use the following names and values. You can find all values, except for your password, in the RDS console
. Property name Description Property value RDS_HOSTNAMEThe hostname of the DB instance.
On the Connectivity & security tab on the Amazon RDS console: Endpoint.
RDS_PORTThe port where the DB instance accepts connections. The default value varies among DB engines.
On the Connectivity & security tab on the Amazon RDS console: Port.
RDS_DB_NAMEThe database name,
ebdb.On the Configuration tab on the Amazon RDS console: DB Name.
RDS_USERNAMEThe username that you configured for your database.
On the Configuration tab on the Amazon RDS console: Master username.
RDS_PASSWORDThe password that you configured for your database.
Not available for reference in the Amazon RDS console.
-
To save the changes choose Apply at the bottom of the page.
If you didn't program your application to read environment properties and construct a connection string yet, see the following language-specific topics for instructions:
-
Java with Tomcat – Connecting to a database (Tomcat platforms)
-
Node.js – Connecting to a database
-
.NET – Connecting to a database
-
Python – Connecting to a database
-
Ruby – Connecting to a database
Finally, depending on when your application reads environment variables, you might need to restart the application server on the instances in your environment.
To restart your environment's app servers
Open the Elastic Beanstalk console
, and in the Regions list, select your Amazon Web Services Region. -
In the navigation pane, choose Environments, and then choose the name of your environment from the list.
-
Choose Actions, and then choose Restart app server(s).