Getting started with the Cypress CY8CKIT-064S0S2-4343W kit
Important
This reference integration is hosted on the Amazon-FreeRTOS repository which is deprecated. We recommend that you start here when you create a new project. If you already have an existing FreeRTOS project based on the now deprecated Amazon-FreeRTOS repository, see the Amazon-FreeRTOS Github Repository Migration Guide.
This tutorial provides instructions for getting started with the CY8CKIT-064S0S2-4343W
Getting started
Before you begin, you must configure Amazon IoT and FreeRTOS to connect your device to the Amazon Cloud. For instructions, see First steps. After you complete the prerequisites, you will have a FreeRTOS package with Amazon IoT Core credentials.
Note
In this tutorial, the path to the FreeRTOS download directory created in the "First steps" section is
referred to as freertos
Setting up the development environment
FreeRTOS works with either a CMake or Make build flow. You can use ModusToolbox for your Make build flow. You can use the Eclipse IDE delivered with ModusToolbox or a partner IDE such as IAR EW-Arm, Arm MDK, or Microsoft Visual Studio Code. The Eclipse IDE is compatible with the Windows, macOS, and Linux operating systems.
Before you begin, download and install the latest ModusToolbox software
Updating tools for ModusToolbox 2.1 or older
If you're using the ModusToolbox 2.1 Eclipse IDE to program this kit, you'll need to update the OpenOCD and Firmware-loader tools.
In the following steps, by default the ModusToolbox
-
Windows is
C:\Users\.user_name\ModusToolbox -
Linux is
user_home/ModusToolbox -
MacOS is under the Applications folder in the volume you select in the wizard.
Updating OpenOCD
This kit requires Cypress OpenOCD 4.0.0 or later to successfully erase and program the chip.
To update Cypress OpenOCD
-
Go to the Cypress OpenOCD release page
. -
Download the archive file for your OS (Windows/Mac/Linux).
-
Delete the existing files in
ModusToolbox/tools_2.x/openocd -
Replace the files in
ModusToolbox/tools_2.x/openocd
Updating Firmware-loader
This kit requires Cypress Firmware-loader 3.0.0 or later.
To update Cypress Firmware-loader
-
Go to the Cypress Firmware-loader release page
. -
Download the archive file for your OS (Windows/Mac/Linux).
-
Delete the existing files in
ModusToolbox/tools_2.x/fw-loader -
Replace the files in
ModusToolbox/tools_2.x/fw-loader
Alternatively, you can use CMake to generate project build files from FreeRTOS application source code, build the
project using your preferred build tool, and then program the kit using OpenOCD. If you prefer to use a GUI tool
for programming with the CMake flow, download and install Cypress Programmer from the Cypress Programming Solutions
Setting up your hardware
Follow these steps to set up the kit's hardware.
-
Provision your kit
Follow the Provisioning Guide for CY8CKIT-064S0S2-4343W Kit
instructions to securely provision your kit for Amazon IoT. This kit requires CySecureTools 3.1.0 or later.
-
Set up a serial connection
-
Connect the kit to your host computer.
-
The USB Serial port for the kit is automatically enumerated on the host computer. Identify the port number. In Windows, you can identify it using the Device Manager under Ports (COM & LPT).
-
Start a serial terminal and open a connection with the following settings:
-
Baud rate: 115200
-
Data: 8 bit
-
Parity: None
-
Stop bits: 1
-
Flow control: None
-
-
Build and run the FreeRTOS Demo project
In this section you build and run the demo.
-
Make sure to follow the steps in Provisioning Guide for CY8CKIT-064S0S2-4343W Kit
. -
Build the FreeRTOS Demo.
-
Open the Eclipse IDE for ModusToolbox and choose, or create, a workspace.
-
From the File menu, choose Import.
Expand General, choose Existing Project Into Workspace, and then choose Next.
-
In Root Directory, enter
freertos/projects/cypress/CY8CKIT-064S0S2-4343W/mtb/aws_demosaws_demos. It should be selected by default. -
Choose Finish to import the project into your workspace.
-
Build the application by doing one of the following:
-
From the Quick Panel, select Build aws_demos Application.
-
Choose Project and choose Build All.
Make sure the project compiles without errors.
-
-
-
Monitoring MQTT Messages on the Cloud
Before you run the demo, you can set up the MQTT client in the Amazon IoT console to monitor the messages that your device sends to the Amazon Cloud. To subscribe to the MQTT topic with the Amazon IoT MQTT client, follow these steps.
-
Sign in to the Amazon IoT console
. -
In the navigation pane, choose Test, then choose MQTT test client to open the MQTT client.
-
For Subscription topic, enter
your-thing-name/example/topic
-
-
Run the FreeRTOS demo project
-
Select the project
aws_demosin the workspace. -
From the Quick Panel, select aws_demos Program (KitProg3). This programs the board and the demo application starts running after the programming is finished.
-
You can view the status of the running application in the serial terminal. The following figure shows a part of the terminal output.
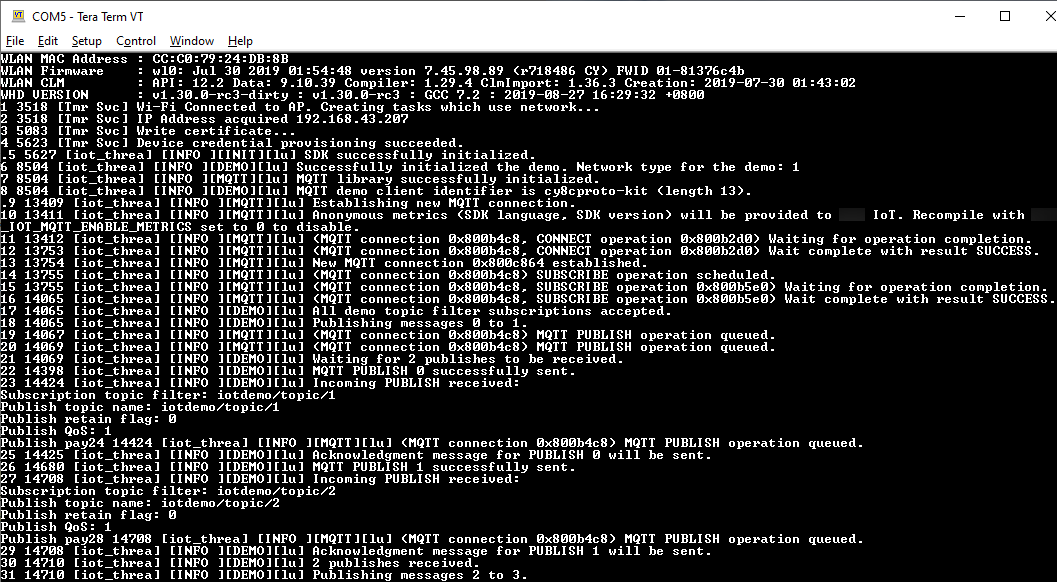
The MQTT demo publishes messages on four different topics (
iotdemo/topic/, where n=1 to 4) and subscribes to all those topics to receive the same messages back. When a message is received, the demo publishes an acknowledgement message on the topicniotdemo/acknowledgements. The following list describes the debug messages that appear in the terminal output, with references to the serial numbers of the messages. In the output, the WICED Host Driver (WHD) driver details are printed first without serial numbering.-
1 to 4 – Device connects to the configured Access Point (AP) and is provisioned by connecting to the Amazon server using the configured endpoint and certificates.
-
5 to 13 – coreMQTT library is initialized and device establishes MQTT connection.
-
14 to 17 – Device subscribes to all the topics to receive the published messages back.
-
18 to 30 – Device publishes two messages and waits to receive them back. When each message is received, the device sends an acknowledgement message.
The same cycle of publish, receive, and acknowledge continues until all the messages are published. Two messages are published per cycle until the number of cycles configured are completed.
-
-
-
Using CMake with FreeRTOS
You can also use CMake to build and run the demo application. To set up CMake and a native build system, see Prerequisites.
-
Use the following command to generate build files. Specify the target board with the
-DBOARDoption.cmake -DVENDOR=cypress -DBOARD=CY8CKIT_064S0S2_4343W -DCOMPILER=arm-gcc -Sfreertos-Bbuild_dirIf you're using Windows, you must specify the native build system using the
-Goption because CMake uses Visual Studio by default.Example
cmake -DVENDOR=cypress -DBOARD=CY8CKIT_064S0S2_4343W -DCOMPILER=arm-gcc -Sfreertos-Bbuild_dir-G NinjaIf
arm-none-eabi-gccis not in your shell path, you also need to set theAFR_TOOLCHAIN_PATHCMake variable.Example
-DAFR_TOOLCHAIN_PATH=/home/user/opt/gcc-arm-none-eabi/bin -
Use the following command to build the project using CMake.
cmake --buildbuild_dir -
Finally, program the
cm0.hexandcm4.hexfiles generated underbuild_dir
-
Running other demos
The following demo applications have been tested and verified to work with the current release. You can find
these demos under the freertos/demos
-
Bluetooth Low Energy demo
-
Over-the-Air Updates demo
-
Secure Sockets Echo Client demo
-
Amazon IoT Device Shadow demo
Debugging
The KitProg3 on the kit supports debugging over the SWD protocol.
-
To debug the FreeRTOS application, select the aws_demos project in the workspace and then select aws_demos Debug (KitProg3) from the Quick Panel.
OTA updates
PSoC 64 MCUs have passed all of the required FreeRTOS qualification tests. However, the optional over-the-air
(OTA) feature implemented in the PSoC 64 Standard Secure Amazon firmware library is still pending evaluation. The OTA
feature as-implemented currently passes all of the OTA qualification tests except
aws_ota_test_case_rollback_if_unable_to_connect_after_update.py
When a successfully validated OTA image is applied to a device using the PSoC64 Standard Secure – Amazon MCU and the device can't communicate with Amazon IoT Core, the device can't automatically rollback to the original known good image. This might result in the device being unreachable from Amazon IoT Core for further updates. This functionality is still under development by the Cypress team.
For more information, see OTA Updates with Amazon and the
CY8CKIT-064S0S2-4343W Kit