Getting started with the Xilinx Avnet MicroZed Industrial IoT Kit
Important
This reference integration is hosted on the Amazon-FreeRTOS repository which is deprecated. We recommend that you start here when you create a new project. If you already have an existing FreeRTOS project based on the now deprecated Amazon-FreeRTOS repository, see the Amazon-FreeRTOS Github Repository Migration Guide.
This tutorial provides instructions for getting started with the Xilinx Avnet MicroZed Industrial IoT Kit. If you do not have the Xilinx Avnet MicroZed Industrial IoT Kit, visit the Amazon Partner Device Catalog to purchase one from our partner
Before you begin, you must configure Amazon IoT and your FreeRTOS download to connect
your device to the Amazon Cloud. See First steps for instructions. In this tutorial, the path to
the FreeRTOS download directory is referred to as freertos
Overview
This tutorial contains instructions for the following getting started steps:
-
Connecting your board to a host machine.
-
Installing software on the host machine for developing and debugging embedded applications for your microcontroller board.
-
Cross compiling a FreeRTOS demo application to a binary image.
-
Loading the application binary image to your board, and then running the application.
Set up the MicroZed hardware
The following diagram might be helpful when you set up the MicroZed hardware:
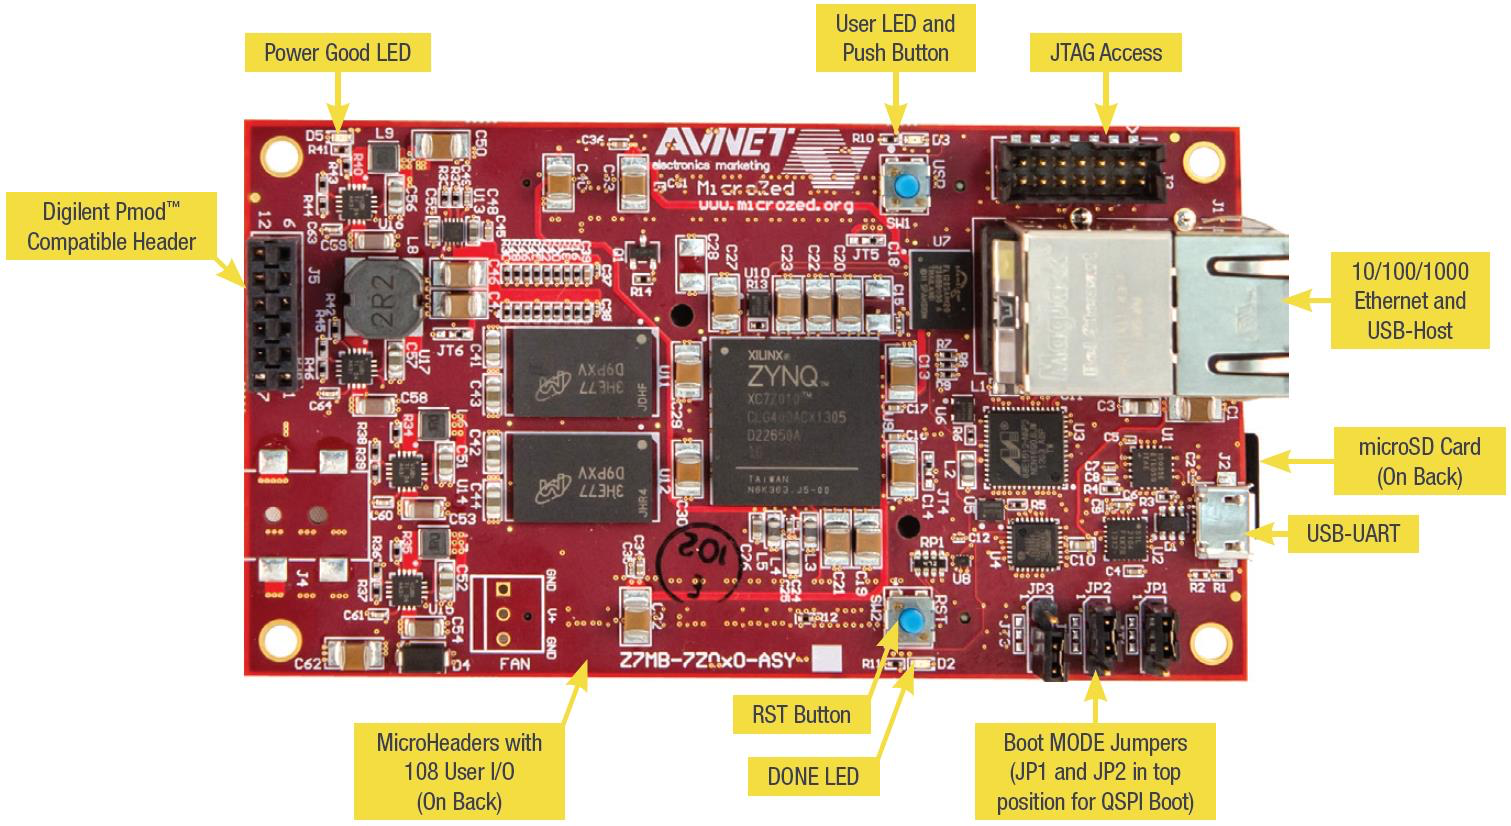
To set up the MicroZed board
-
Connect your computer to the USB-UART port on your MicroZed board.
-
Connect your computer to the JTAG Access port on your MicroZed board.
-
Connect a router or internet-connected Ethernet port to the Ethernet and USB-Host port on your MicroZed board.
Set up your development environment
To set up FreeRTOS configurations for the MicroZed kit, you must use the Xilinx Software Development Kit (XSDK). XSDK is supported on Windows and Linux.
Download and install XSDK
To install Xilinx software, you need a free Xilinx account.
To download the XSDK
-
Go to the Software Development Kit Standalone WebInstall Client
download page. -
Choose the option appropriate for your operating system.
-
You are directed to a Xilinx sign-in page.
If you have an account with Xilinx, enter your sign-in credentials and then choose Sign in.
If you do not have an account, choose Create your account. After you register, you should receive an email with a link to activate your Xilinx account.
-
On the Name and Address Verification page, enter your information and then choose Next. The download should be ready to start.
-
Save the
Xilinx_SDK_file.version_os
To install the XSDK
-
Open the
Xilinx_SDK_file.version_os -
In Select Edition to Install, choose Xilinx Software Development Kit (XSDK) and then choose Next.
-
On the following page of the installation wizard, under Installation Options, select Install Cable Drivers and then choose Next.
If your computer does not detect the MicroZed's USB-UART connection, install the CP210x
USB-to-UART Bridge VCP drivers manually. For instructions, see the Silicon Labs CP210x USB-to-UART Installation Guide
For more information about XSDK, see the Getting Started with Xilinx SDK
Monitoring MQTT messages on the cloud
Before you run the FreeRTOS demo project, you can set up the MQTT client in the Amazon IoT console to monitor the messages that your device sends to the Amazon Cloud.
To subscribe to the MQTT topic with the Amazon IoT MQTT client
-
Sign in to the Amazon IoT console
. -
In the navigation pane, choose Test, then choose MQTT test client to open the MQTT client.
-
In Subscription topic, enter
your-thing-name/example/topic
Build and run the FreeRTOS demo project
Open the FreeRTOS demo in the XSDK IDE
-
Launch the XSDK IDE with the workspace directory set to
freertos/projects/xilinx/microzed/xsdk -
Close the welcome page. From the menu, choose Project, and then clear Build Automatically.
-
From the menu, choose File, and then choose Import.
-
On the Select page, expand General, choose Existing Projects into Workspace, and then choose Next.
-
On the Import Projects page, choose Select root directory, and then enter the root directory of your demo project:
freertos/projects/xilinx/microzed/xsdk/aws_demosAfter you specify a root directory, the projects in that directory appear on the Import Projects page. All available projects are selected by default.
Note
If you see a warning at the top of the Import Projects page ("Some projects cannot be imported because they already exist in the workspace.") you can ignore it.
-
With all of the projects selected, choose Finish.
-
If you don't see the
aws_bsp,fsbl, andMicroZed_hw_platform_0projects in the projects pane, repeat the previous steps starting from #3 but with the root directory set tofreertos/vendors/xilinxaws_bsp,fsbl, andMicroZed_hw_platform_0. -
From the menu, choose Window, and then choose Preferences.
-
In the navigation pane, expand Run/Debug, choose String Substitution, and then choose New.
-
In New String Substitution Variable, for Name, enter
AFR_ROOT. For Value, enter the root path of thefreertos/projects/xilinx/microzed/xsdk/aws_demos
Build the FreeRTOS demo project
-
In the XSDK IDE, from the menu, choose Project, and then choose Clean.
-
In Clean, leave the options at their default values, and then choose OK. XSDK cleans and builds all of the projects, and then generates
.elffiles.Note
To build all projects without cleaning them, choose Project, and then choose Build All.
To build individual projects, select the project you want to build, choose Project, and then choose Build Project.
Generate the boot image for the FreeRTOS demo project
-
In the XSDK IDE, right-click aws_demos, and then choose Create Boot Image.
-
In Create Boot Image, choose Create new BIF file.
-
Next to Output BIF file path, choose Browse, and then choose
aws_demos.biflocated at<freertos>/vendors/xilinx/microzed/aws_demos/aws_demos.bif -
Choose Add.
-
On Add new boot image partition, next to File path, choose Browse, and then choose
fsbl.elf, located atvendors/xilinx/fsbl/Debug/fsbl.elf. -
For the Partition type, choose bootloader, and then choose OK.
-
On Create Boot Image, choose Create Image. On Override Files, choose OK to overwrite the existing
aws_demos.bifand generate theBOOT.binfile atprojects/xilinx/microzed/xsdk/aws_demos/BOOT.bin.
JTAG debugging
-
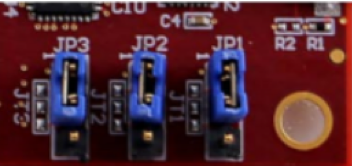
Set your MicroZed board's boot mode jumpers to the JTAG boot mode.
-
Insert your MicroSD card into the MicroSD card slot located directly under the USB-UART port.
Note
Before you debug, be sure to back up any content that you have on the MicroSD card.
Your board should look similar to the following:

-
In the XSDK IDE, right-click aws_demos, choose Debug As, and then choose 1 Launch on System Hardware (System Debugger).
-
When the debugger stops at the breakpoint in
main(), from the menu, choose Run, and then choose Resume.Note
The first time you run the application, a new certificate-key pair is imported into non-volatile memory. For subsequent runs, you can comment out
vDevModeKeyProvisioning()in themain.cfile before you rebuild the images and theBOOT.binfile. This prevents the copying of the certificates and key to storage on every run.
You can opt to boot your MicroZed board from a MicroSD card or from QSPI flash to run the FreeRTOS demo project. For instructions, see Generate the boot image for the FreeRTOS demo project and Run the FreeRTOS demo project.
Run the FreeRTOS demo project
To run the FreeRTOS demo project, you can boot your MicroZed board from a MicroSD card or from QSPI flash.
As you set up your MicroZed board for running the FreeRTOS demo project, refer to the diagram in Set up the MicroZed hardware. Make sure that you have connected your MicroZed board to your computer.
Boot the FreeRTOS project from a MicroSD card
Format the MicroSD card that is provided with the Xilinx MicroZed Industrial IoT Kit.
-
Copy the
BOOT.binfile to the MicroSD card. -
Insert the card into the MicroSD card slot directly under the USB-UART port.
-
Set the MicroZed boot mode jumpers to SD boot mode.

-
Press the RST button to reset the device and start booting the application. You can also unplug the USB-UART cable from the USB-UART port, and then reinsert the cable.
Boot the FreeRTOS demo project from QSPI flash
-
Set your MicroZed board's boot mode jumpers to the JTAG boot mode.
-
Verify that your computer is connected to the USB-UART and JTAG Access ports. The green Power Good LED light should be illuminated.
-
In the XSDK IDE, from the menu, choose Xilinx, and then choose Program Flash.
-
In Program Flash Memory, the hardware platform should be filled in automatically. For Connection, choose your MicroZed hardware server to connect your board with your host computer.
Note
If you are using the Xilinx Smart Lync JTAG cable, you must create a hardware server in XSDK IDE. Choose New, and then define your server.
-
In Image File, enter the directory path to your
BOOT.binimage file. Choose Browse to browse for the file instead. -
In Offset, enter
0x0. -
In FSBL File, enter the directory path to your
fsbl.elffile. Choose Browse to browse for the file instead. -
Choose Program to program your board.
-
After the QSPI programming is complete, remove the USB-UART cable to power off the board.
-
Set your MicroZed board's boot mode jumpers to the QSPI boot mode.
-
Insert your card into the MicroSD card slot located directly under the USB-UART port.
Note
Be sure to back up any content that you have on the MicroSD card.
-
Press the RST button to reset the device and start booting the application. You can also unplug the USB-UART cable from the USB-UART port, and then reinsert the cable.
Troubleshooting
If you encounter build errors that are related to incorrect paths, try to clean and rebuild the project, as described in Build the FreeRTOS demo project.
If you are using Windows, make sure that you use forward slashes when you set the string substitution variables in the Windows XSDK IDE.
For general troubleshooting information about Getting Started with FreeRTOS, see Troubleshooting getting started.