End of support notice: On October 7th, 2026, Amazon will discontinue support for Amazon IoT Greengrass Version 1. After October 7th, 2026, you will no longer be able to access the Amazon IoT Greengrass V1 resources. For more information, please visit Migrate from Amazon IoT Greengrass Version 1.
Test communications (device syncs disabled)
-
Make sure that your computer and the Amazon IoT Greengrass core device are connected to the internet using the same network.
-
On the Amazon IoT Greengrass core device, run the following command to find its IP address.
hostname -I -
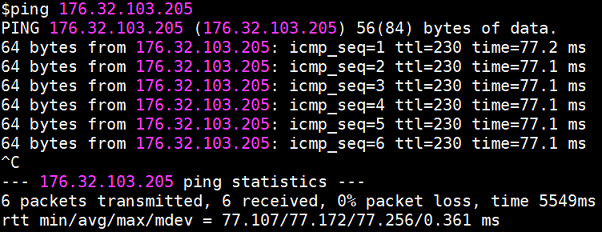
On your computer, run the following command using the IP address of the core. You can use Ctrl + C to stop the ping command.
pingIP-addressOutput similar to the following indicates successful communication between the computer and the Amazon IoT Greengrass core device (0% packet loss):
Note
If you're unable to ping an EC2 instance that's running Amazon IoT Greengrass, make sure that the inbound security group rules for the instance allow ICMP traffic for Echo request messages. For more information, see Adding rules to a security group in the Amazon EC2 User Guide.
On Windows host computers, in the Windows Firewall with Advanced Security app, you might also need to enable an inbound rule that allows inbound echo requests (for example, File and Printer Sharing (Echo Request - ICMPv4-In)), or create one.
-
-
Get your Amazon IoT endpoint.
-
From the Amazon IoT console
navigation pane, choose Settings. -
Under Device data endpoint, make a note of the value of Endpoint. You use this value to replace the
AWS_IOT_ENDPOINTplaceholder in the commands in the following steps.Note
Make sure that your endpoints correspond to your certificate type.
-
-
On your computer (not the Amazon IoT Greengrass core device), open two command-line
(terminal or command prompt) windows. One window represents the GG_Switch client device and the other represents the GG_TrafficLight client device. -
From the GG_Switch client device window, run the following commands.
-
Replace
path-to-certs-folderwith the path to the folder that contains the certificates, keys, and Python files. -
Replace
AWS_IOT_ENDPOINTwith your endpoint. -
Replace the two
switchCertIdinstances with the certificate ID in the file name for your GG_Switch client device.
cdpath-to-certs-folderpython lightController.py --endpointAWS_IOT_ENDPOINT--rootCA AmazonRootCA1.pem --certswitchCertId-certificate.pem.crt --keyswitchCertId-private.pem.key --thingName GG_TrafficLight --clientId GG_Switch -
-
From the GG_TrafficLight client device window, run the following commands.
-
Replace
path-to-certs-folderwith the path to the folder that contains the certificates, keys, and Python files. -
Replace
AWS_IOT_ENDPOINTwith your endpoint. -
Replace the two
lightCertIdinstances with the certificate ID in the file name for your GG_TrafficLight client device.
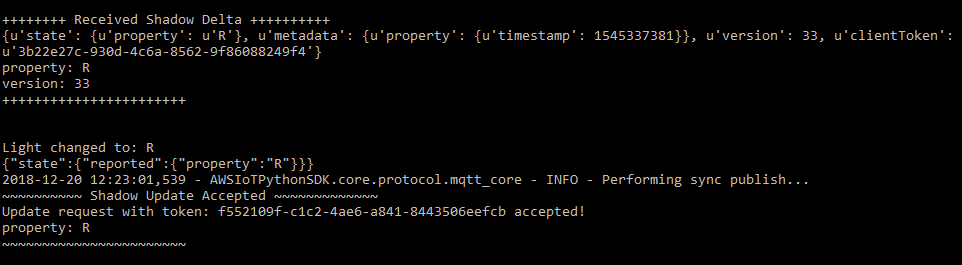
cdpath-to-certs-folderpython trafficLight.py --endpointAWS_IOT_ENDPOINT--rootCA AmazonRootCA1.pem --certlightCertId-certificate.pem.crt --keylightCertId-private.pem.key --thingName GG_TrafficLight --clientId GG_TrafficLightEvery 20 seconds, the switch updates the shadow state to G, Y, and R, and the light displays its new state, as shown next.
GG_Switch output:

GG_TrafficLight output:
-
When executed for the first time, each client device script runs the Amazon IoT Greengrass discovery service to connect to the Amazon IoT Greengrass core (through the internet). After a client device has discovered and successfully connected to the Amazon IoT Greengrass core, future operations can be executed locally.
Note
The
lightController.pyandtrafficLight.pyscripts store connection information in thegroupCAfolder, which is created in the same folder as the scripts. If you receive connection errors, make sure that the IP address in theggc-hostfile matches the IP address endpoint for your core. -
-
In the Amazon IoT console, choose your Amazon IoT Greengrass group, choose the Client devices tab, and then choose GG_TrafficLight to open the client device's Amazon IoT thing details page.
-
Choose the Device Shadows tab. After the GG_Switch changes states, there should not be any updates to this shadow. That's because the GG_TrafficLight is set to Disable shadow sync with cloud.
-
Press Ctrl + C in the GG_Switch (
lightController.py) client device window. You should see that the GG_TrafficLight (trafficLight.py) window stops receiving state change messages.Keep these windows open so you can run the commands in the next section.