End of support notice: On October 7th, 2026, Amazon will discontinue support for Amazon IoT Greengrass Version 1. After October 7th, 2026, you will no longer be able to access the Amazon IoT Greengrass V1 resources. For more information, please visit Migrate from Amazon IoT Greengrass Version 1.
Getting started with Greengrass connectors (CLI)
This feature is available for Amazon IoT Greengrass Core v1.7 and later.
This tutorial shows how to use the Amazon CLI to work with connectors.
Use connectors to accelerate your development life cycle. Connectors are prebuilt, reusable modules that can make it easier to interact with services, protocols, and resources. They can help you deploy business logic to Greengrass devices more quickly. For more information, see Integrate with services and protocols using Greengrass connectors.
In this tutorial, you configure and deploy the Twilio Notifications connector. The connector receives Twilio message information as input data, and then triggers a Twilio text message. The data flow is shown in following diagram.
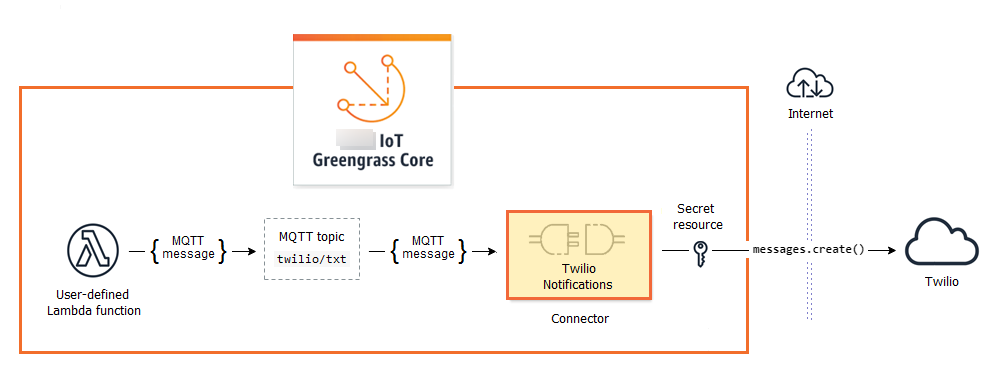
After you configure the connector, you create a Lambda function and a subscription.
The function evaluates simulated data from a temperature sensor. It conditionally publishes the Twilio message information to an MQTT topic. This is the topic that the connector subscribes to.
The subscription allows the function to publish to the topic and the connector to receive data from the topic.
The Twilio Notifications connector requires a Twilio auth token to interact with the Twilio API. The token is a text type secret created in Amazon Secrets Manager and referenced from a group resource. This enables Amazon IoT Greengrass to create a local copy of the secret on the Greengrass core, where it is encrypted and made available to the connector. For more information, see Deploy secrets to the Amazon IoT Greengrass core.
The tutorial contains the following high-level steps:
The tutorial should take about 30 minutes to complete.
Using the Amazon IoT Greengrass API
It's helpful to understand the following patterns when you work with Greengrass groups and group components (for example, the connectors, functions, and resources in the group).
At the top of the hierarchy, a component has a definition object that is a container for version objects. In turn, a version is a container for the connectors, functions, or other component types.
When you deploy to the Greengrass core, you deploy a specific group version. A group version can contain one version of each type of component. A core is required, but the others are included as needed.
Versions are immutable, so you must create new versions when you want to make changes.
Tip
If you receive an error when you run an Amazon CLI command, add the --debug parameter
and then rerun the command to get more information about the error.
The Amazon IoT Greengrass API lets you create multiple definitions for a component type. For example, you
can create a FunctionDefinition object every time that you create a FunctionDefinitionVersion, or you can add new
versions to an existing definition. This flexibility allows you to customize your version management system.
Prerequisites
To complete this tutorial, you need:
-
A Greengrass group and a Greengrass core (v1.9.3 or later). To learn how to create a Greengrass group and core, see Getting started with Amazon IoT Greengrass. The Getting Started tutorial also includes steps for installing the Amazon IoT Greengrass Core software.
-
Python 3.7 installed on the Amazon IoT Greengrass core device.
-
Amazon IoT Greengrass must be configured to support local secrets, as described in Secrets Requirements.
Note
This requirement includes allowing access to your Secrets Manager secrets. If you're using the default Greengrass service role, Greengrass has permission to get the values of secrets with names that start with greengrass-.
-
A Twilio account SID, auth token, and Twilio-enabled phone number. After you create a Twilio project, these values are available on the project dashboard.
Note
You can use a Twilio trial account. If you're using a trial account, you must add non-Twilio recipient phone numbers to a list of verified phone numbers. For more information, see How to Work with your Free Twilio Trial Account
.
-
Amazon CLI installed and configured on your computer. For more information, see Installing the Amazon Command Line Interface and Configuring the Amazon CLI in the Amazon Command Line Interface User Guide.
The examples in this tutorial are written for Linux and other Unix-based systems. If you're using Windows, see Specifying parameter values for the Amazon Command Line Interface to learn about differences in syntax.
If the command contains a JSON string, the tutorial provides an example that has the JSON on a single line. On some systems, it might be easier to edit and run commands using this format.
Step 1: Create a Secrets Manager secret
In this step, you use the Amazon Secrets Manager API to create a secret for your Twilio auth token.
-
First, create the secret.
Replace
twilio-auth-tokenwith your Twilio auth token.
aws secretsmanager create-secret --name greengrass-TwilioAuthToken --secret-stringtwilio-auth-tokenNote
By default, the Greengrass service role allows Amazon IoT Greengrass to get the value of secrets with names that start with greengrass-. For more information, see secrets requirements.
-
Copy the
ARNof the secret from the output. You use this to create the secret resource and to configure the Twilio Notifications connector.
Step 2: Create a resource definition and version
In this step, you use the Amazon IoT Greengrass API to create a secret resource for your Secrets Manager secret.
-
Create a resource definition that includes an initial version.
Replace
secret-arnwith theARNof the secret that you copied in the previous step.
Copy the
LatestVersionArnof the resource definition from the output. You use this value to add the resource definition version to the group version that you deploy to the core.
Step 3: Create a connector definition and version
In this step, you configure parameters for the Twilio Notifications connector.
-
Create a connector definition with an initial version.
Replace
account-sidwith your Twilio account SID.Replace
secret-arnwith theARNof your Secrets Manager secret. The connector uses this to get the value of the local secret.Replace
phone-numberwith your Twilio-enabled phone number. Twilio uses this to initiate the text message. This can be overridden in the input message payload. Use the following format:+19999999999.
Note
TwilioAuthTokenis the ID that you used in the previous step to create the secret resource. Copy the
LatestVersionArnof the connector definition from the output. You use this value to add the connector definition version to the group version that you deploy to the core.
Step 4: Create a Lambda function deployment package
To create a Lambda function, you must first create a Lambda function deployment package that contains the function code and dependencies. Greengrass Lambda functions require the Amazon IoT Greengrass Core SDK for tasks such as communicating with MQTT messages in the core environment and accessing local secrets. This tutorial creates a Python function, so you use the Python version of the SDK in the deployment package.
-
From the Amazon IoT Greengrass Core SDK downloads page, download the Amazon IoT Greengrass Core SDK for Python to your computer.
-
Unzip the downloaded package to get the SDK. The SDK is the
greengrasssdkfolder. -
Save the following Python code function in a local file named
temp_monitor.py.import greengrasssdk import json import random client = greengrasssdk.client('iot-data') # publish to the Twilio Notifications connector through the twilio/txt topic def function_handler(event, context): temp = event['temperature'] # check the temperature # if greater than 30C, send a notification if temp > 30: data = build_request(event) client.publish(topic='twilio/txt', payload=json.dumps(data)) print('published:' + str(data)) print('temperature:' + str(temp)) return # build the Twilio request from the input data def build_request(event): to_name = event['to_name'] to_number = event['to_number'] temp_report = 'temperature:' + str(event['temperature']) return { "request": { "recipient": { "name": to_name, "phone_number": to_number, "message": temp_report } }, "id": "request_" + str(random.randint(1,101)) } -
Zip the following items into a file named
temp_monitor_python.zip. When creating the ZIP file, include only the code and dependencies, not the containing folder.-
temp_monitor.py. App logic.
-
greengrasssdk. Required library for Python Greengrass Lambda functions that publish MQTT messages.
This is your Lambda function deployment package.
-
Step 5: Create a Lambda function
Now, create a Lambda function that uses the deployment package.
-
Create an IAM role so you can pass in the role ARN when you create the function.
Note
Amazon IoT Greengrass doesn't use this role because permissions for your Greengrass Lambda functions are specified in the Greengrass group role. For this tutorial, you create an empty role.
-
Copy the
Arnfrom the output. -
Use the Amazon Lambda API to create the TempMonitor function. The following command assumes that the zip file is in the current directory.
Replace
role-arnwith theArnthat you copied.
aws lambda create-function \ --function-name TempMonitor \ --zip-file fileb://temp_monitor_python.zip \ --rolerole-arn\ --handler temp_monitor.function_handler \ --runtime python3.7 -
Publish a version of the function.
aws lambda publish-version --function-name TempMonitor --description 'First version' -
Create an alias for the published version.
Greengrass groups can reference a Lambda function by alias (recommended) or by version. Using an alias makes it easier to manage code updates because you don't have to change your subscription table or group definition when the function code is updated. Instead, you just point the alias to the new function version.
Note
Amazon IoT Greengrass doesn't support Lambda aliases for $LATEST versions.
aws lambda create-alias --function-name TempMonitor --name GG_TempMonitor --function-version 1 -
Copy the
AliasArnfrom the output. You use this value when you configure the function for Amazon IoT Greengrass and when you create a subscription.
Now you're ready to configure the function for Amazon IoT Greengrass.
Step 6: Create a function definition and version
To use a Lambda function on an Amazon IoT Greengrass core, you create a function definition version that references the Lambda function by alias and defines the group-level configuration. For more information, see Controlling execution of Greengrass Lambda functions by using group-specific configuration.
-
Create a function definition that includes an initial version.
Replace
alias-arnwith theAliasArnthat you copied when you created the alias.
Copy the
LatestVersionArnfrom the output. You use this value to add the function definition version to the group version that you deploy to the core.Copy the
Idfrom the output. You use this value later when you update the function.
Step 7: Create a subscription definition and version
In this step, you add a subscription that enables the Lambda function to send input data to the connector. The connector defines the MQTT topics that it subscribes to, so this subscription uses one of the topics. This is the same topic that the example function publishes to.
For this tutorial, you also create subscriptions that allow the function to receive simulated temperature readings from Amazon IoT and allow Amazon IoT to receive status information from the connector.
-
Create a subscription definition that contains an initial version that includes the subscriptions.
Replace
alias-arnwith theAliasArnthat you copied when you created the alias for the function. Use this ARN for both subscriptions that use it.
Copy the
LatestVersionArnfrom the output. You use this value to add the subscription definition version to the group version that you deploy to the core.
Step 8: Create a group version
Now, you're ready to create a group version that contains all of the items that you want to deploy. You do this by creating a group version that references the target version of each component type.
First, get the group ID and the ARN of the core definition version. These values are required to create the group version.
-
Get the ID of the group and latest group version:
-
Get the IDs of the target Greengrass group and group version. This procedure assumes that this is the latest group and group version. The following query returns the most recently created group.
aws greengrass list-groups --query "reverse(sort_by(Groups, &CreationTimestamp))[0]"Or, you can query by name. Group names are not required to be unique, so multiple groups might be returned.
aws greengrass list-groups --query "Groups[?Name=='MyGroup']"Note
You can also find these values in the Amazon IoT console. The group ID is displayed on the group's Settings page. Group version IDs are displayed on the group's Deployments tab.
-
Copy the
Idof the target group from the output. You use this to get the core definition version and when you deploy the group. -
Copy the
LatestVersionfrom the output, which is the ID of the last version added to the group. You use this to get the core definition version.
-
-
Get the ARN of the core definition version:
Get the group version. For this step, we assume that the latest group version includes a core definition version.
Replace
group-idwith theIdthat you copied for the group.Replace
group-version-idwith theLatestVersionthat you copied for the group.
aws greengrass get-group-version \ --group-idgroup-id\ --group-version-idgroup-version-idCopy the
CoreDefinitionVersionArnfrom the output.
-
Create a group version.
Replace
group-idwith theIdthat you copied for the group.Replace
core-definition-version-arnwith theCoreDefinitionVersionArnthat you copied for the core definition version.Replace
resource-definition-version-arnwith theLatestVersionArnthat you copied for the resource definition.Replace
connector-definition-version-arnwith theLatestVersionArnthat you copied for the connector definition.Replace
function-definition-version-arnwith theLatestVersionArnthat you copied for the function definition.Replace
subscription-definition-version-arnwith theLatestVersionArnthat you copied for the subscription definition.
aws greengrass create-group-version \ --group-idgroup-id\ --core-definition-version-arncore-definition-version-arn\ --resource-definition-version-arnresource-definition-version-arn\ --connector-definition-version-arnconnector-definition-version-arn\ --function-definition-version-arnfunction-definition-version-arn\ --subscription-definition-version-arnsubscription-definition-version-arn Copy the value of
Versionfrom the output. This is the ID of the group version. You use this value to deploy the group version.
Step 9: Create a deployment
Deploy the group to the core device.
-
In a core device terminal, make sure that the Amazon IoT Greengrass daemon is running.
To check whether the daemon is running:
ps aux | grep -E 'greengrass.*daemon'If the output contains a
rootentry for/greengrass/ggc/packages/1.11.6/bin/daemon, then the daemon is running.To start the daemon:
cd /greengrass/ggc/core/
sudo ./greengrassd start
-
Create a deployment.
Replace
group-idwith theIdthat you copied for the group.Replace
group-version-idwith theVersionthat you copied for the new group version.
aws greengrass create-deployment \ --deployment-type NewDeployment \ --group-idgroup-id\ --group-version-idgroup-version-id -
Copy the
DeploymentIdfrom the output. -
Get the deployment status.
Replace
group-idwith theIdthat you copied for the group.Replace
deployment-idwith theDeploymentIdthat you copied for the deployment.
aws greengrass get-deployment-status \ --group-idgroup-id\ --deployment-iddeployment-idIf the status is
Success, the deployment was successful. For troubleshooting help, see Troubleshooting Amazon IoT Greengrass.
Test the solution
-
On the Amazon IoT console home page, choose Test.
-
For Subscribe to topic, use the following values, and then choose Subscribe. The Twilio Notifications connector publishes status information to this topic.
Property
Value
Subscription topic
twilio/message/status
MQTT payload display
Display payloads as strings
-
For Publish to topic, use the following values, and then choose Publish to invoke the function.
Property
Value
Topic
temperature/input
Message
Replace
recipient-namewith a name andrecipient-phone-numberwith the phone number of the text message recipient. Example:+12345000000{ "to_name": "recipient-name", "to_number": "recipient-phone-number", "temperature": 31 }If you're using a trial account, you must add non-Twilio recipient phone numbers to a list of verified phone numbers. For more information, see Verify your Personal Phone Number
. If successful, the recipient receives the text message and the console displays the
successstatus from the output data.Now, change the
temperaturein the input message to29and publish. Because this is less than 30, the TempMonitor function doesn't trigger a Twilio message.
See also
-
Integrate with services and protocols using Greengrass connectors
-
Amazon Secrets Manager commands in the Amazon CLI Command Reference
-
Amazon Identity and Access Management (IAM) commands in the Amazon CLI Command Reference
-
Amazon Lambda commands in the Amazon CLI Command Reference
-
Amazon IoT Greengrass commands in the Amazon CLI Command Reference