End of support notice: On October 7th, 2026, Amazon will discontinue support for Amazon IoT Greengrass Version 1. After October 7th, 2026, you will no longer be able to access the Amazon IoT Greengrass V1 resources. For more information, please visit Migrate from Amazon IoT Greengrass Version 1.
How to configure local resource access using the Amazon Web Services Management Console
This feature is available for Amazon IoT Greengrass Core v1.3 and later.
You can configure Lambda functions to securely access local resources on the host Greengrass core device. Local resources refer to buses and peripherals that are physically present on the host, or file system volumes on the host OS. For more information, including requirements and constraints, see Access local resources with Lambda functions and connectors.
This tutorial describes how to use the Amazon Web Services Management Console to configure access to local resources that are present on an Amazon IoT Greengrass core device. It contains the following high-level steps:
For a tutorial that uses the Amazon Command Line Interface, see How to configure local resource access using the Amazon command line interface.
Prerequisites
To complete this tutorial, you need:
-
A Greengrass group and a Greengrass core (v1.3 or later). To create a Greengrass group or core, see Getting started with Amazon IoT Greengrass.
-
The following directories on the Greengrass core device:
-
/src/LRAtest
-
/dest/LRAtest
The owner group of these directories must have read and write access to the directories. You might use the following command to grant access:
sudo chmod 0775 /src/LRAtest -
Step 1: Create a Lambda function deployment package
In this step, you create a Lambda function deployment package, which is a ZIP file that contains the function's code and dependencies. You also download the Amazon IoT Greengrass Core SDK to include in the package as a dependency.
-
On your computer, copy the following Python script to a local file named
lraTest.py. This is the app logic for the Lambda function.# Demonstrates a simple use case of local resource access. # This Lambda function writes a file test to a volume mounted inside # the Lambda environment under destLRAtest. Then it reads the file and # publishes the content to the Amazon IoT LRAtest topic. import sys import greengrasssdk import platform import os import logging # Setup logging to stdout logger = logging.getLogger(__name__) logging.basicConfig(stream=sys.stdout, level=logging.DEBUG) # Create a Greengrass Core SDK client. client = greengrasssdk.client('iot-data') volumePath = '/dest/LRAtest' def function_handler(event, context): try: client.publish(topic='LRA/test', payload='Sent from Amazon IoT Greengrass Core.') volumeInfo = os.stat(volumePath) client.publish(topic='LRA/test', payload=str(volumeInfo)) with open(volumePath + '/test', 'a') as output: output.write('Successfully write to a file.') with open(volumePath + '/test', 'r') as myfile: data = myfile.read() client.publish(topic='LRA/test', payload=data) except Exception as e: logger.error('Failed to publish message: ' + repr(e)) return -
From the Amazon IoT Greengrass Core SDK downloads page, download the Amazon IoT Greengrass Core SDK for Python to your computer.
-
Unzip the downloaded package to get the SDK. The SDK is the
greengrasssdkfolder. -
Zip the following items into a file named
lraTestLambda.zip:-
lraTest.py. App logic. -
greengrasssdk. Required library for all Python Lambda functions.
The
lraTestLambda.zipfile is your Lambda function deployment package. Now you're ready to create a Lambda function and upload the deployment package. -
Step 2: Create and publish a Lambda function
In this step, you use the Amazon Lambda console to create a Lambda function and configure it to use your deployment package. Then, you publish a function version and create an alias.
First, create the Lambda function.
-
In the Amazon Web Services Management Console, choose Services, and open the Amazon Lambda console.
-
Choose Functions.
-
Choose Create function and then choose Author from scratch.
-
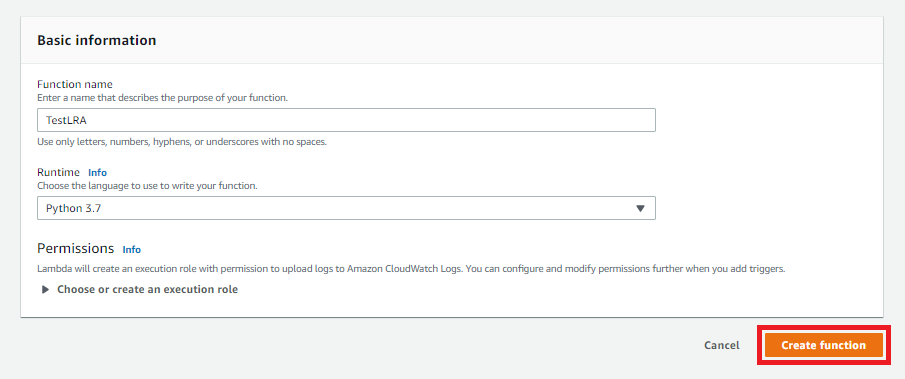
In the Basic information section, use the following values.
-
For Function name, enter
TestLRA. -
For Runtime, choose Python 3.7.
-
For Permissions, keep the default setting. This creates an execution role that grants basic Lambda permissions. This role isn't used by Amazon IoT Greengrass.
-
-
Choose Create function.
-
Upload your Lambda function deployment package and register the handler.
-
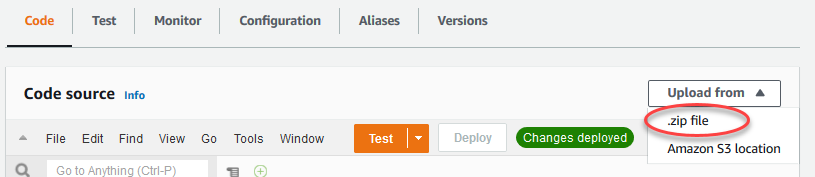
On the Code tab, under Code source, choose Upload from. From the dropdown, choose .zip file.
-
Choose Upload, and then choose your
lraTestLambda.zipdeployment package. Then, choose Save. -
On the Code tab for the function, under Runtime settings, choose Edit, and then enter the following values.
-
For Runtime, choose Python 3.7.
-
For Handler, enter lraTest.function_handler.
-
-
Choose Save.
Note
The Test button on the Amazon Lambda console doesn't work with this function. The Amazon IoT Greengrass Core SDK doesn't contain modules that are required to run your Greengrass Lambda functions independently in the Amazon Lambda console. These modules (for example,
greengrass_common) are supplied to the functions after they are deployed to your Greengrass core.
Next, publish the first version of your Lambda function. Then, create an alias for the version.
Greengrass groups can reference a Lambda function by alias (recommended) or by version. Using an alias makes it easier to manage code updates because you don't have to change your subscription table or group definition when the function code is updated. Instead, you just point the alias to the new function version.
-
-
From Actions, choose Publish new version.
-
For Version description, enter
First version, and then choose Publish. -
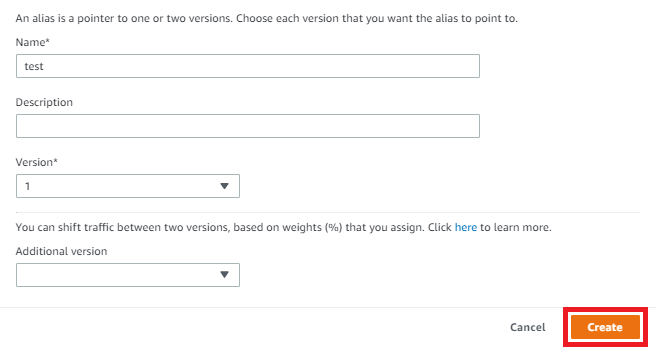
On the TestLRA: 1 configuration page, from Actions, choose Create alias.
-
On the Create alias page, for Name, enter
test. For Version, enter 1.Note
Amazon IoT Greengrass doesn't support Lambda aliases for $LATEST versions.
-
Choose Create.
You can now add the Lambda function to your Greengrass group.
Step 3: Add the Lambda function to the Greengrass group
In this step, you add the function to your group and configure the function's lifecycle.
First, add the Lambda function to your Greengrass group.
In the Amazon IoT console navigation pane, under Manage, expand Greengrass devices, and then choose Groups (V1).
-
Choose the Greengrass group where you want to add the Lambda function.
-
On the group configuration page, choose the Lambda functions tab.
-
Under My Lambda functions section, choose Add.
-
On the Add Lambda function page, choose the Lambda function. Select
TestLRA. -
Choose the Lambda function version.
-
In the Lambda function configuration section, select System user and group and Lambda function containerization.
Next, configure the lifecycle of the Lambda function.
-
For Timeout, choose 30 seconds.
Important
Lambda functions that use local resources (as described in this procedure) must run in a Greengrass container. Otherwise, deployment fails if you try to deploy the function. For more information, see Containerization.
-
At the bottom of the page, choose Add Lambda function.
Step 4: Add a local resource to the Greengrass group
In this step, you add a local volume resource to the Greengrass group and grant the function read and write access to the resource. A local resource has a group-level scope. You can grant permissions for any Lambda function in the group to access the resource.
-
On the group configuration page, choose the Resources tab.
-
Under the Local resources section, choose Add.
-
On the Add a local resource page, use the following values.
-
For Resource name, enter
testDirectory. -
For Resource type, choose Volume.
-
For Local device path, enter
/src/LRAtest. This path must exist on the host OS.The local device path is the local absolute path of the resource on the file system of the core device. This location is outside of the container that the function runs in. The path can't start with
/sys. -
For Destination path, enter
/dest/LRAtest. This path must exist on the host OS.The destination path is the absolute path of the resource in the Lambda namespace. This location is inside the container that the function runs in.
-
Under System group owner and file access permission, select Automatically add file system permissions of the system group that owns the resource.
The System group owner and file access permission option lets you grant additional file access permissions to the Lambda process. For more information, see Group owner file access permission.
-
-
Choose Add resource. The Resources page displays the new testDirectory resource.
Step 5: Add subscriptions to the Greengrass group
In this step, you add two subscriptions to the Greengrass group. These subscriptions enable bidirectional communication between the Lambda function and Amazon IoT.
First, create a subscription for the Lambda function to send messages to Amazon IoT.
-
On the group configuration page, choose the Subscriptions tab.
-
Choose Add.
-
On the Create a subscription page, configure the source and target, as follows:
-
For Source type, choose Lambda function, and then choose TestLRA.
-
For Target type, choose Service, and then choose IoT Cloud.
-
For Topic filter, enter
LRA/test, and then choose Create subscription.
-
-
The Subscriptions page displays the new subscription.
Next, configure a subscription that invokes the function from Amazon IoT.
-
On the Subscriptions page, choose Add Subscription.
-
On the Select your source and target page, configure the source and target, as follows:
-
For Source type, choose Lambda function, and then choose IoT Cloud.
-
For Target type, choose Service, and then choose TestLRA.
-
Choose Next.
-
-
On the Filter your data with a topic page, for Topic filter, enter
invoke/LRAFunction, and then choose Next. -
Choose Finish. The Subscriptions page displays both subscriptions.
Step 6: Deploy the Amazon IoT Greengrass group
In this step, you deploy the current version of the group definition.
-
Make sure that the Amazon IoT Greengrass core is running. Run the following commands in your Raspberry Pi terminal, as needed.
To check whether the daemon is running:
ps aux | grep -E 'greengrass.*daemon'If the output contains a
rootentry for/greengrass/ggc/packages/1.11.6/bin/daemon, then the daemon is running.Note
The version in the path depends on the Amazon IoT Greengrass Core software version that's installed on your core device.
To start the daemon:
cd /greengrass/ggc/core/
sudo ./greengrassd start
-
On the group configuration page, choose Deploy.
Note
Deployment fails if you run your Lambda function without containerization and try to access attached local resources.
-
If prompted, on the Lambda function tab, under System Lambda functions, select IP detector, and then Edit, and then Automatically detect.
This enables devices to automatically acquire connectivity information for the core, such as IP address, DNS, and port number. Automatic detection is recommended, but Amazon IoT Greengrass also supports manually specified endpoints. You're only prompted for the discovery method the first time that the group is deployed.
Note
If prompted, grant permission to create the Greengrass service role and associate it with your Amazon Web Services account in the current Amazon Web Services Region. This role allows Amazon IoT Greengrass to access your resources in Amazon services.
The Deployments page shows the deployment timestamp, version ID, and status. When completed, the deployment status is Completed.
For troubleshooting help, see Troubleshooting Amazon IoT Greengrass.
Test local resource access
Now you can verify whether the local resource access is configured correctly. To test, you
subscribe to the LRA/test topic and publish to the
invoke/LRAFunction topic. The test is successful if the Lambda function
sends the expected payload to Amazon IoT.
-
From the Amazon IoT console navigation menu, under Test, choose MQTT test client.
-
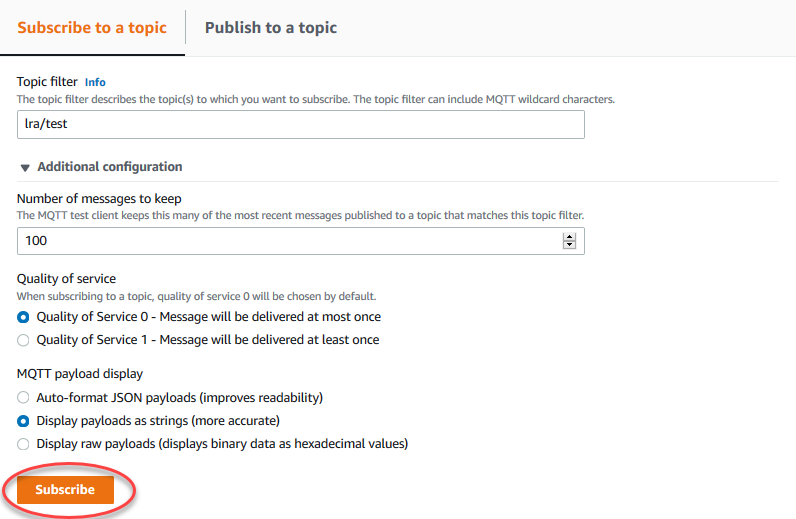
Under Subscribe to a topic, for Topic filter, enter
LRA/test. -
Under Additional information, for MQTT payload display, select Display payloads as strings.
-
Choose Subscribe. Your Lambda function publishes to the LRA/test topic.
-
Under Publish to a topic, in the Topic nameenter
invoke/LRAFunction, and then choose Publish to invoke your Lambda function. The test is successful if the page displays the function's three message payloads.
The test file created by the Lambda function is in the /src/LRAtest
directory on the Greengrass core device. Although the Lambda function writes to a file in the
/dest/LRAtest directory, that file is visible in the Lambda namespace only.
You can't see it in a regular Linux namespace. Any changes to the destination path are reflected
in the source path on the file system.
For troubleshooting help, see Troubleshooting Amazon IoT Greengrass.