End of support notice: On October 7th, 2026, Amazon will discontinue support for Amazon IoT Greengrass Version 1. After October 7th, 2026, you will no longer be able to access the Amazon IoT Greengrass V1 resources. For more information, please visit Migrate from Amazon IoT Greengrass Version 1.
Setting up an Amazon EC2 instance
Follow the steps in this topic to set up an Amazon EC2 instance to use as your Amazon IoT Greengrass core.
Tip
Or, to use a script that sets up your environment and installs the Amazon IoT Greengrass Core software for you, see Quick start: Greengrass device setup.
Although you can complete this tutorial using an Amazon EC2 instance, Amazon IoT Greengrass should ideally be used with physical hardware. We recommend that you set up a Raspberry Pi instead of using an Amazon EC2 instance when possible. If you're using a Raspberry Pi, you do not need to follow the steps in this topic.
-
Sign in to the Amazon Web Services Management Console
and launch an Amazon EC2 instance using an Amazon Linux AMI. For information about Amazon EC2 instances, see the Amazon EC2 Getting Started Guide. -
After your Amazon EC2 instance is running, enable port 8883 to allow incoming MQTT communications so that other devices can connect with the Amazon IoT Greengrass core.
-
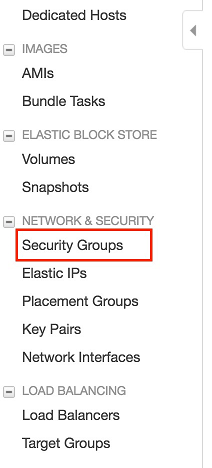
In the navigation pane of the Amazon EC2 console, choose Security Groups.
-
Select the security group for the instance that you just launched, and then choose the Inbound rules tab.
-
Choose Edit inbound rules.
To enable port 8883, you add a custom TCP rule to the security group. For more information, see Adding rules to a security group in the Amazon EC2 User Guide.
-
On the Edit inbound rules page, choose Add rule, enter the following settings, and then choose Save.
-
For Type, choose Custom TCP Rule.
-
For Port range, enter
8883. -
For Source, choose Anywhere.
-
For Description, enter
MQTT Communications.
-
-
-
Connect to your Amazon EC2 instance.
-
In the navigation pane, choose Instances, choose your instance, and then choose Connect.
-
Follow the instructions on the Connect To Your Instance page to connect to your instance by using SSH and your private key file.
You can use PuTTY for Windows or Terminal for macOS. For more information, see Connect to your Linux instance in the Amazon EC2 User Guide.
You are now ready to set up your Amazon EC2 instance for Amazon IoT Greengrass.
-
-
After you are connected to your Amazon EC2 instance, create the
ggc_userandggc_groupaccounts:sudo adduser --system ggc_user sudo groupadd --system ggc_groupNote
If the
addusercommand isn't available on your system, use the following command.sudo useradd --system ggc_user -
To improve security, make sure that hardlink and softlink (symlink) protections are enabled on the operating system of the Amazon EC2 instance at startup.
Note
The steps for enabling hardlink and softlink protection vary by operating system. Consult the documentation for your distribution.
-
Run the following command to check if hardlink and softlink protections are enabled:
sudo sysctl -a | grep fs.protectedIf hardlinks and softlinks are set to
1, your protections are enabled correctly. Proceed to step 6.Note
Softlinks are represented by
fs.protected_symlinks. -
If hardlinks and softlinks are not set to
1, enable these protections. Navigate to your system configuration file.cd /etc/sysctl.d ls -
Using your favorite text editor (Leafpad, GNU nano, or vi), add the following two lines to the end of the system configuration file. On Amazon Linux 1, this is the
00-defaults.conffile. On Amazon Linux 2, this is the99-amazon.conffile. You might need to change permissions (using thechmodcommand) to write to the file, or use thesudocommand to edit as root (for example,sudo nano).00-defaults.conffs.protected_hardlinks = 1 fs.protected_symlinks = 1 -
Reboot the Amazon EC2 instance.
sudo rebootAfter a few minutes, connect to your instance using SSH and then run the following command to confirm the change.
sudo sysctl -a | grep fs.protectedYou should see that hardlinks and softlinks are set to 1.
-
-
Extract and run the following script to mount Linux control groups
(cgroups). This allows Amazon IoT Greengrass to set the memory limit for Lambda functions. Cgroups are also required to run Amazon IoT Greengrass in the default containerization mode. curl https://raw.githubusercontent.com/tianon/cgroupfs-mount/951c38ee8d802330454bdede20d85ec1c0f8d312/cgroupfs-mount > cgroupfs-mount.sh chmod +x cgroupfs-mount.sh sudo bash ./cgroupfs-mount.shYour Amazon EC2 instance should now be ready for Amazon IoT Greengrass.
-
Optional. Install the Java 8 runtime, which is required by stream manager. This tutorial doesn't use stream manager, but it does use the Default Group creation workflow that enables stream manager by default. Use the following commands to install the Java 8 runtime on the core device, or disable stream manager before you deploy your group. Instructions for disabling stream manager are provided in Module 3.
-
For Debian-based distributions:
sudo apt install openjdk-8-jdk -
For Red Hat-based distributions:
sudo yum install java-1.8.0-openjdk
-
-
To make sure that you have all required dependencies, download and run the Greengrass dependency checker from the Amazon IoT Greengrass Samples
repository on GitHub. These commands download, unzip, and run the dependency checker script in your Amazon EC2 instance. mkdir greengrass-dependency-checker-GGCv1.11.x cd greengrass-dependency-checker-GGCv1.11.x wget https://github.com/aws-samples/aws-greengrass-samples/raw/master/greengrass-dependency-checker-GGCv1.11.x.zip unzip greengrass-dependency-checker-GGCv1.11.x.zip cd greengrass-dependency-checker-GGCv1.11.x sudo ./check_ggc_dependencies | moreImportant
This tutorial requires the Python 3.7 runtime to run local Lambda functions. When stream manager is enabled, it also requires the Java 8 runtime. If the
check_ggc_dependenciesscript produces warnings about these missing runtime prerequisites, make sure to install them before you continue. You can ignore warnings about other missing optional runtime prerequisites.
Your Amazon EC2 instance configuration is complete. Continue to Module 2: Installing the Amazon IoT Greengrass Core software.