End of support notice: On October 7th, 2026, Amazon will discontinue support for Amazon IoT Greengrass Version 1. After October 7th, 2026, you will no longer be able to access the Amazon IoT Greengrass V1 resources. For more information, please visit Migrate from Amazon IoT Greengrass Version 1.
Test communications
-
Make sure that your computer and the Amazon IoT Greengrass core device are connected to the internet using the same network.
-
On the Amazon IoT Greengrass core device, run the following command to find its IP address.
hostname -I -
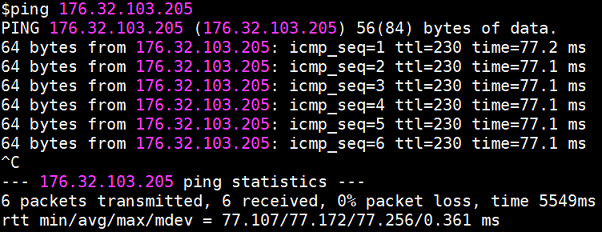
On your computer, run the following command using the IP address of the core. You can use Ctrl + C to stop the ping command.
pingIP-addressOutput similar to the following indicates successful communication between the computer and the Amazon IoT Greengrass core device (0% packet loss):
Note
If you're unable to ping an EC2 instance that's running Amazon IoT Greengrass, make sure that the inbound security group rules for the instance allow ICMP traffic for Echo request messages. For more information, see Adding rules to a security group in the Amazon EC2 User Guide.
On Windows host computers, in the Windows Firewall with Advanced Security app, you might also need to enable an inbound rule that allows inbound echo requests (for example, File and Printer Sharing (Echo Request - ICMPv4-In)), or create one.
-
-
Get your Amazon IoT endpoint.
-
From the Amazon IoT console
navigation pane, choose Settings. -
Under Device data endpoint, make a note of the value of Endpoint. You use this value to replace the
AWS_IOT_ENDPOINTplaceholder in the commands in the following steps.Note
Make sure that your endpoints correspond to your certificate type.
-
-
On your computer (not the Amazon IoT Greengrass core device), open two command-line
(terminal or command prompt) windows. One window represents the HelloWorld_Publisher client device and the other represents the HelloWorld_Subscriber client device. Upon execution,
basicDiscovery.pyattempts to collect information on the location of the Amazon IoT Greengrass core at its endpoints. This information is stored after the client device has discovered and successfully connected to the core. This allows future messaging and operations to be executed locally (without the need for an internet connection).Note
Client IDs used for MQTT connections must match the thing name of the client device. The
basicDiscovery.pyscript sets the client ID for MQTT connections to the thing name that you specify when you run the script.Run the following command from the folder that contains the
basicDiscovery.pyfile for detailed script usage information:python basicDiscovery.py --help -
From the HelloWorld_Publisher client device window, run the following commands.
-
Replace
path-to-certs-folderwith the path to the folder that contains the certificates, keys, andbasicDiscovery.py. -
Replace
AWS_IOT_ENDPOINTwith your endpoint. -
Replace the two
publisherCertIdinstances with the certificate ID in the file name for your HelloWorld_Publisher client device.
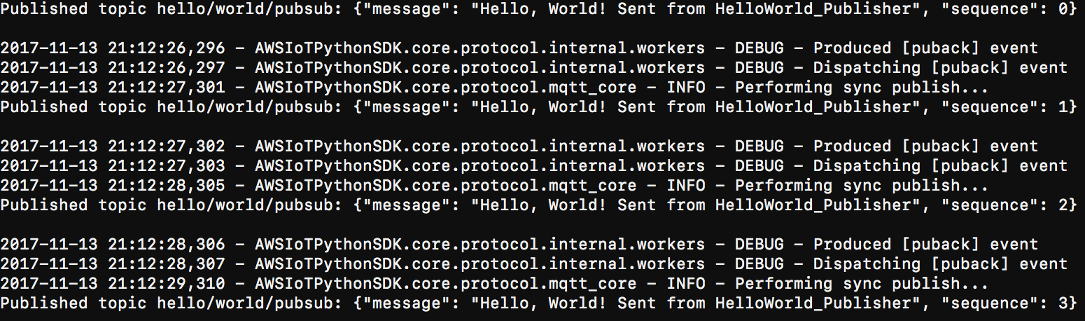
cdpath-to-certs-folderpython basicDiscovery.py --endpointAWS_IOT_ENDPOINT--rootCA AmazonRootCA1.pem --certpublisherCertId-certificate.pem.crt --keypublisherCertId-private.pem.key --thingName HelloWorld_Publisher --topic 'hello/world/pubsub' --mode publish --message 'Hello, World! Sent from HelloWorld_Publisher'You should see output similar to the following, which includes entries such as
Published topic 'hello/world/pubsub': {"message": "Hello, World! Sent from HelloWorld_Publisher", "sequence": 1}.Note
If the script returns an
error: unrecognized argumentsmessage, change the single quotation marks to double quotation marks for the--topicand--messageparameters and run the command again.To troubleshoot a connection issue, you can try using manual IP detection.
-
-
From the HelloWorld_Subscriber client device window, run the following commands.
-
Replace
path-to-certs-folderwith the path to the folder that contains the certificates, keys, andbasicDiscovery.py. -
Replace
AWS_IOT_ENDPOINTwith your endpoint. -
Replace the two
subscriberCertIdinstances with the certificate ID in the file name for your HelloWorld_Subscriber client device.
cdpath-to-certs-folderpython basicDiscovery.py --endpointAWS_IOT_ENDPOINT--rootCA AmazonRootCA1.pem --certsubscriberCertId-certificate.pem.crt --keysubscriberCertId-private.pem.key --thingName HelloWorld_Subscriber --topic 'hello/world/pubsub' --mode subscribeYou should see the following output, which includes entries such as
Received message on topic hello/world/pubsub: {"message": "Hello,
                            World! Sent from HelloWorld_Publisher", "sequence": 1}
.
-
Close the HelloWorld_Publisher window to stop messages from accruing in the HelloWorld_Subscriber window.
Testing on a corporate network might
interfere with connecting to the core. As a workaround, you can manually enter the
endpoint. This ensures that the basicDiscovery.py script
connects to the correct IP address of the Amazon IoT Greengrass core device.
To manually enter the endpoint
In the Amazon IoT console navigation pane, under Manage, expand Greengrass devices, and then choose Groups (V1).
-
Under Greengrass groups, choose your group.
-
Configure the core to manually manage MQTT broker endpoints. Do the following:
-
On the group configuration page, choose the Lambda functions tab.
-
Under System Lambda functions, choose IP detector, and then choose Edit.
-
In the Edit IP detector settings, choose Manually manage MQTT broker endpoints, and then choose Save.
-
-
Enter the MQTT broker endpoint for the core. Do the following:
-
Under Overview, choose the Greengrass core.
-
Under MQTT broker endpoints, choose Manage endpoints.
-
Choose Add endpoint and make sure that you have only one endpoint value. This value must be the IP address endpoint for port 8883 of your Amazon IoT Greengrass core device (for example,
192.168.1.4). -
Choose Update.
-