Use your Windows or Linux PC or Mac as an Amazon IoT device
In this tutorial, you'll configure a personal computer for use with Amazon IoT. These instructions support Windows and Linux PCs and Macs. To accomplish this, you need to install some software on your computer. If you don't want to install software on your computer, you might try Create a virtual device with Amazon EC2, which installs all software on a virtual machine.
In this tutorial, you'll:
Set up your personal computer
To complete this tutorial, you need a Windows or Linux PC or a Mac with a connection to the internet.
Before you continue to the next step, make sure you can open a command line window on your computer. Use cmd.exe on a Windows PC. On a Linux PC or a Mac, use Terminal.
Install Git, Python, and the Amazon IoT Device SDK for Python
In this section, you'll install Python, and the Amazon IoT Device SDK for Python on your computer.
Install the latest version of Git and Python
This procedure explains how to install the latest version of Git and Python on your personal computer.
To download and install Git and Python on your computer
-
Check to see if you have Git installed on your computer. Enter this command in the command line.
git --versionIf the command displays the Git version, Git is installed and you can continue to the next step.
If the command displays an error, open
https://git-scm.com/downloadand install Git for your computer. -
Check to see if you have already installed Python. Enter the command in the command line.
python -VNote
If this command gives an error:
Python was not
                                            found
, it might be because your operating system calls the Python v3.x executable asPython3. In that case, replace all instances ofpythonwithpython3and continue the remainder of this tutorial.If the command displays the Python version, Python is already installed. This tutorial requires Python v3.7 or later.
-
If Python is installed, you can skip the rest of the steps in this section. If not, continue.
-
Open https://www.python.org/downloads/
and download the installer for your computer. -
If the download didn't automatically start to install, run the downloaded program to install Python.
-
Verify the installation of Python.
python -VConfirm that the command displays the Python version. If the Python version isn't displayed, try downloading and installing Python again.
Install the Amazon IoT Device SDK for Python
To install the Amazon IoT Device SDK for Python on your computer
-
Install v2 of the Amazon IoT Device SDK for Python.
python3 -m pip install awsiotsdk -
Clone the Amazon IoT Device SDK for Python repository into the aws-iot-device-sdk-python-v2 directory of your home directory. This procedure refers to the base directory for the files you're installing as
home.The actual location of the
homedirectory depends on your operating system.Note
If you're using Windows PowerShell as opposed to cmd.exe, then use the following command.
echo $home
For more information, see the Amazon IoT
Device SDK for Python GitHub repository
Prepare to run the sample applications
To prepare your system to run the sample application
-
Create the
certsdirectory. Into thecertsdirectory, copy the private key, device certificate, and root CA certificate files you saved when you created and registered the thing object in Create Amazon IoT resources. The file names of each file in the destination directory should match those in the table.The commands in the next section assume that your key and certificate files are stored on your device as shown in this table.
Set up the policy and run the sample application
In this section, you'll set up your policy and run the
pubsub.py sample script found in the
aws-iot-device-sdk-python-v2/samples directory of the
Amazon IoT Device SDK for Python. This script shows how your device uses the MQTT library to
publish and subscribe to MQTT messages.
The pubsub.py sample app subscribes to a topic,
test/topic, publishes 10 messages to that topic, and
displays the messages as they're received from the message broker.
To run the pubsub.py sample script, you need the following
information:
|
Parameter |
Where to find the value |
|---|---|
your-iot-endpoint |
|
The your-iot-endpoint value has a format of:
endpoint_id-ats.iot.region.amazonaws.coma3qj468EXAMPLE-ats.iot.us-west-2.amazonaws.com.
Before running the script, make sure your thing's policy provides permissions for the sample script to connect, subscribe, publish, and receive.
To find and review the policy document for a thing resource
-
In the Amazon IoT console
, in the Things list, find the thing resource that represents your device. -
Choose the Name link of the thing resource that represents your device to open the Thing details page.
-
In the Thing details page, in the Certificates tab, choose the certificate that is attached to the thing resource. There should only be one certificate in the list. If there is more than one, choose the certificate whose files are installed on your device and that will be used to connect to Amazon IoT Core.
In the Certificate details page, in the Policies tab, choose the policy that's attached to the certificate. There should only be one. If there is more than one, repeat the next step for each to make sure that at least one policy grants the required access.
-
In the Policy overview page, find the JSON editor and choose Edit policy document to review and edit the policy document as required.
-
The policy JSON is displayed in the following example. In the
"Resource"element, replaceregion:accountResourcevalues.-
{
    "Version":"2012-10-17",
    "Statement": [
        {
            "Effect": "Allow",
            "Action": [
                "iot:Publish",
                "iot:Receive"
            ],
            "Resource": [
            "arn:aws-cn:iot:us-east-1:123456789012:topic/test/topic"
            ]
        },
        {
            "Effect": "Allow",
            "Action": [
                "iot:Subscribe"
            ],
            "Resource": [
            "arn:aws-cn:iot:us-east-1:123456789012:topicfilter/test/topic"
            ]
        },
        {
            "Effect": "Allow",
            "Action": [
                "iot:Connect"
            ],
            "Resource": [
            "arn:aws-cn:iot:us-east-1:123456789012:client/test-*"
            ]
        }
    ]
}
The sample script:
-
Connects to the Amazon IoT Core for your account.
-
Subscribes to the message topic, test/topic, and displays the messages it receives on that topic.
-
Publishes 10 messages to the topic, test/topic.
-
Displays output similar to the following:
Connected!
Subscribing to topic 'test/topic'...
Subscribed with QoS.AT_LEAST_ONCE
Sending 10 message(s)
Publishing message to topic 'test/topic': Hello World! [1]
Received message from topic 'test/topic': b'"Hello World! [1]"'
Publishing message to topic 'test/topic': Hello World! [2]
Received message from topic 'test/topic': b'"Hello World! [2]"'
Publishing message to topic 'test/topic': Hello World! [3]
Received message from topic 'test/topic': b'"Hello World! [3]"'
Publishing message to topic 'test/topic': Hello World! [4]
Received message from topic 'test/topic': b'"Hello World! [4]"'
Publishing message to topic 'test/topic': Hello World! [5]
Received message from topic 'test/topic': b'"Hello World! [5]"'
Publishing message to topic 'test/topic': Hello World! [6]
Received message from topic 'test/topic': b'"Hello World! [6]"'
Publishing message to topic 'test/topic': Hello World! [7]
Received message from topic 'test/topic': b'"Hello World! [7]"'
Publishing message to topic 'test/topic': Hello World! [8]
Received message from topic 'test/topic': b'"Hello World! [8]"'
Publishing message to topic 'test/topic': Hello World! [9]
Received message from topic 'test/topic': b'"Hello World! [9]"'
Publishing message to topic 'test/topic': Hello World! [10]
Received message from topic 'test/topic': b'"Hello World! [10]"'
10 message(s) received.
Disconnecting...
Disconnected!
If you're having trouble running the sample app, review Troubleshoot problems with the sample application.
You can also add the --verbosity Debug parameter to the
command line so the sample app displays detailed messages about what it’s
doing. That information might help you correct the problem.
View messages from the sample app in the Amazon IoT console
You can see the sample app's messages as they pass through the message broker by using the MQTT test client in the Amazon IoT console.
To view the MQTT messages published by the sample app
-
Review View MQTT messages with the Amazon IoT MQTT client. This helps you learn how to use the MQTT test client in the Amazon IoT console to view MQTT messages as they pass through the message broker.
-
Open the MQTT test client in the Amazon IoT console.
-
In Subscribe to a topic, subscribe to the topic, test/topic.
-
In your command line window, run the sample app again and watch the messages in the MQTT client in the Amazon IoT console.
For more information about MQTT and how Amazon IoT Core supports the protocol, see MQTT.
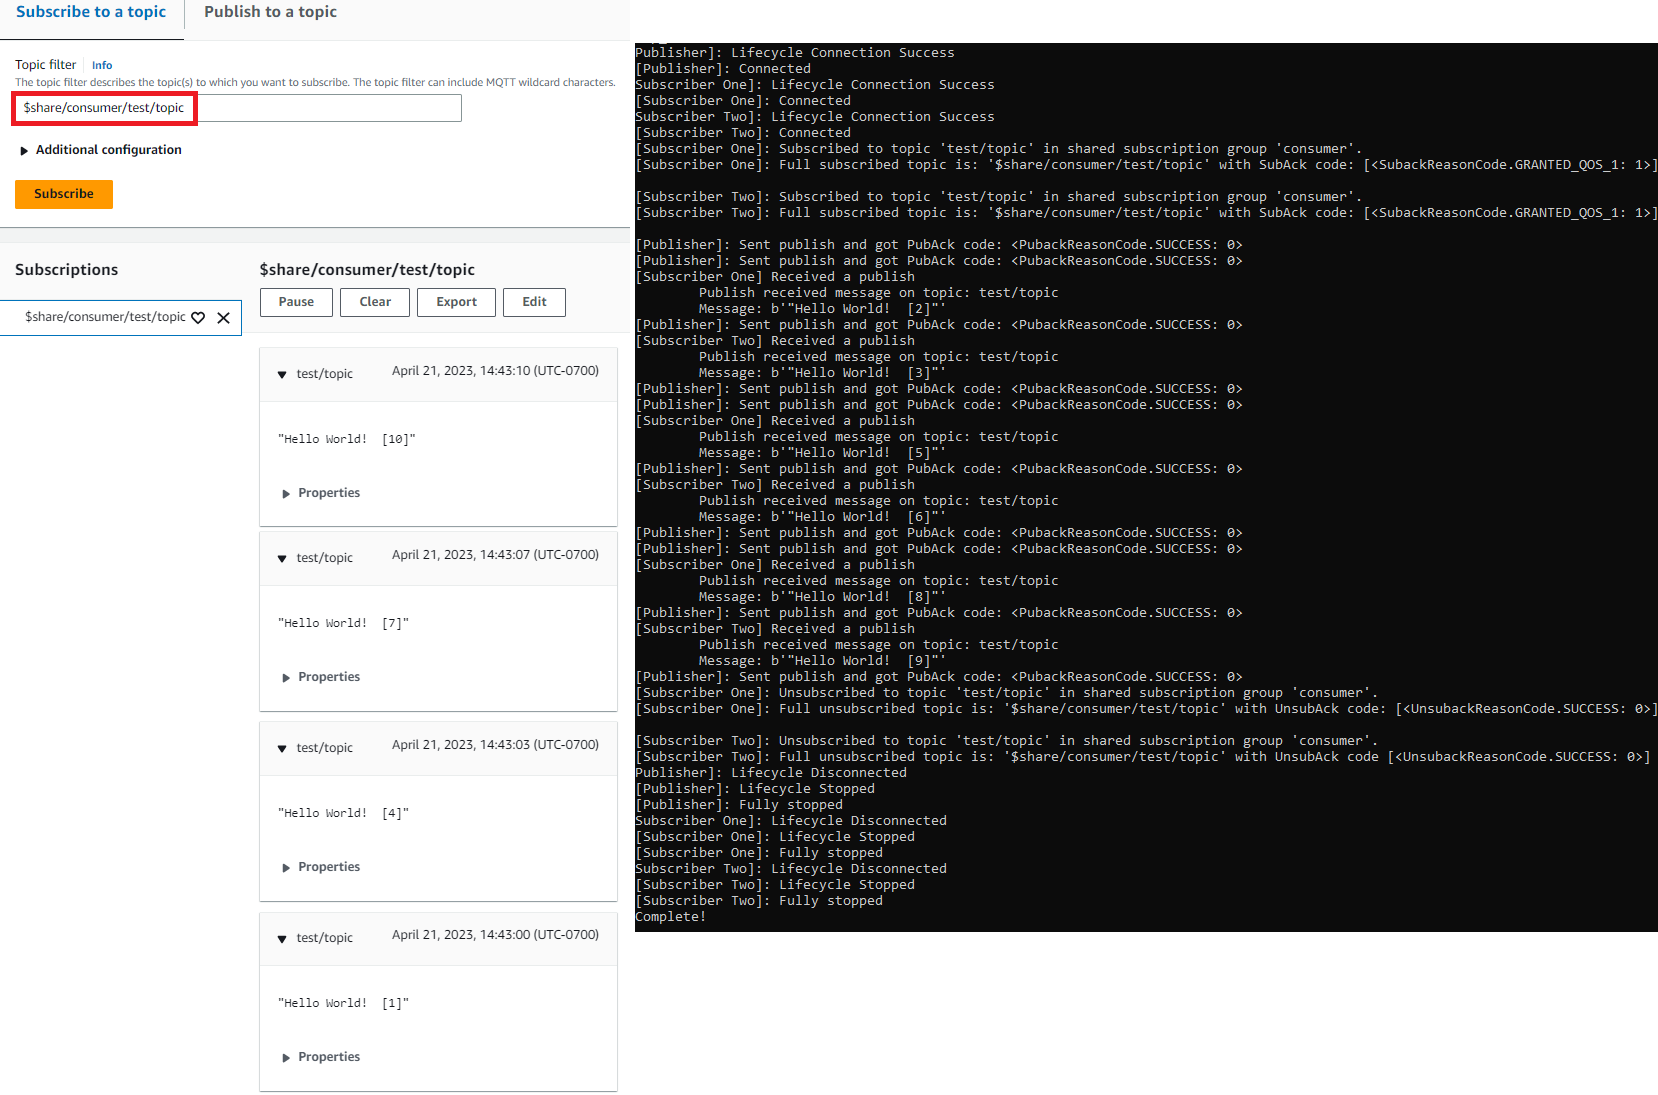
Run the Shared Subscription example in Python
Amazon IoT Core supports Shared
Subscriptions for both MQTT 3 and MQTT 5. Shared Subscriptions
allow multiple clients to share a subscription to a topic and only one
client will receive messages published to that topic using a random
distribution. To use Shared Subscriptions, clients subscribe to a Shared
Subscription's topic
filter: $share/{ShareName}/{TopicFilter}.
To set up the policy and run the Shared Subscription example
-
To run the Shared Subscription example, you must set up your thing's policy as documented in MQTT 5 Shared Subscription
. -
To run the Shared Subscription example, run the following commands.
Note
You can optionally specify a group identifier based on your needs when you run the sample (e.g.,
--group_identifier
                                        consumer
). If you don't specify one,python-sampleis the default group identifier. -
The output in your command line can look like the following:
Publisher]: Lifecycle Connection Success [Publisher]: Connected Subscriber One]: Lifecycle Connection Success [Subscriber One]: Connected Subscriber Two]: Lifecycle Connection Success [Subscriber Two]: Connected [Subscriber One]: Subscribed to topic 'test/topic' in shared subscription group 'consumer'. [Subscriber One]: Full subscribed topic is: '$share/consumer/test/topic' with SubAck code: [<SubackReasonCode.GRANTED_QOS_1: 1>] [Subscriber Two]: Subscribed to topic 'test/topic' in shared subscription group 'consumer'. [Subscriber Two]: Full subscribed topic is: '$share/consumer/test/topic' with SubAck code: [<SubackReasonCode.GRANTED_QOS_1: 1>] [Publisher]: Sent publish and got PubAck code: <PubackReasonCode.SUCCESS: 0> [Subscriber Two] Received a publish Publish received message on topic: test/topic Message: b'"Hello World! [1]"' [Publisher]: Sent publish and got PubAck code: <PubackReasonCode.SUCCESS: 0> [Subscriber One] Received a publish Publish received message on topic: test/topic Message: b'"Hello World! [2]"' [Publisher]: Sent publish and got PubAck code: <PubackReasonCode.SUCCESS: 0> [Subscriber Two] Received a publish Publish received message on topic: test/topic Message: b'"Hello World! [3]"' [Publisher]: Sent publish and got PubAck code: <PubackReasonCode.SUCCESS: 0> [Subscriber One] Received a publish Publish received message on topic: test/topic Message: b'"Hello World! [4]"' [Publisher]: Sent publish and got PubAck code: <PubackReasonCode.SUCCESS: 0> [Subscriber Two] Received a publish Publish received message on topic: test/topic Message: b'"Hello World! [5]"' [Publisher]: Sent publish and got PubAck code: <PubackReasonCode.SUCCESS: 0> [Subscriber One] Received a publish Publish received message on topic: test/topic Message: b'"Hello World! [6]"' [Publisher]: Sent publish and got PubAck code: <PubackReasonCode.SUCCESS: 0> [Subscriber Two] Received a publish Publish received message on topic: test/topic Message: b'"Hello World! [7]"' [Publisher]: Sent publish and got PubAck code: <PubackReasonCode.SUCCESS: 0> [Subscriber One] Received a publish Publish received message on topic: test/topic Message: b'"Hello World! [8]"' [Publisher]: Sent publish and got PubAck code: <PubackReasonCode.SUCCESS: 0> [Subscriber Two] Received a publish Publish received message on topic: test/topic Message: b'"Hello World! [9]"' [Publisher]: Sent publish and got PubAck code: <PubackReasonCode.SUCCESS: 0> [Subscriber One] Received a publish Publish received message on topic: test/topic Message: b'"Hello World! [10]"' [Subscriber One]: Unsubscribed to topic 'test/topic' in shared subscription group 'consumer'. [Subscriber One]: Full unsubscribed topic is: '$share/consumer/test/topic' with UnsubAck code: [<UnsubackReasonCode.SUCCESS: 0>] [Subscriber Two]: Unsubscribed to topic 'test/topic' in shared subscription group 'consumer'. [Subscriber Two]: Full unsubscribed topic is: '$share/consumer/test/topic' with UnsubAck code [<UnsubackReasonCode.SUCCESS: 0>] Publisher]: Lifecycle Disconnected [Publisher]: Lifecycle Stopped [Publisher]: Fully stopped Subscriber One]: Lifecycle Disconnected [Subscriber One]: Lifecycle Stopped [Subscriber One]: Fully stopped Subscriber Two]: Lifecycle Disconnected [Subscriber Two]: Lifecycle Stopped [Subscriber Two]: Fully stopped Complete! -
Open MQTT test client in the Amazon IoT console. In Subscribe to a topic, subscribe to the Shared Subscription’s topic such as:
$share/consumer/test/topic. You can specify a group identifier based on your needs when you run the sample (e.g.,--group_identifier consumer). If you don't specify a group identifier, the default value ispython-sample. For more information, see MQTT 5 Shared Subscription Python exampleand Shared Subscriptions from Amazon IoT Core Developer Guide. In your command line window, run the sample app again and watch the distribution of messages in your MQTT test client of the Amazon IoT console and the command line.