Developing Lambda functions locally
You can move your Lambda functions from the Lambda console to your preferred integrated development environment (IDE), which provides a full development environment where you can use other local development options like Amazon SAM and Amazon CDK. The Lambda console supports opening functions directly in Visual Studio Code, Kiro, or Cursor.
Key benefits of local development
While the Lambda console provides a quick way to edit and test functions, local development offers more advanced capabilities:
-
Advanced IDE features: Debugging, code completion, and refactoring tools
-
Offline development: Work and test changes locally before cloud deployment
-
Infrastructure as code integration: Seamless use with Amazon SAM, Amazon CDK, and Infrastructure Composer
-
Dependency management: Full control over function dependencies
Prerequisites
Before developing Lambda functions locally using Visual Studio Code, Kiro, and Cursor, you must install them using the instructions below:
-
Visual Studio Code: For installation instructions, see Download Visual Studio Code
. -
Kiro: For installation instructions, see Getting started with Kiro
. -
Cursor: For installation instructions, see Download Cursor
.
You also need the following:
-
Amazon Toolkit for Visual Studio Code: For Visual Studio Code installation instructions, see Setting up the Amazon Toolkit for Visual Studio Code. For an overview, see Amazon Toolkit for Visual Studio Code
. -
Amazon credentials: For information about configuring credentials, see Setting up your Amazon credentials.
-
Amazon SAM CLI: For installation instructions, see Installing the Amazon SAM CLI.
-
Docker installed (optional, but required for local testing): For installation instructions, see Get Docker
.
Note
If you already have an Amazon account and profile configured locally, ensure that the AdministratorAccess managed policy is added to your configured Amazon profile.
Authentication and access control
To develop Lambda functions locally, you need Amazon credentials to securely access and manage Amazon resources on your behalf, just like they would in the cloud.
The Amazon Toolkit for Visual Studio Code supports the following authentication methods:
-
IAM user long-term credentials
-
Temporary credentials from assumed roles
-
Identity federation
-
Amazon account root user credentials (not recommended)
This section guides you through obtaining and configuring these credentials using IAM user long-term credentials.
Get IAM Credentials
If you already have an IAM user with access keys, have both the access key ID and secret access key ready for the next section. If you don't have these keys, follow these steps to create them:
Note
You must use both the access key ID and secret access key together to authenticate your requests.
To create an IAM user and access keys:
-
Open the IAM console at https://console.aws.amazon.com/iam/
-
In the navigation pane, choose Users.
-
Choose Create user.
-
For User name, enter a name and choose Next.
-
Under Set permissions, choose Attach policies directly.
-
Select AdministratorAccess and choose Next.
-
Choose Create user.
-
In the success banner, choose View user.
-
Choose Create access key.
-
For Use case, select Local code.
-
Select the confirmation check box and choose Next.
-
(Optional) Enter a description tag value.
-
Choose Create access key.
-
Copy your access key and secret access key immediately. You won't be able to access the secret access key again after you leave this page.
Important
Never share your secret key or commit it to source control. Store these keys securely and delete them when no longer needed.
Note
For more information, see Create an IAM user in your Amazon account and Manage access keys for IAM users in the IAM User Guide.
Configure Amazon credentials using the Amazon Toolkit
The following table summarizes the credential setup process you complete in the following procedure.
| What to do | Why? |
|---|---|
| Open Sign In panel | Start authentication |
| Use Command Palette, search for Amazon Add a New Connection | Access the sign-in UI |
| Choose IAM Credential | Use your access keys for programmatic access |
| Enter profile name, access key, secret key | Provide credentials for connection |
| See Amazon Explorer update | Confirm you're connected |
Complete the following steps to authenticate to your Amazon account:
Note
The following steps apply to Visual Studio Code, Kiro, and Cursor. Because Kiro and Cursor are built on Visual Studio Code, the authentication flow is the same across all three IDEs.
-
Open the Sign In panel in your IDE:
To start the authentication process, select the Amazon icon in the left navigation pane or open the Command Palette (Cmd+Shift+P on Mac or Ctrl+Shift+P on Windows/Linux) and search for and select Amazon Add a New Connection.
-
In the sign in panel, choose IAM Credentials and select Continue.
Note
To proceed, you need to allow Amazon IDE Extensions to access your data.
-
Enter your profile name, access key ID, and secret access key, then select Continue.
-
Verify the connection by checking the Amazon Explorer in your IDE for your Amazon services and resources.
For information on setting up authentication with long-term credentials, see Using long-term credentials to authenticate Amazon SDKs and tools.
For information about configuring authentication, see Amazon IAM credentials in the Amazon Toolkit for Visual Studio Code User Guide.
Moving from console to local development
Note
If you've made changes in the console, make sure you don't have any undeployed changes before transitioning to local development.
To move a Lambda function from the Lambda console to a local IDE, complete the following steps:
-
Open the Lambda console
. -
Choose the name of your function.
-
Select the Code source tab.
-
Open your function in your IDE of choice by choosing the dropdown arrow next to the button. The supported options are Open in Visual Studio Code, Open in Kiro, and Open in Cursor.
Note
Your IDE selection is persisted. Once you choose an IDE, subsequent visits show that IDE as the primary button.
-
When prompted, allow your browser to open the selected IDE.
When you open your function in your IDE, Lambda creates a local project with your function code in a temporary location that's designed for quick testing and deployment. This includes the function code, dependencies, and a basic project structure that you can use for local development.
Note
The Open in IDE button requires Amazon Toolkit version 3.69.0 or later. If you have an earlier
version of the Amazon Toolkit installed, you may see a Cannot open the handler message. To resolve this, update your Amazon Toolkit to the latest version.
For details on using Amazon in your IDE, see the Amazon Toolkit for Visual Studio Code User Guide.
Working with functions locally
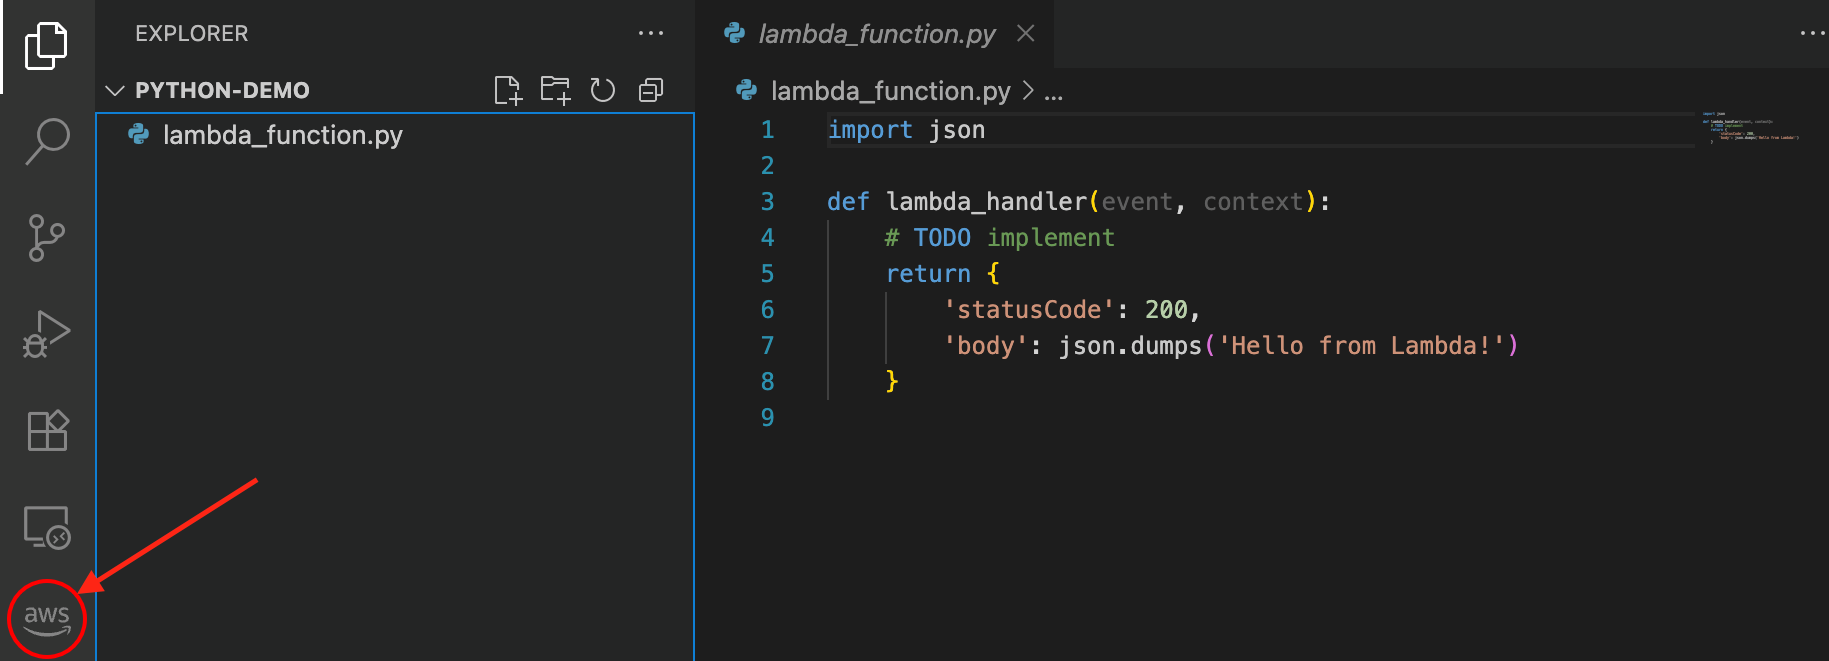
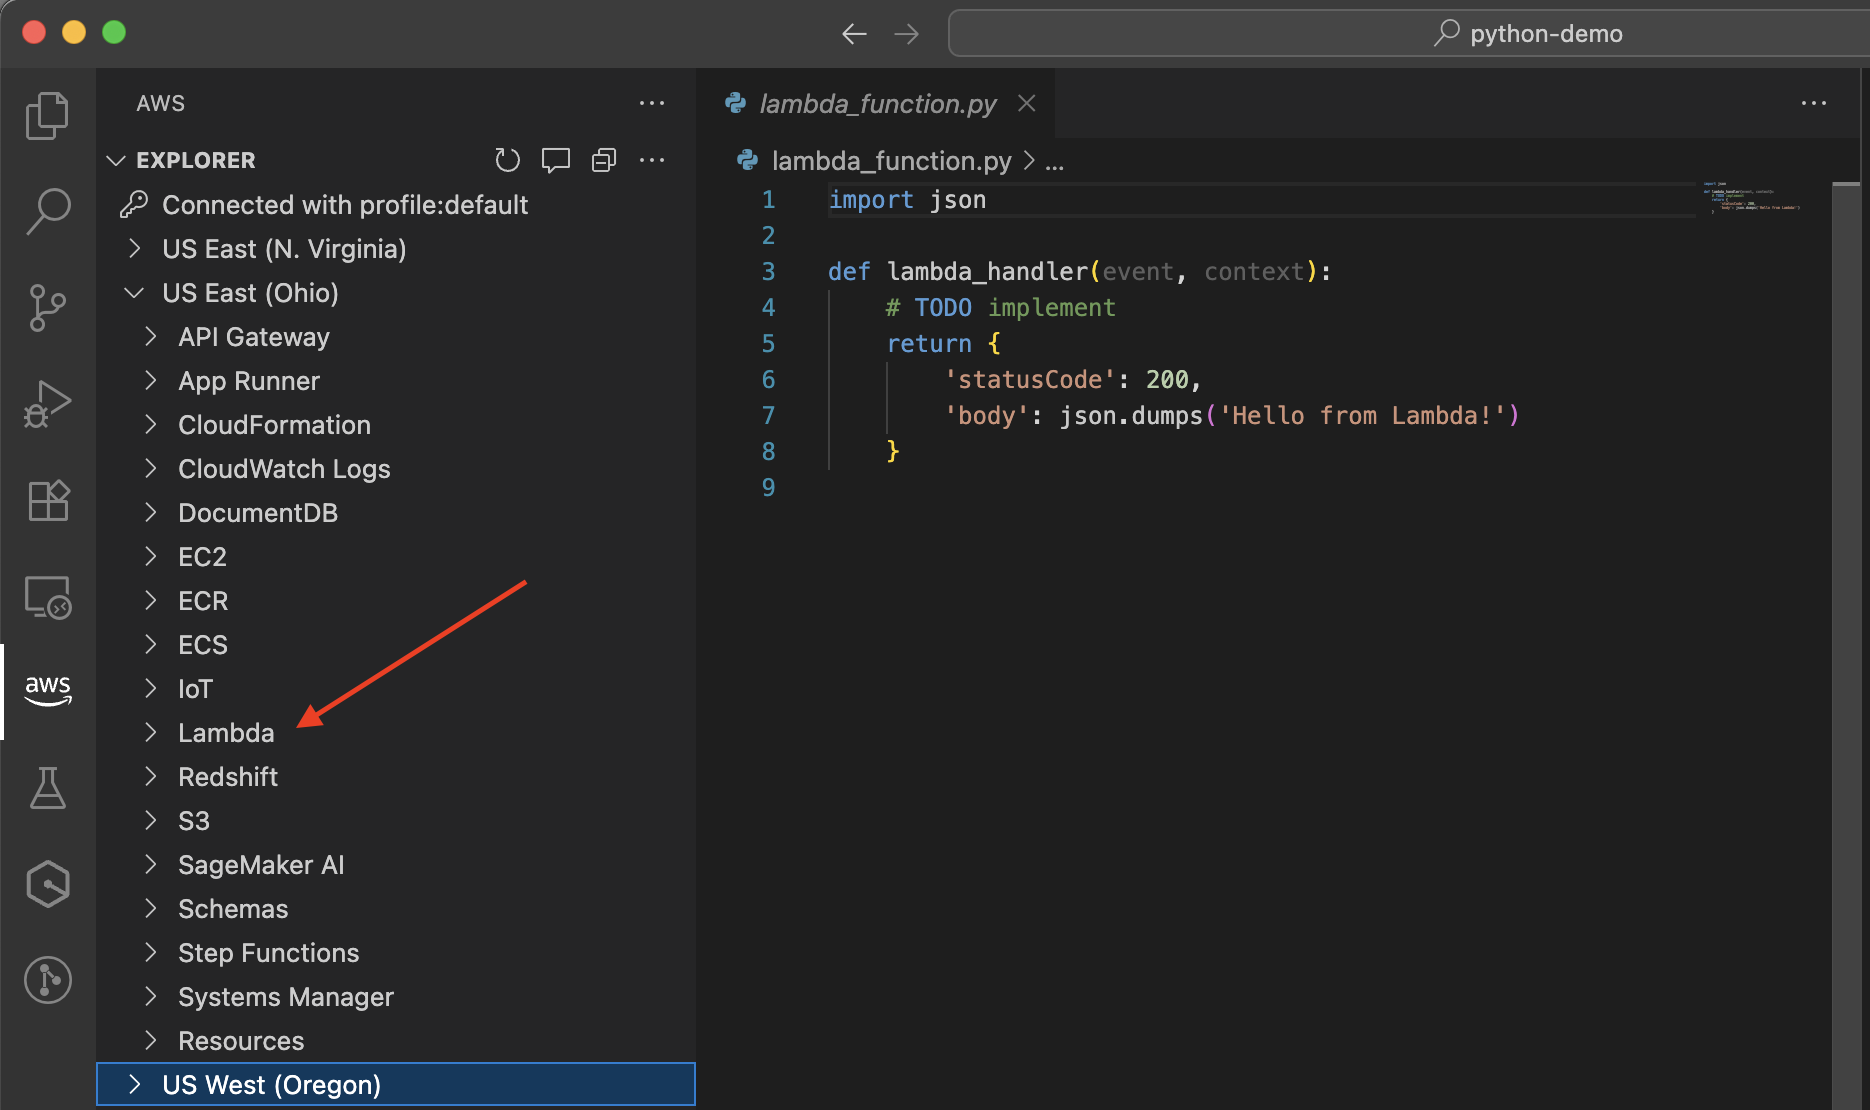
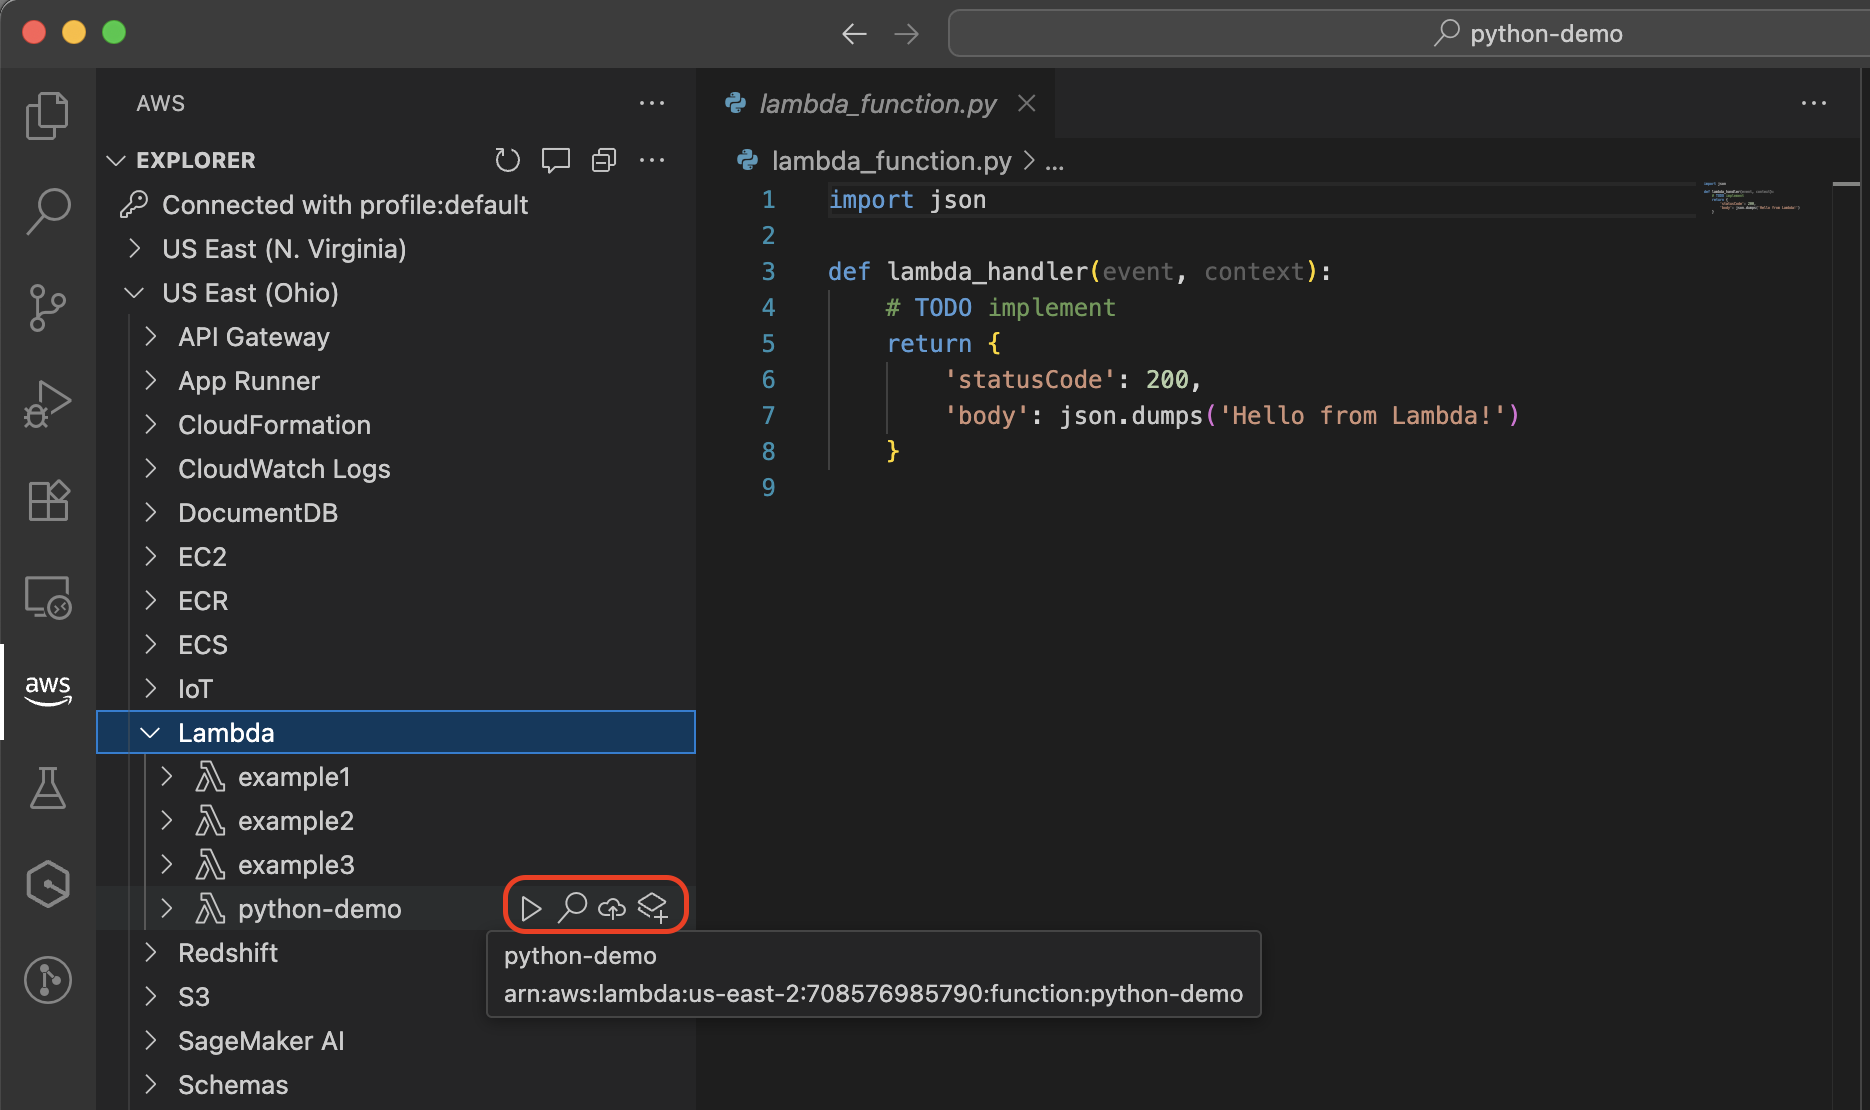
After opening your function in your preferred IDE, follow these steps to access and manage your functions. For the example below we have used Visual Studio Code.
-
Select the Amazon icon in the sidebar to open the Amazon Explorer:
-
In the Amazon Explorer, select the region with your Lambda function:
-
Under your selected region, expand the Lambda section to view and manage your functions:
With your function opened in your IDE, you can:
-
Edit function code with full language support and code completion.
-
Use the LocalStack integration to test Lambda functions that make API calls to other Amazon Web Services services during execution, such as reading from DynamoDB tables or writing to Amazon S3 buckets. LocalStack is a cloud service emulator that provides a complete local development environment for testing service integrations. You can also use Amazon SAM CLI to test your function in a local container. If your function makes API calls to other Amazon Web Services services, those calls will reach real Amazon resources, not emulated ones.
-
Debug your function with breakpoints and variable inspection. For more information, see Running and debugging Lambda functions directly from code in the Amazon Toolkit for Visual Studio Code User Guide.
-
Deploy your updated function back to Amazon using the cloud icon.
-
Install and manage dependencies for your function.
Convert your function to an Amazon SAM template and use IaC tools
In all supported IDEs (Visual Studio Code, Kiro, and Cursor), you can convert your Lambda function to an Amazon SAM template by choosing the Convert to Amazon SAM Application icon next to your Lambda function.
You are prompted to select an Amazon SAM project location. Once selected, your Lambda function is converted to a template.yaml file that is saved in your new Amazon SAM project.
With your function converted to an Amazon SAM template, you can:
Control the versioning of your infrastructure
Automate deployments
Remotely debug functions
Add additional Amazon resources to your application
Maintain consistent environments across your development lifecycle
Use Infrastructure Composer to visually edit your Amazon SAM template
For more information on using IaC tools, refer to the following guides:
These tools provide additional capabilities for defining, testing, and deploying your serverless applications.
Next steps
To learn more about working with Lambda functions in Visual Studio Code, see the following resources:
-
Working with Amazon Lambda functions in the Amazon Toolkit for Visual Studio Code User Guide
-
Working with serverless applications in the Amazon Toolkit for Visual Studio Code User Guide
-
Infrastructure as code in the Lambda Developer Guide