Configuring provisioned concurrency for a function
In Lambda, concurrency is the number of in-flight requests that your function is currently handling. There are two types of concurrency controls available:
-
Reserved concurrency – This sets both the maximum and minimum number of concurrent instances allocated to your function. When a function has reserved concurrency, no other function can use that concurrency. Reserved concurrency is useful for ensuring that your most critical functions always have enough concurrency to handle incoming requests. Additionally, reserved concurrency can be used for limiting concurrency to prevent overwhelming downstream resources, like database connections. Reserved concurrency acts as both a lower and upper bound - it reserves the specified capacity exclusively for your function while also preventing it from scaling beyond that limit. Configuring reserved concurrency for a function incurs no additional charges.
-
Provisioned concurrency – This is the number of pre-initialized execution environments allocated to your function. These execution environments are ready to respond immediately to incoming function requests. Provisioned concurrency is useful for reducing cold start latencies for functions and designed to make functions available with double-digit millisecond response times. Generally, interactive workloads benefit the most from the feature. Those are applications with users initiating requests, such as web and mobile applications, and are the most sensitive to latency. Asynchronous workloads, such as data processing pipelines, are often less latency sensitive and so do not usually need provisioned concurrency. Configuring provisioned concurrency incurs additional charges to your Amazon Web Services account.
This topic details how to manage and configure provisioned concurrency. For a conceptual overview of these two types of concurrency controls, see Reserved concurrency and provisioned concurrency. For more information on configuring reserved concurrency, see Configuring reserved concurrency for a function.
Note
Lambda functions linked to an Amazon MQ event source mapping have a default maximum concurrency. For Apache Active MQ, the maximum number of concurrent instances is 5. For Rabbit MQ, the maximum number of concurrent instances is 1. Setting reserved or provisioned concurrency for your function doesn't change these limits. To request an increase in the default maximum concurrency when using Amazon MQ, contact Amazon Web Services Support.
Sections
Configuring provisioned concurrency
You can configure provisioned concurrency settings for a function using the Lambda console or the Lambda API.
To allocate provisioned concurrency for a function (console)
Open the Functions page
of the Lambda console. -
Choose the function you want to allocate provisioned concurrency for.
-
Choose Configuration and then choose Concurrency.
-
Under Provisioned concurrency configurations, choose Add configuration.
-
Choose the qualifier type, and alias or version.
Note
You cannot use provisioned concurrency with the $LATEST version of any function.
If your function has an event source, make sure that event source points to the correct function alias or version. Otherwise, your function won't use provisioned concurrency environments.
-
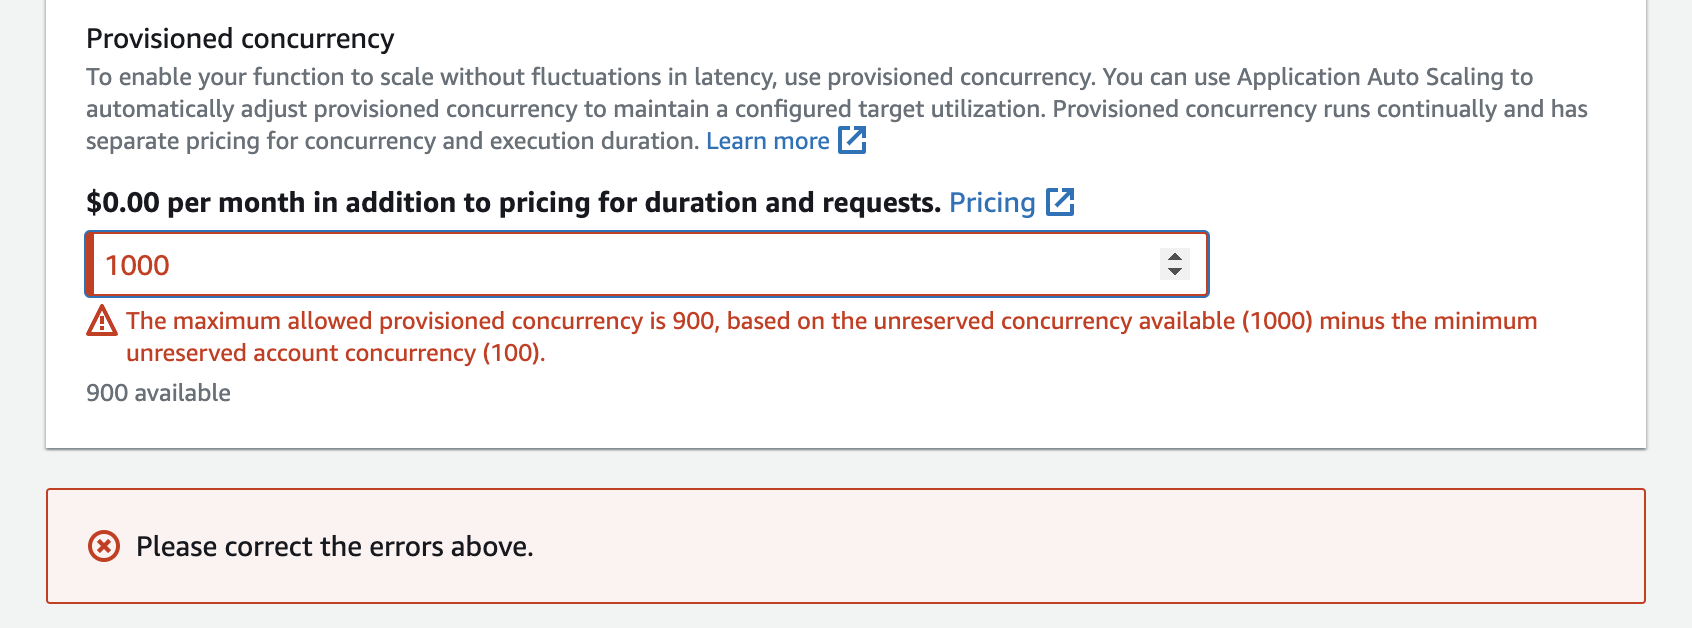
Enter a number under Provisioned concurrency.
-
Choose Save.
You can configure up to the Unreserved account concurrency in your account, minus 100. The remaining 100 units of concurrency are for functions that aren't using reserved concurrency. For example, if your account has a concurrency limit of 1,000, and you haven't assigned any reserved or provisioned concurrency to any of your other functions, you can configure a maximum of 900 provisioned concurrency units for a single function.
Configuring provisioned concurrency for a function has an impact on the concurrency pool
available to other functions. For instance, if you configure 100 units of provisioned concurrency
for function-a, other functions in your account must share the remaining 900 units
of concurrency. This is true even if function-a doesn't use all 100 units.
It's possible to allocate both reserved concurrency and provisioned concurrency for the same function. In such cases, the provisioned concurrency cannot exceed the reserved concurrency.
This limitation extends to function versions. The maximum provisioned concurrency you can assign to a specific function version is the function's reserved concurrency minus the provisioned concurrency on other function versions.
To configure provisioned concurrency with the Lambda API, use the following API operations.
For example, to configure provisioned concurrency with the Amazon Command Line Interface (CLI), use the
put-provisioned-concurrency-config command. The following command allocates
100 units of provisioned concurrency for the BLUE alias of a function named
my-function:
aws lambda put-provisioned-concurrency-config --function-name my-function \
  --qualifier BLUE \
  --provisioned-concurrent-executions 100
You should see output that looks like the following:
{
  "Requested ProvisionedConcurrentExecutions": 100,
  "Allocated ProvisionedConcurrentExecutions": 0,
  "Status": "IN_PROGRESS",
  "LastModified": "2023-01-21T11:30:00+0000"
}
Accurately estimating required provisioned concurrency for a function
You can view any active function's concurrency metrics using CloudWatch metrics.
Specifically, the ConcurrentExecutions metric shows you the number of
concurrent invocations for functions in your account.
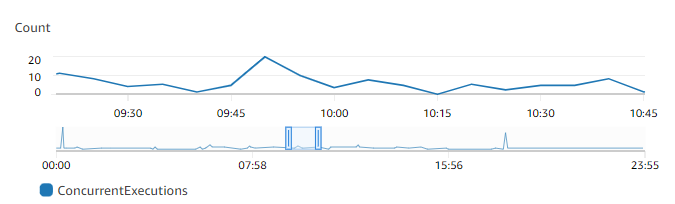
The previous graph suggests that this function serves an average of 5 to 10 concurrent requests at any given time, and peaks at 20 requests. Suppose that there are many other functions in your account. If this function is critical to your application and you need a low-latency response on every invocation, configure at least 20 units of provisioned concurrency.
Recall that you can also calculate concurrency using the following formula:
Concurrency = (average requests per second) * (average request duration in seconds)
To estimate how much concurrency you need, multiply average requests per
second with the average request duration in seconds. You can estimate average
requests per second using the Invocation metric, and the average
request duration in seconds using the Duration
metric.
When configuring provisioned concurrency, Lambda suggests adding a 10% buffer on top of the amount of concurrency your function typically needs. For example, if your function usually peaks at 200 concurrent requests, set the provisioned concurrency to 220 (200 concurrent requests + 10% = 220 provisioned concurrency).
Optimizing function code when using provisioned concurrency
If you're using provisioned concurrency, consider restructuring your function code to optimize for low latency. For functions using provisioned concurrency, Lambda runs any initialization code, such as loading libraries and instantiating clients, during allocation time. Therefore, it's advisable to move as much initialization outside of the main function handler to avoid impacting latency during actual function invocations. In contrast, initializing libraries or instantiating clients within your main handler code means your function must run this each time it's invoked (this occurs regardless of whether you're using provisioned concurrency).
For on-demand invocations, Lambda may need to rerun your initialization code every time your function experiences a cold start. For such functions, you may choose to defer initialization of a specific capability until your function needs it. For example, consider the following control flow for a Lambda handler:
def handler(event, context):
    ...
    if ( some_condition ):
        // Initialize CLIENT_A to perform a task
    else:
        // Do nothing
In the previous example, instead of initializing CLIENT_A outside
of the main handler, the developer initialized it within the if
statement. By doing this, Lambda runs this code only if some_condition is
met. If you initialize CLIENT_A outside the main handler,
Lambda runs that code on every cold start. This can increase overall latency.
You can measure cold starts as Lambda scales up by adding X-Ray monitoring to your function. A function using
provisioned concurrency does not exhibit cold start behavior since the execution environment is prepared ahead of
invocation. However, provisioned concurrency must be applied to a
specific version or alias
Using environment variables to view and control provisioned concurrency behavior
It's possible for your function to use up all of its provisioned concurrency.
Lambda uses on-demand instances to handle any excess traffic. To determine the type
of initialization Lambda used for a specific environment, check
the value of the AWS_LAMBDA_INITIALIZATION_TYPE environment variable.
This variable has two possible values: provisioned-concurrency or
on-demand. The value of AWS_LAMBDA_INITIALIZATION_TYPE is
immutable and remains constant throughout the lifetime of the environment. To check
the value of an environment variable in your function code, see
Retrieving Lambda environment variables.
If you're using the .NET 8 runtime, you can configure the
AWS_LAMBDA_DOTNET_PREJIT environment variable to improve the latency for
functions, even if they don't use provisioned concurrency. The .NET runtime employs lazy
compilation and initialization for each library that your code calls for the first time.
As a result, the first invocation of a Lambda function may take longer than subsequent
ones. To mitigate this, you can choose one of three values for
AWS_LAMBDA_DOTNET_PREJIT:
-
ProvisionedConcurrency: Lambda performs ahead-of-time JIT compilation for all environments using provisioned concurrency. This is the default value. -
Always: Lambda performs ahead-of-time JIT compilation for every environment, even if the function doesn't use provisioned concurrency. -
Never: Lambda disables ahead-of-time JIT compilation for all environments.
Understanding logging and billing behavior with provisioned concurrency
For provisioned concurrency environments, your function's initialization code
runs during allocation, and periodically as Lambda recycles instances
of your environment. Lambda bills you for initialization even if the environment
instance never processes a request. Provisioned concurrency runs continually
and incurs separate billing from initialization and invocation costs. For more
details, see Amazon Lambda Pricing
When you configure a Lambda function with provisioned concurrency, Lambda
pre-initializes that execution environment so that it's available ahead of
invocation requests. Lambda logs the
Init Duration field of the function in a
platform-initReport log event in JSON logging format every time the environment
is initialized. To see this log event, configure your
JSON log level to at least
INFO. You can also use the Telemetry
API to consume platform events where the Init Duration field is reported.
Using Application Auto Scaling to automate provisioned concurrency management
You can use Application Auto Scaling to manage provisioned concurrency on a schedule or based on utilization. If your function receives predictable traffic patterns, use scheduled scaling. If you want your function to maintain a specific utilization percentage, use a target tracking scaling policy.
Note
If you use Application Auto Scaling to manage your function's provisioned concurrency, ensure that you configure an initial provisioned concurrency value first. If your function doesn't have an initial provisioned concurrency value, Application Auto Scaling may not handle function scaling properly.
Scheduled scaling
With Application Auto Scaling, you can set your own scaling schedule according to predictable
load changes. For more information and examples, see
Scheduled scaling for Application Auto Scaling in the Application Auto Scaling User Guide, and
Scheduling Amazon Lambda Provisioned Concurrency for recurring peak usage
Target tracking
With target tracking, Application Auto Scaling creates and manages a set of CloudWatch alarms based on how you define your scaling policy. When these alarms activate, Application Auto Scaling automatically adjusts the amount of environments allocated using provisioned concurrency. Use target tracking for applications that don't have predictable traffic patterns.
To scale provisioned concurrency using target tracking, use the
RegisterScalableTarget and PutScalingPolicy
Application Auto Scaling API operations. For example, if you're using the Amazon Command Line Interface (CLI),
follow these steps:
-
Register a function's alias as a scaling target. The following example registers the BLUE alias of a function named
my-function:aws application-autoscaling register-scalable-target --service-namespace lambda \ --resource-id function:my-function:BLUE --min-capacity 1 --max-capacity 100 \ --scalable-dimension lambda:function:ProvisionedConcurrency -
Apply a scaling policy to the target. The following example configures Application Auto Scaling to adjust the provisioned concurrency configuration for an alias to keep utilization near 70 percent, but you can apply any value between 10% and 90%.
aws application-autoscaling put-scaling-policy \
    --service-namespace lambda \
    --scalable-dimension lambda:function:ProvisionedConcurrency \
    --resource-id function:my-function:BLUE \
    --policy-name my-policy \
    --policy-type TargetTrackingScaling \
    --target-tracking-scaling-policy-configuration '{ "TargetValue": 0.7, "PredefinedMetricSpecification": { "PredefinedMetricType": "LambdaProvisionedConcurrencyUtilization" }}'
You should see output that looks like this:
{
    "PolicyARN": "arn:aws:autoscaling:us-east-2:123456789012:scalingPolicy:12266dbb-1524-xmpl-a64e-9a0a34b996fa:resource/lambda/function:my-function:BLUE:policyName/my-policy",
    "Alarms": [
        {
            "AlarmName": "TargetTracking-function:my-function:BLUE-AlarmHigh-aed0e274-xmpl-40fe-8cba-2e78f000c0a7",
            "AlarmARN": "arn:aws:cloudwatch:us-east-2:123456789012:alarm:TargetTracking-function:my-function:BLUE-AlarmHigh-aed0e274-xmpl-40fe-8cba-2e78f000c0a7"
        },
        {
            "AlarmName": "TargetTracking-function:my-function:BLUE-AlarmLow-7e1a928e-xmpl-4d2b-8c01-782321bc6f66",
            "AlarmARN": "arn:aws:cloudwatch:us-east-2:123456789012:alarm:TargetTracking-function:my-function:BLUE-AlarmLow-7e1a928e-xmpl-4d2b-8c01-782321bc6f66"
        }
    ]
}
Application Auto Scaling creates two alarms in CloudWatch. The first alarm triggers when the utilization of provisioned concurrency consistently exceeds 70%. When this happens, Application Auto Scaling allocates more provisioned concurrency to reduce utilization. The second alarm triggers when utilization is consistently less than 63% (90 percent of the 70% target). When this happens, Application Auto Scaling reduces the alias's provisioned concurrency.
Note
Lambda emits the ProvisionedConcurrencyUtilization metric only
when your function is active and receiving requests. During periods of inactivity,
no metrics are emitted, and your auto-scaling alarms will enter the
INSUFFICIENT_DATA state. As a result, Application Auto Scaling won't be able
to adjust your function's provisioned concurrency. This may lead to unexpected
billing.
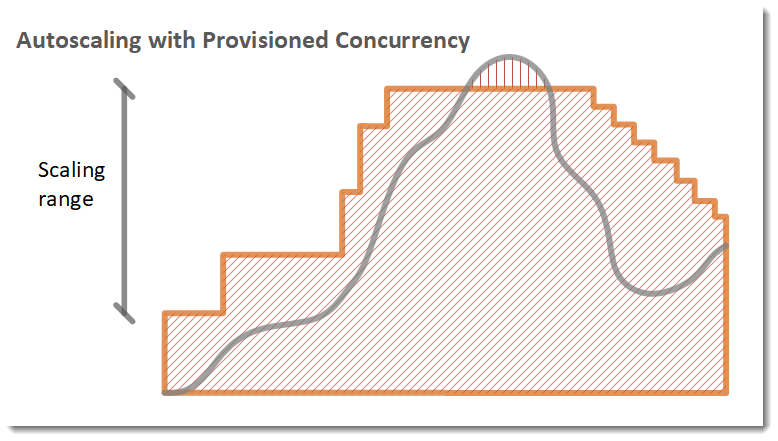
In the following example, a function scales between a minimum and maximum amount of provisioned concurrency based on utilization.
Legend
-
 Function instances
 -
 Open requests
 -
 Provisioned concurrency
 -
 Standard concurrency
When the number of open requests increase, Application Auto Scaling increases provisioned concurrency in large steps until it reaches the configured maximum. After this, the function can continue to scale on standard, unreserved concurrency if you haven't reached your account concurrency limit. When utilization drops and stays low, Application Auto Scaling decreases provisioned concurrency in smaller periodic steps.
Both of the Application Auto Scaling alarms use the average statistic by default. Functions that experience quick bursts of traffic may not trigger these alarms. For example, suppose your Lambda function executes quickly (i.e. 20-100 ms) and your traffic comes in quick bursts. In this case, the number of requests exceeds the allocated provisioned concurrency during the burst. However, Application Auto Scaling requires the burst load to sustain for at least 3 minutes in order to provision additional environments. Additionally, both CloudWatch alarms require 3 data points that hit the target average to activate the auto scaling policy. If your function experiences quick bursts of traffic, using the Maximum statistic instead of the Average statistic can be more effective at scaling provisioned concurrency to minimize cold starts.
For more information on target tracking scaling policies, see Target tracking scaling policies for Application Auto Scaling.