Services or capabilities described in Amazon Web Services documentation might vary by Region. To see the differences applicable to the China Regions,
see Getting Started with Amazon Web Services in China
(PDF).
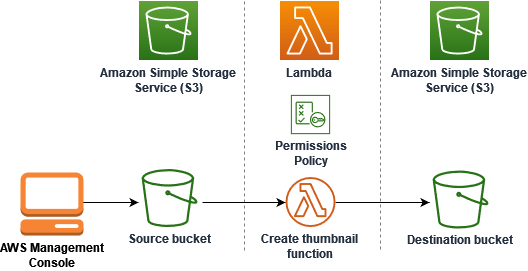
Tutorial: Using an Amazon S3 trigger to create thumbnail images
In this tutorial, you create and configure a Lambda function that resizes images added to an Amazon Simple Storage Service (Amazon S3) bucket. When you add an image
file to your bucket, Amazon S3 invokes your Lambda function. The function then creates a thumbnail version of the image and outputs it to a different
Amazon S3 bucket.
To complete this tutorial, you carry out the following steps:
-
Create source and destination Amazon S3 buckets and upload a sample image.
-
Create a Lambda function that resizes an image and outputs a thumbnail to an Amazon S3 bucket.
-
Configure a Lambda trigger that invokes your function when objects are uploaded to your source bucket.
-
Test your function, first with a dummy event, and then by uploading an image to your source bucket.
By completing these steps, you’ll learn how to use Lambda to carry out a file processing task on objects added to an Amazon S3 bucket. You can
complete this tutorial using the Amazon Command Line Interface (Amazon CLI) or the Amazon Web Services Management Console.
If you're looking for a simpler example to learn how to configure an Amazon S3 trigger for Lambda, you can try Tutorial: Using an Amazon S3 trigger to invoke a Lambda function.
Prerequisites
If you want to use the Amazon CLI to complete the tutorial, install the latest version of the Amazon Command Line Interface.
For your Lambda function code, you can use Python or Node.js. Install the language support tools and a package manager for the
language that you want to use.
If you have not yet installed the Amazon Command Line Interface, follow the steps at Installing or updating the latest version of the Amazon CLI
to install it.
The tutorial requires a command line terminal or shell to run commands. In Linux and macOS, use your preferred shell and package manager.
In Windows, some Bash CLI commands that you commonly use with Lambda (such as zip) are not supported by the operating system's built-in terminals.
To get a Windows-integrated version of Ubuntu and Bash, install the Windows Subsystem for Linux.
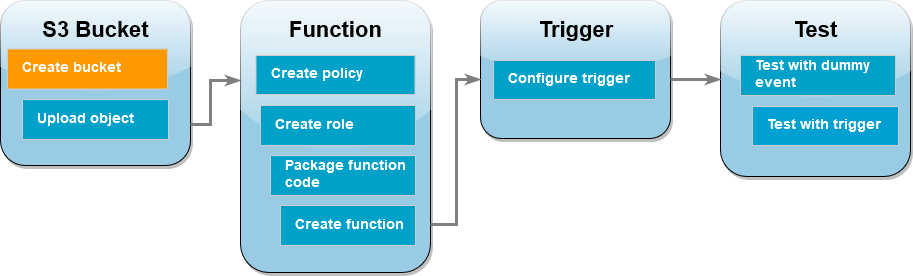
Create two Amazon S3 buckets
First create two Amazon S3 buckets. The first bucket is the source bucket you will upload your images to. The second bucket is used by
Lambda to save the resized thumbnail when you invoke your function.
- Amazon Web Services Management Console
-
To create the Amazon S3 buckets (console)
-
Open the Amazon S3 console and select the General purpose buckets page.
-
Select the Amazon Web Services Region closest to your geographical location. You can change your region using the drop-down list at the top of the screen.
Later in the tutorial, you must create your Lambda function in the same Region.
-
Choose Create bucket.
-
Under General configuration, do the following:
-
For Bucket type, ensure General purpose is selected.
-
For Bucket name, enter a globally unique name that meets the Amazon S3 Bucket naming rules.
Bucket names can contain only lower case letters, numbers, dots (.), and hyphens (-).
-
Leave all other options set to their default values and choose Create bucket.
-
Repeat steps 1 to 5 to create your destination bucket. For Bucket name, enter amzn-s3-demo-source-bucket-resizedamzn-s3-demo-source-bucket
- Amazon CLI
-
To create the Amazon S3 buckets (Amazon CLI)
-
Run the following CLI command to create your source bucket. The name you choose for your bucket must be globally unique and
follow the Amazon S3 Bucket naming rules.
Names can only contain lower case letters, numbers, dots (.), and hyphens (-). For region and LocationConstraint,
choose the Amazon Web Services Region closest to your geographical
location.
aws s3api create-bucket --bucket amzn-s3-demo-source-bucket --region us-east-1 \
--create-bucket-configuration LocationConstraint=us-east-1
Later in the tutorial, you must create your Lambda function in the same Amazon Web Services Region as your source bucket, so make a note of the
region you chose.
-
Run the following command to create your destination bucket. For the bucket name, you must use amzn-s3-demo-source-bucket-resizedamzn-s3-demo-source-bucketregion
and LocationConstraint, choose the same Amazon Web Services Region you used to create your source bucket.
aws s3api create-bucket --bucket amzn-s3-demo-source-bucket-resized --region us-east-1 \
--create-bucket-configuration LocationConstraint=us-east-1
Upload a test image to your source bucket
Later in the tutorial, you’ll test your Lambda function by invoking it using the Amazon CLI or the Lambda console. To confirm that your function
is operating correctly, your source bucket needs to contain a test image. This image can be any JPG or PNG file you choose.
- Amazon Web Services Management Console
-
To upload a test image to your source bucket (console)
-
Open the Buckets page of the Amazon S3 console.
-
Select the source bucket you created in the previous step.
-
Choose Upload.
-
Choose Add files and use the file selector to choose the object you want to upload.
-
Choose Open, then choose Upload.
- Amazon CLI
-
To upload a test image to your source bucket (Amazon CLI)
-
From the directory containing the image you want to upload, run the following CLI command. Replace the --bucket
parameter with the name of your source bucket. For the --key and --body parameters, use the filename of
your test image.
aws s3api put-object --bucket amzn-s3-demo-source-bucket --key HappyFace.jpg --body ./HappyFace.jpg
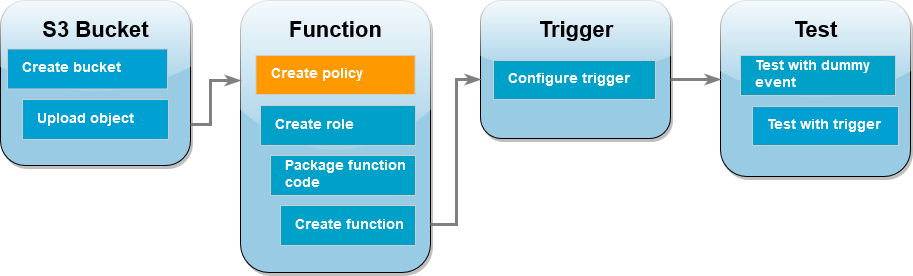
Create a permissions policy
The first step in creating your Lambda function is to create a permissions policy. This policy gives your function the permissions it needs
to access other Amazon resources. For this tutorial, the policy gives Lambda read and write permissions for Amazon S3 buckets and allows it to write
to Amazon CloudWatch Logs.
- Amazon Web Services Management Console
-
To create the policy (console)
-
Open the Policies page of the Amazon Identity and Access Management (IAM) console.
-
Choose Create policy.
-
Choose the JSON tab, and then paste the following custom policy into the JSON editor.
-
{
    "Version":"2012-10-17",
    "Statement": [
        {
            "Effect": "Allow",
            "Action": [
                "logs:PutLogEvents",
                "logs:CreateLogGroup",
                "logs:CreateLogStream"
            ],
            "Resource": "arn:aws-cn:logs:*:*:*"
        },
        {
            "Effect": "Allow",
            "Action": [
                "s3:GetObject"
            ],
            "Resource": "arn:aws-cn:s3:::*/*"
        },
        {
            "Effect": "Allow",
            "Action": [
                "s3:PutObject"
            ],
            "Resource": "arn:aws-cn:s3:::*/*"
        }
    ]
}
-
Choose Next.
-
Under Policy details, for Policy name, enter LambdaS3Policy
-
Choose Create policy.
- Amazon CLI
-
To create the policy (Amazon CLI)
-
Save the following JSON in a file named policy.json.
-
{
    "Version":"2012-10-17",
    "Statement": [
        {
            "Effect": "Allow",
            "Action": [
                "logs:PutLogEvents",
                "logs:CreateLogGroup",
                "logs:CreateLogStream"
            ],
            "Resource": "arn:aws-cn:logs:*:*:*"
        },
        {
            "Effect": "Allow",
            "Action": [
                "s3:GetObject"
            ],
            "Resource": "arn:aws-cn:s3:::*/*"
        },
        {
            "Effect": "Allow",
            "Action": [
                "s3:PutObject"
            ],
            "Resource": "arn:aws-cn:s3:::*/*"
        }
    ]
}
-
From the directory you saved the JSON policy document in, run the following CLI command.
aws iam create-policy --policy-name LambdaS3Policy --policy-document file://policy.json
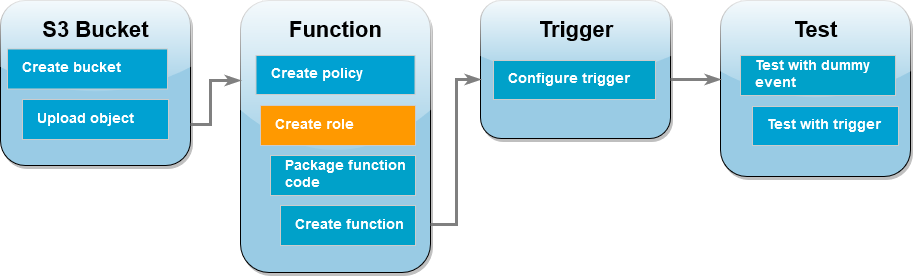
Create an execution role
An execution role is an IAM role that grants a Lambda function permission to access Amazon Web Services services and resources. To give your function
read and write access to an Amazon S3 bucket, you attach the permissions policy you created in the previous step.
- Amazon Web Services Management Console
-
To create an execution role and attach your permissions policy (console)
-
Open the Roles page of the (IAM) console.
-
Choose Create role.
-
For Trusted entity type, select Amazon Web Services service, and for Use case,
select Lambda.
-
Choose Next.
-
Add the permissions policy you created in the previous step by doing the following:
-
In the policy search box, enter LambdaS3Policy
-
In the search results, select the check box for LambdaS3Policy.
-
Choose Next.
-
Under Role details, for the Role name enter LambdaS3Role
-
Choose Create role.
- Amazon CLI
-
To create an execution role and attach your permissions policy (Amazon CLI)
-
Save the following JSON in a file named trust-policy.json. This trust policy allows Lambda to use the role’s
permissions by giving the service principal lambda.amazonaws.com permission to call the Amazon Security Token Service (Amazon STS) AssumeRole
action.
-
{
  "Version":"2012-10-17",
  "Statement": [
    {
      "Effect": "Allow",
      "Principal": {
        "Service": "lambda.amazonaws.com"
      },
      "Action": "sts:AssumeRole"
    }
  ]
}
-
From the directory you saved the JSON trust policy document in, run the following CLI command to create the execution role.
aws iam create-role --role-name LambdaS3Role --assume-role-policy-document file://trust-policy.json
-
To attach the permissions policy you created in the previous step, run the following CLI command. Replace the Amazon Web Services account number
in the policy’s ARN with your own account number.
aws iam attach-role-policy --role-name LambdaS3Role --policy-arn arn:aws:iam::123456789012:policy/LambdaS3Policy
Create the function deployment package
To create your function, you create a deployment package containing your function code and its dependencies. For this
CreateThumbnail function, your function code uses a separate library for the image resizing. Follow the instructions for your
chosen language to create a deployment package containing the required library.
- Node.js
-
To create the deployment package (Node.js)
-
Create a directory named lambda-s3 for your function code and dependencies and navigate into it.
mkdir lambda-s3
cd lambda-s3
-
Create a new Node.js project with npm. To accept the default options provided in the interactive experience, press Enter.
npm init
-
Save the following function code in a file named index.mjs. Make sure to replace us-east-1 with the
Amazon Web Services Region in which you created your own source and destination buckets.
// dependencies
import { S3Client, GetObjectCommand, PutObjectCommand } from '@aws-sdk/client-s3';

import { Readable } from 'stream';

import sharp from 'sharp';
import util from 'util';


// create S3 client
const s3 = new S3Client({region: 'us-east-1'});

// define the handler function
export const handler = async (event, context) => {

// Read options from the event parameter and get the source bucket
console.log("Reading options from event:\n", util.inspect(event, {depth: 5}));
  const srcBucket = event.Records[0].s3.bucket.name;

// Object key may have spaces or unicode non-ASCII characters
const srcKey    = decodeURIComponent(event.Records[0].s3.object.key.replace(/\+/g, " "));
const dstBucket = srcBucket + "-resized";
const dstKey    = "resized-" + srcKey;

// Infer the image type from the file suffix
const typeMatch = srcKey.match(/\.([^.]*)$/);
if (!typeMatch) {
  console.log("Could not determine the image type.");
  return;
}

// Check that the image type is supported
const imageType = typeMatch[1].toLowerCase();
if (imageType != "jpg" && imageType != "png") {
  console.log(`Unsupported image type: ${imageType}`);
  return;
}

// Get the image from the source bucket. GetObjectCommand returns a stream.
try {
  const params = {
    Bucket: srcBucket,
    Key: srcKey
  };
  var response = await s3.send(new GetObjectCommand(params));
  var stream = response.Body;

// Convert stream to buffer to pass to sharp resize function.
  if (stream instanceof Readable) {
    var content_buffer = Buffer.concat(await stream.toArray());

  } else {
    throw new Error('Unknown object stream type');
  }


} catch (error) {
  console.log(error);
  return;
}


// set thumbnail width. Resize will set the height automatically to maintain aspect ratio.
const width  = 200;

// Use the sharp module to resize the image and save in a buffer.
try {
  var output_buffer = await sharp(content_buffer).resize(width).toBuffer();

} catch (error) {
  console.log(error);
  return;
}

// Upload the thumbnail image to the destination bucket
try {
  const destparams = {
    Bucket: dstBucket,
    Key: dstKey,
    Body: output_buffer,
    ContentType: "image"
  };

  const putResult = await s3.send(new PutObjectCommand(destparams));

  } catch (error) {
    console.log(error);
    return;
  }

  console.log('Successfully resized ' + srcBucket + '/' + srcKey +
    ' and uploaded to ' + dstBucket + '/' + dstKey);
  };
-
In your lambda-s3 directory, install the sharp library using npm. Note that the latest version of sharp (0.33) isn't
compatible with Lambda. Install version 0.32.6 to complete this tutorial.
npm install sharp@0.32.6
The npm install command creates a node_modules directory for your modules. After this step, your
directory structure should look like the following.
lambda-s3
|- index.mjs
|- node_modules
|  |- base64js
|  |- bl
|  |- buffer
...
|- package-lock.json
|- package.json
-
Create a .zip deployment package containing your function code and its dependencies. In MacOS and Linux, run the following
command.
zip -r function.zip .
In Windows, use your preferred zip utility to create a .zip file. Ensure that your index.mjs,
package.json, and package-lock.json files and your node_modules directory are all at the root
of your .zip file.
- Python
-
To create the deployment package (Python)
-
Save the example code as a file named
lambda_function.py.
import boto3
import os
import sys
import uuid
from urllib.parse import unquote_plus
from PIL import Image
import PIL.Image

s3_client = boto3.client('s3')

def resize_image(image_path, resized_path):
  with Image.open(image_path) as image:
    image.thumbnail(tuple(x / 2 for x in image.size))
    image.save(resized_path)

def lambda_handler(event, context):
  for record in event['Records']:
    bucket = record['s3']['bucket']['name']
    key = unquote_plus(record['s3']['object']['key'])
    tmpkey = key.replace('/', '')
    download_path = '/tmp/{}{}'.format(uuid.uuid4(), tmpkey)
    upload_path = '/tmp/resized-{}'.format(tmpkey)
    s3_client.download_file(bucket, key, download_path)
    resize_image(download_path, upload_path)
    s3_client.upload_file(upload_path, '{}-resized'.format(bucket), 'resized-{}'.format(key))
-
In the same directory in which you created your lambda_function.py file, create a new directory named
package and install the Pillow (PIL) library and the
Amazon SDK for Python (Boto3). Although the Lambda Python runtime includes a version of the Boto3 SDK, we recommend that you add all of your function's
dependencies to your deployment package, even if they are included in the runtime. For more information, see
Runtime dependencies in Python.
mkdir package
pip install \
--platform manylinux2014_x86_64 \
--target=package \
--implementation cp \
--python-version 3.12 \
--only-binary=:all: --upgrade \
pillow boto3
The Pillow library contains C/C++ code. By using the --platform manylinux_2014_x86_64 and --only-binary=:all:
options, pip will download and install a version of Pillow that contains pre-compiled binaries compatible with the Amazon Linux 2 operating
system. This ensures that your deployment package will work in the Lambda execution environment, regardless of the operating system and
architecture of your local build machine.
-
Create a .zip file containing your application code and the Pillow and Boto3 libraries. In Linux or MacOS, run the following commands from your
command line interface.
cd package
zip -r ../lambda_function.zip .
cd ..
zip lambda_function.zip lambda_function.py
In Windows, use your preferred zip tool to create the lambda_function.zip file. Make sure that your
lambda_function.py file and the folders containing your dependencies are all at the root of the .zip file.
You can also create your deployment package using a Python virtual environment. See Working with .zip file archives for Python Lambda functions
Create the Lambda function
You can create your Lambda function using either the Amazon CLI or the Lambda console. Follow the instructions for your chosen language to create
the function.
- Amazon Web Services Management Console
-
To create the function (console)
To create your Lambda function using the console, you first create a basic function containing some ‘Hello world’ code. You then
replace this code with your own function code by uploading the.zip or JAR file you created in the previous step.
-
Open the Functions page of the Lambda console.
-
Make sure you're working in the same Amazon Web Services Region you created your Amazon S3 bucket in. You can change your region using the drop-down
list at the top of the screen.
-
Choose Create function.
-
Choose Author from scratch.
-
Under Basic information, do the following:
-
For Function name, enter CreateThumbnail
-
For Runtime, choose either Node.js 22.x or Python 3.12 according to the language you chose for your function.
-
For Architecture, choose x86_64.
-
In the Change default execution role tab, do the following:
-
Expand the tab, then choose Use an existing role.
-
Select the LambdaS3Role you created earlier.
-
Choose Create function.
To upload the function code (console)
-
In the Code source pane, choose Upload from.
-
Choose .zip file.
-
Choose Upload.
-
In the file selector, select your .zip file and choose Open.
-
Choose Save.
- Amazon CLI
-
To create the function (Amazon CLI)
-
Run the CLI command for the language you chose. For the role parameter, make sure to replace 123456789012
with your own Amazon Web Services account ID. For the region parameter, replace us-east-1 with the region you created your
Amazon S3 buckets in.
-
For Node.js, run the following command from the directory containing your function.zip
file.
aws lambda create-function --function-name CreateThumbnail \
--zip-file fileb://function.zip --handler index.handler --runtime nodejs24.x \
--timeout 10 --memory-size 1024 \
--role arn:aws:iam::123456789012:role/LambdaS3Role --region us-east-1
-
For Python, run the following command from the directory containing your lambda_function.zip
file.
aws lambda create-function --function-name CreateThumbnail \
--zip-file fileb://lambda_function.zip --handler lambda_function.lambda_handler \
--runtime python3.14 --timeout 10 --memory-size 1024 \
--role arn:aws:iam::123456789012:role/LambdaS3Role --region us-east-1
For your Lambda function to run when you upload an image to your source bucket, you need to configure a trigger for your function. You can
configure the Amazon S3 trigger using either the console or the Amazon CLI.
This procedure configures the Amazon S3 bucket to invoke your function every time that an object is created in the bucket. Be sure to
configure this only on the source bucket. If your Lambda function creates objects in the same bucket that invokes it, your function can be
invoked continuously in a loop. This can result
in un expected charges being billed to your Amazon Web Services account.
- Amazon Web Services Management Console
-
To configure the Amazon S3 trigger (console)
-
Open the Functions page of the Lambda console and choose your function (CreateThumbnail).
-
Choose Add trigger.
-
Select S3.
-
Under Bucket, select your source bucket.
-
Under Event types, select All object create events.
-
Under Recursive invocation, select the check box to acknowledge that using the same Amazon S3 bucket for input
and output is not recommended. You can learn more about recursive invocation patterns in Lambda by reading
Recursive patterns that cause run-away Lambda functions
in Serverless Land.
-
Choose Add.
When you create a trigger using the Lambda console, Lambda automatically creates a resource based policy
to give the service you select permission to invoke your function.
- Amazon CLI
-
To configure the Amazon S3 trigger (Amazon CLI)
-
For your Amazon S3 source bucket to invoke your function when you add an image file, you first need to configure permissions for your
function using a resource based policy.
A resource-based policy statement gives other Amazon Web Services services permission to invoke your function. To give Amazon S3 permission to invoke
your function, run the following CLI command. Be sure to replace the source-account parameter with your own Amazon Web Services account ID and to
use your own source bucket name.
aws lambda add-permission --function-name CreateThumbnail \
--principal s3.amazonaws.com --statement-id s3invoke --action "lambda:InvokeFunction" \
--source-arn arn:aws:s3:::amzn-s3-demo-source-bucket \
--source-account 123456789012
The policy you define with this command allows Amazon S3 to invoke your function only when an action takes place on your source bucket.
Although Amazon S3 bucket names are globally unique, when using resource-based policies it is best practice to specify that the
bucket must belong to your account. This is because if you delete a bucket, it is possible for another Amazon Web Services account to create a
bucket with the same Amazon Resource Name (ARN).
-
Save the following JSON in a file named notification.json. When applied to your source bucket, this JSON
configures the bucket to send a notification to your Lambda function every time a new object is added. Replace the Amazon Web Services account
number and Amazon Web Services Region in the Lambda function ARN with your own account number and region.
{
"LambdaFunctionConfigurations": [
    {
      "Id": "CreateThumbnailEventConfiguration",
      "LambdaFunctionArn": "arn:aws:lambda:us-east-1:123456789012:function:CreateThumbnail",
      "Events": [ "s3:ObjectCreated:Put" ]
    }
  ]
}
-
Run the following CLI command to apply the notification settings in the JSON file you created to your source bucket. Replace
amzn-s3-demo-source-bucket with the name of your own source bucket.
aws s3api put-bucket-notification-configuration --bucket amzn-s3-demo-source-bucket \
--notification-configuration file://notification.json
To learn more about the put-bucket-notification-configuration command and the
notification-configuration option, see put-bucket-notification-configuration
in the Amazon CLI Command Reference.
Test your Lambda function with a dummy event
Before you test your whole setup by adding an image file to your Amazon S3 source bucket, you test that your Lambda function is working
correctly by invoking it with a dummy event. An event in Lambda is a JSON-formatted document that contains data for your function to process.
When your function is invoked by Amazon S3, the event sent to your function contains information such as the bucket name, bucket ARN, and object
key.
- Amazon Web Services Management Console
-
To test your Lambda function with a dummy event (console)
-
Open the Functions page of the Lambda console and choose your
function (CreateThumbnail).
-
Choose the Test tab.
-
To create your test event, in the Test event pane, do the following:
-
Under Test event action, select Create new event.
-
For Event name, enter myTestEvent.
-
For Template, select S3 Put.
-
Replace the values for the following parameters with your own values.
-
For awsRegion, replace us-east-1 with the Amazon Web Services Region you created your Amazon S3 buckets in.
-
For name, replace amzn-s3-demo-bucket with the name of your own Amazon S3 source bucket.
-
For key, replace test%2Fkey with the filename of the test object you uploaded to your source
bucket in the step Upload a test image to your source bucket.
{
  "Records": [
    {
      "eventVersion": "2.0",
      "eventSource": "aws:s3",
      "awsRegion": "us-east-1",
      "eventTime": "1970-01-01T00:00:00.000Z",
      "eventName": "ObjectCreated:Put",
      "userIdentity": {
        "principalId": "EXAMPLE"
      },
      "requestParameters": {
        "sourceIPAddress": "127.0.0.1"
      },
      "responseElements": {
        "x-amz-request-id": "EXAMPLE123456789",
        "x-amz-id-2": "EXAMPLE123/5678abcdefghijklambdaisawesome/mnopqrstuvwxyzABCDEFGH"
      },
      "s3": {
        "s3SchemaVersion": "1.0",
        "configurationId": "testConfigRule",
        "bucket": {
          "name": "amzn-s3-demo-bucket",
          "ownerIdentity": {
            "principalId": "EXAMPLE"
          },
          "arn": "arn:aws:s3:::amzn-s3-demo-bucket"
        },
        "object": {
          "key": "test%2Fkey",
          "size": 1024,
          "eTag": "0123456789abcdef0123456789abcdef",
          "sequencer": "0A1B2C3D4E5F678901"
        }
      }
    }
  ]
}
-
Choose Save.
-
In the Test event pane, choose Test.
-
To check the your function has created a resized verison of your image and stored it in your target Amazon S3 bucket, do the following:
-
Open the Buckets page of the Amazon S3 console.
-
Choose your target bucket and confirm that your resized file is listed in the Objects pane.
- Amazon CLI
-
To test your Lambda function with a dummy event (Amazon CLI)
-
Save the following JSON in a file named dummyS3Event.json. Replace the values for the following parameters
with your own values:
-
For awsRegion, replace us-east-1 with the Amazon Web Services Region you created your Amazon S3 buckets in.
-
For name, replace amzn-s3-demo-bucket with the name of your own Amazon S3 source bucket.
-
For key, replace test%2Fkey with the filename of the test object you uploaded to your source
bucket in the step Upload a test image to your source bucket.
{
  "Records": [
    {
      "eventVersion": "2.0",
      "eventSource": "aws:s3",
      "awsRegion": "us-east-1",
      "eventTime": "1970-01-01T00:00:00.000Z",
      "eventName": "ObjectCreated:Put",
      "userIdentity": {
        "principalId": "EXAMPLE"
      },
      "requestParameters": {
        "sourceIPAddress": "127.0.0.1"
      },
      "responseElements": {
        "x-amz-request-id": "EXAMPLE123456789",
        "x-amz-id-2": "EXAMPLE123/5678abcdefghijklambdaisawesome/mnopqrstuvwxyzABCDEFGH"
      },
      "s3": {
        "s3SchemaVersion": "1.0",
        "configurationId": "testConfigRule",
        "bucket": {
          "name": "amzn-s3-demo-bucket",
          "ownerIdentity": {
            "principalId": "EXAMPLE"
          },
          "arn": "arn:aws:s3:::amzn-s3-demo-bucket"
        },
        "object": {
          "key": "test%2Fkey",
          "size": 1024,
          "eTag": "0123456789abcdef0123456789abcdef",
          "sequencer": "0A1B2C3D4E5F678901"
        }
      }
    }
  ]
}
-
From the directory you saved your dummyS3Event.json file in, invoke the function by running the following
CLI command. This command invokes your Lambda function synchronously by specifying RequestResponse as the value of the
invocation-type parameter. To learn more about synchronous and asynchronous invocation, see Invoking Lambda functions.
aws lambda invoke --function-name CreateThumbnail \
--invocation-type RequestResponse --cli-binary-format raw-in-base64-out \
--payload file://dummyS3Event.json outputfile.txt
The cli-binary-format option is required if you are using version 2 of the Amazon CLI. To make this the default setting, run
aws configure set cli-binary-format raw-in-base64-out. For more information, see Amazon CLI supported global command line options.
-
Verify that your function has created a thumbnail version of your image and saved it to your target Amazon S3 bucket. Run the
following CLI command, replacing amzn-s3-demo-source-bucket-resized with the name of your own destination bucket.
aws s3api list-objects-v2 --bucket amzn-s3-demo-source-bucket-resized
You should see output similar to the following. The Key parameter shows the filename of your resized image file.
{
    "Contents": [
        {
            "Key": "resized-HappyFace.jpg",
            "LastModified": "2023-06-06T21:40:07+00:00",
            "ETag": "\"d8ca652ffe83ba6b721ffc20d9d7174a\"",
            "Size": 2633,
            "StorageClass": "STANDARD"
        }
    ]
}
Test your function using the Amazon S3 trigger
Now that you’ve confirmed your Lambda function is operating correctly, you’re ready to test your complete setup by adding an image file to
your Amazon S3 source bucket. When you add your image to the source bucket, your Lambda function should be automatically invoked. Your function
creates a resized version of the file and stores it in your target bucket.
- Amazon Web Services Management Console
-
To test your Lambda function using the Amazon S3 trigger (console)
-
To upload an image to your Amazon S3 bucket, do the following:
-
Open the Buckets page of the Amazon S3 console and choose your source bucket.
-
Choose Upload.
-
Choose Add files and use the file selector to choose the image file you want to upload. Your image
object can be any .jpg or .png file.
-
Choose Open, then choose Upload.
-
Verify that Lambda has saved a resized version of your image file in your target bucket by doing the following:
-
Navigate back to the Buckets page of the Amazon S3 console and choose your destination bucket.
-
In the Objects pane, you should now see two resized image files, one from each test of your Lambda function.
To download your resized image, select the file, then choose Download.
- Amazon CLI
-
To test your Lambda function using the Amazon S3 trigger (Amazon CLI)
-
From the directory containing the image you want to upload, run the following CLI command. Replace the --bucket
parameter with the name of your source bucket. For the --key and --body parameters, use the filename of
your test image. Your test image can be any .jpg or .png file.
aws s3api put-object --bucket amzn-s3-demo-source-bucket --key SmileyFace.jpg --body ./SmileyFace.jpg
-
Verify that your function has created a thumbnail version of your image and saved it to your target Amazon S3 bucket. Run the
following CLI command, replacing amzn-s3-demo-source-bucket-resized with the name of your own destination bucket.
aws s3api list-objects-v2 --bucket amzn-s3-demo-source-bucket-resized
If your function runs successfully, you’ll see output similar to the following. Your target bucket should now contain two resized files.
{
    "Contents": [
        {
            "Key": "resized-HappyFace.jpg",
            "LastModified": "2023-06-07T00:15:50+00:00",
            "ETag": "\"7781a43e765a8301713f533d70968a1e\"",
            "Size": 2763,
            "StorageClass": "STANDARD"
        },
        {
            "Key": "resized-SmileyFace.jpg",
            "LastModified": "2023-06-07T00:13:18+00:00",
            "ETag": "\"ca536e5a1b9e32b22cd549e18792cdbc\"",
            "Size": 1245,
            "StorageClass": "STANDARD"
        }
    ]
}
Clean up your resources
You can now delete the resources that you created for this tutorial, unless you want to retain them. By deleting Amazon resources that you're no longer using, you prevent unnecessary charges to your Amazon Web Services account.
To delete the Lambda function
-
Open the Functions page of the Lambda console.
-
Select the function that you created.
-
Choose Actions, Delete.
-
Type confirm in the text input field and choose Delete.
To delete the policy that you created
-
Open the Policies page of the IAM console.
-
Select the policy that you created (AWSLambdaS3Policy).
-
Choose Policy actions, Delete.
-
Choose Delete.
To delete the execution role
-
Open the Roles page of the IAM console.
-
Select the execution role that you created.
-
Choose Delete.
-
Enter the name of the role in the text input field and choose Delete.
To delete the S3 bucket
-
Open the Amazon S3 console.
-
Select the bucket you created.
-
Choose Delete.
-
Enter the name of the bucket in the text input field.
-
Choose Delete bucket.