Connecting an Amazon EC2 instance to Amazon Neptune cluster in the same VPC
One of the most common ways to connect to a Neptune database is from an Amazon EC2 instance in the same VPC as your Neptune DB cluster. For example, the EC2 instance might be running a web server that connects with the internet. In this case, only the EC2 instance has access to the Neptune DB cluster, and the internet only has access to the EC2 instance:
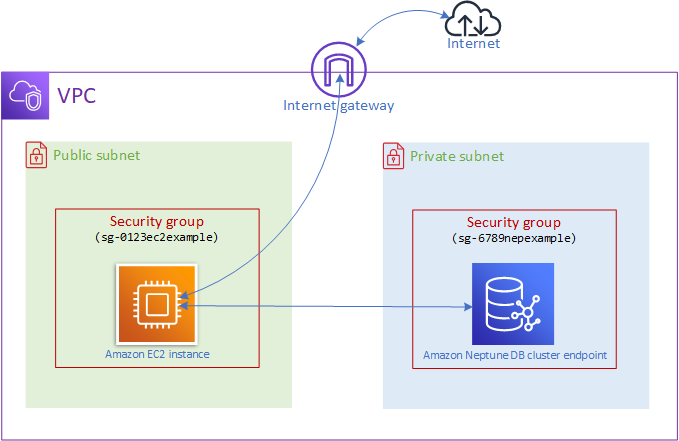
To enable this configuration, you need to have the right VPC security groups and subnet groups set up. The web server is hosted in a public subnet, so that it can reach the public internet, and your Neptune cluster instance is hosted in a private subnet to keep it secure. See Set up the Amazon VPC where your Amazon Neptune DB cluster is located.
In order for the Amazon EC2 instance to connect to your Neptune endpoint on, for example,
port 8182, you will need to set up a security group to do that. If your
Amazon EC2 instance is using a security group named, for example, ec2-sg1, you
need to create another Amazon EC2 security group (let's say db-sg1) that has
inbound rules for port 8182 and has ec2-sg1 as its source.
Then, add db-sg1 to your Neptune cluster to allow the connection.
After creating the Amazon EC2 instance, you can log into it using SSH and connect to your Neptune DB cluster. For information about connecting to an EC2 instance using SSH, see Connect to your Linux instance in the Amazon EC2 User Guide.
If you are using a Linux or macOS command line to connect to the EC2 instance, you can paste
the SSH command from the SSHAccess item in the Outputs
section of the Amazon CloudFormation stack. You must have the PEM file in the current directory and the PEM file
permissions must be set to 400 (chmod 400 ).keypair.pem
To create a VPC with both private and public subnets
Sign in to the Amazon Web Services Management Console and open the Amazon VPC console at https://console.amazonaws.cn/vpc/
. In the top-right corner of the Amazon Web Services Management Console, choose the Region to create your VPC in.
In the VPC Dashboard, choose Launch VPC Wizard.
-
Complete the VPC Settings area of the Create VPC page:
Under Resources to create, choose VPC, subnets, etc..
Leave the default name tag as is, or enter a name of your choosing, or un-check the Auto-generate check box to disable name tag generation.
Leave the IPv4 CIDR block value at
10.0.0.0/16.Leave the IPv6 CIDR block value at No IPv6 CIDR block.
Leave the Tenancy at Default.
Leave the number of Availability Zones (AZs) at 2.
Leave NAT gateways ($) at None, unless you will be needing one or more NAT gateways.
Set VPC endpoints to None, unless you will be using Amazon S3.
Both Enable DNS hostnames and Enable DNS resolution should be checked.
Choose Create VPC.