Configure Amazon EMR CloudFormation templates in the Service Catalog
This topic assumes administrators are familiar with Amazon CloudFormation, portfolios and products in Amazon Service Catalog, as well as Amazon EMR.
To simplify the creation of Amazon EMR clusters from Studio, administrators can register an Amazon EMR CloudFormation template as a product in an Amazon Service Catalog portfolio. To make the template available to data scientists, they must associate the portfolio with the SageMaker AI execution role used in Studio or Studio Classic. Finally, to allow users to discover templates, provision clusters, and connect to Amazon EMR clusters from Studio or Studio Classic, administrators need to set appropriate access permissions.
The Amazon EMR Amazon CloudFormation templates can allow end-users to customize various cluster aspects. For example, administrators can define an approved list of instance types that users can choose from when creating a cluster.
The following instructions use end-to-end CloudFormation stacks
Note
The GitHub repository aws-samples/sagemaker-studio-emr
The sagemaker-studio-emr/cloudformation/emr_servicecatalog_templates
Refer to Connect to an Amazon EMR cluster from SageMaker Studio or Studio Classic for details on the authentication methods you can use to connect to an Amazon EMR cluster.
To let data scientists discover Amazon EMR CloudFormation templates and provision clusters from Studio or Studio Classic, follow these steps.
Step 0: Check your networking and prepare your CloudFormation stack
Before you start:
-
Ensure that you have reviewed the networking and security requirements in Configure network access for your Amazon EMR cluster.
-
You must have an existing end-to-end CloudFormation stack that supports the authentication method of your choice. You can find examples of such CloudFormation templates in the aws-samples/sagemaker-studio-emr
GitHub repository. The following steps highlight the specific configurations in your end-to-end stack to enable the use of Amazon EMR templates within Studio or Studio Classic.
Step 1: Associate your Service Catalog portfolio with SageMaker AI
In your Service Catalog portfolio, associate your portfolio ID with the SageMaker AI execution role accessing your cluster.
To do so, add the following section (here in YAML format) to your stack. This grants the SageMaker AI execution role access to the specified Service Catalog portfolio containing products like Amazon EMR templates. It allows roles assumed by SageMaker AI to launch those products.
Replace SageMakerExecutionRole.Arn and
SageMakerStudioEMRProductPortfolio.ID with their
actual values.
SageMakerStudioEMRProductPortfolioPrincipalAssociation: Type: AWS::ServiceCatalog::PortfolioPrincipalAssociation Properties: PrincipalARN:SageMakerExecutionRole.ArnPortfolioId:SageMakerStudioEMRProductPortfolio.IDPrincipalType: IAM
For details on the required set of IAM permissions, see the permissions section.
Step 2: Reference an Amazon EMR template in a Service Catalog product
In a Service Catalog product of your portfolio, reference an Amazon EMR template resource and ensure its visibility in Studio or Studio Classic.
To do so, reference the Amazon EMR template resource in the Service Catalog product definition,
and then add the following tag key "sagemaker:studio-visibility:emr"
set to the value "true" (see the example in YAML format).
In the Service Catalog product definition, the Amazon CloudFormation template of the cluster is referenced via URL. The additional tag set to true ensures the visibility of the Amazon EMR templates in Studio or Studio Classic.
Note
The Amazon EMR template referenced by the provided URL in the example does not enforce any authentication requirements when launched. This option is meant for demonstration and learning purposes. It is not recommended in a production environment.
SMStudioEMRNoAuthProduct: Type: AWS::ServiceCatalog::CloudFormationProduct Properties: Owner: AWS Name: SageMaker Studio Domain No Auth EMR ProvisioningArtifactParameters: - Name: SageMaker Studio Domain No Auth EMR Description: Provisions a SageMaker domain and No Auth EMR Cluster Info: LoadTemplateFromURL:Link to your CloudFormation template. For example, https://aws-blogs-artifacts-public.s3.amazonaws.com/artifacts/astra-m4-sagemaker/end-to-end/CFN-EMR-NoStudioNoAuthTemplate-v3.yamlTags: - Key: "sagemaker:studio-visibility:emr" Value: "true"
Step 3: Parameterize the Amazon EMR CloudFormation template
The CloudFormation template used to define the Amazon EMR cluster
within the Service Catalog product allows administrators to specify configurable
parameters. Administrators can define Default values and
AllowedValues ranges for these parameters within the template's
Parameters section. During the cluster launch process, data
scientists can provide custom inputs or make selections from those predefined
options to customize certain aspects of their Amazon EMR cluster.
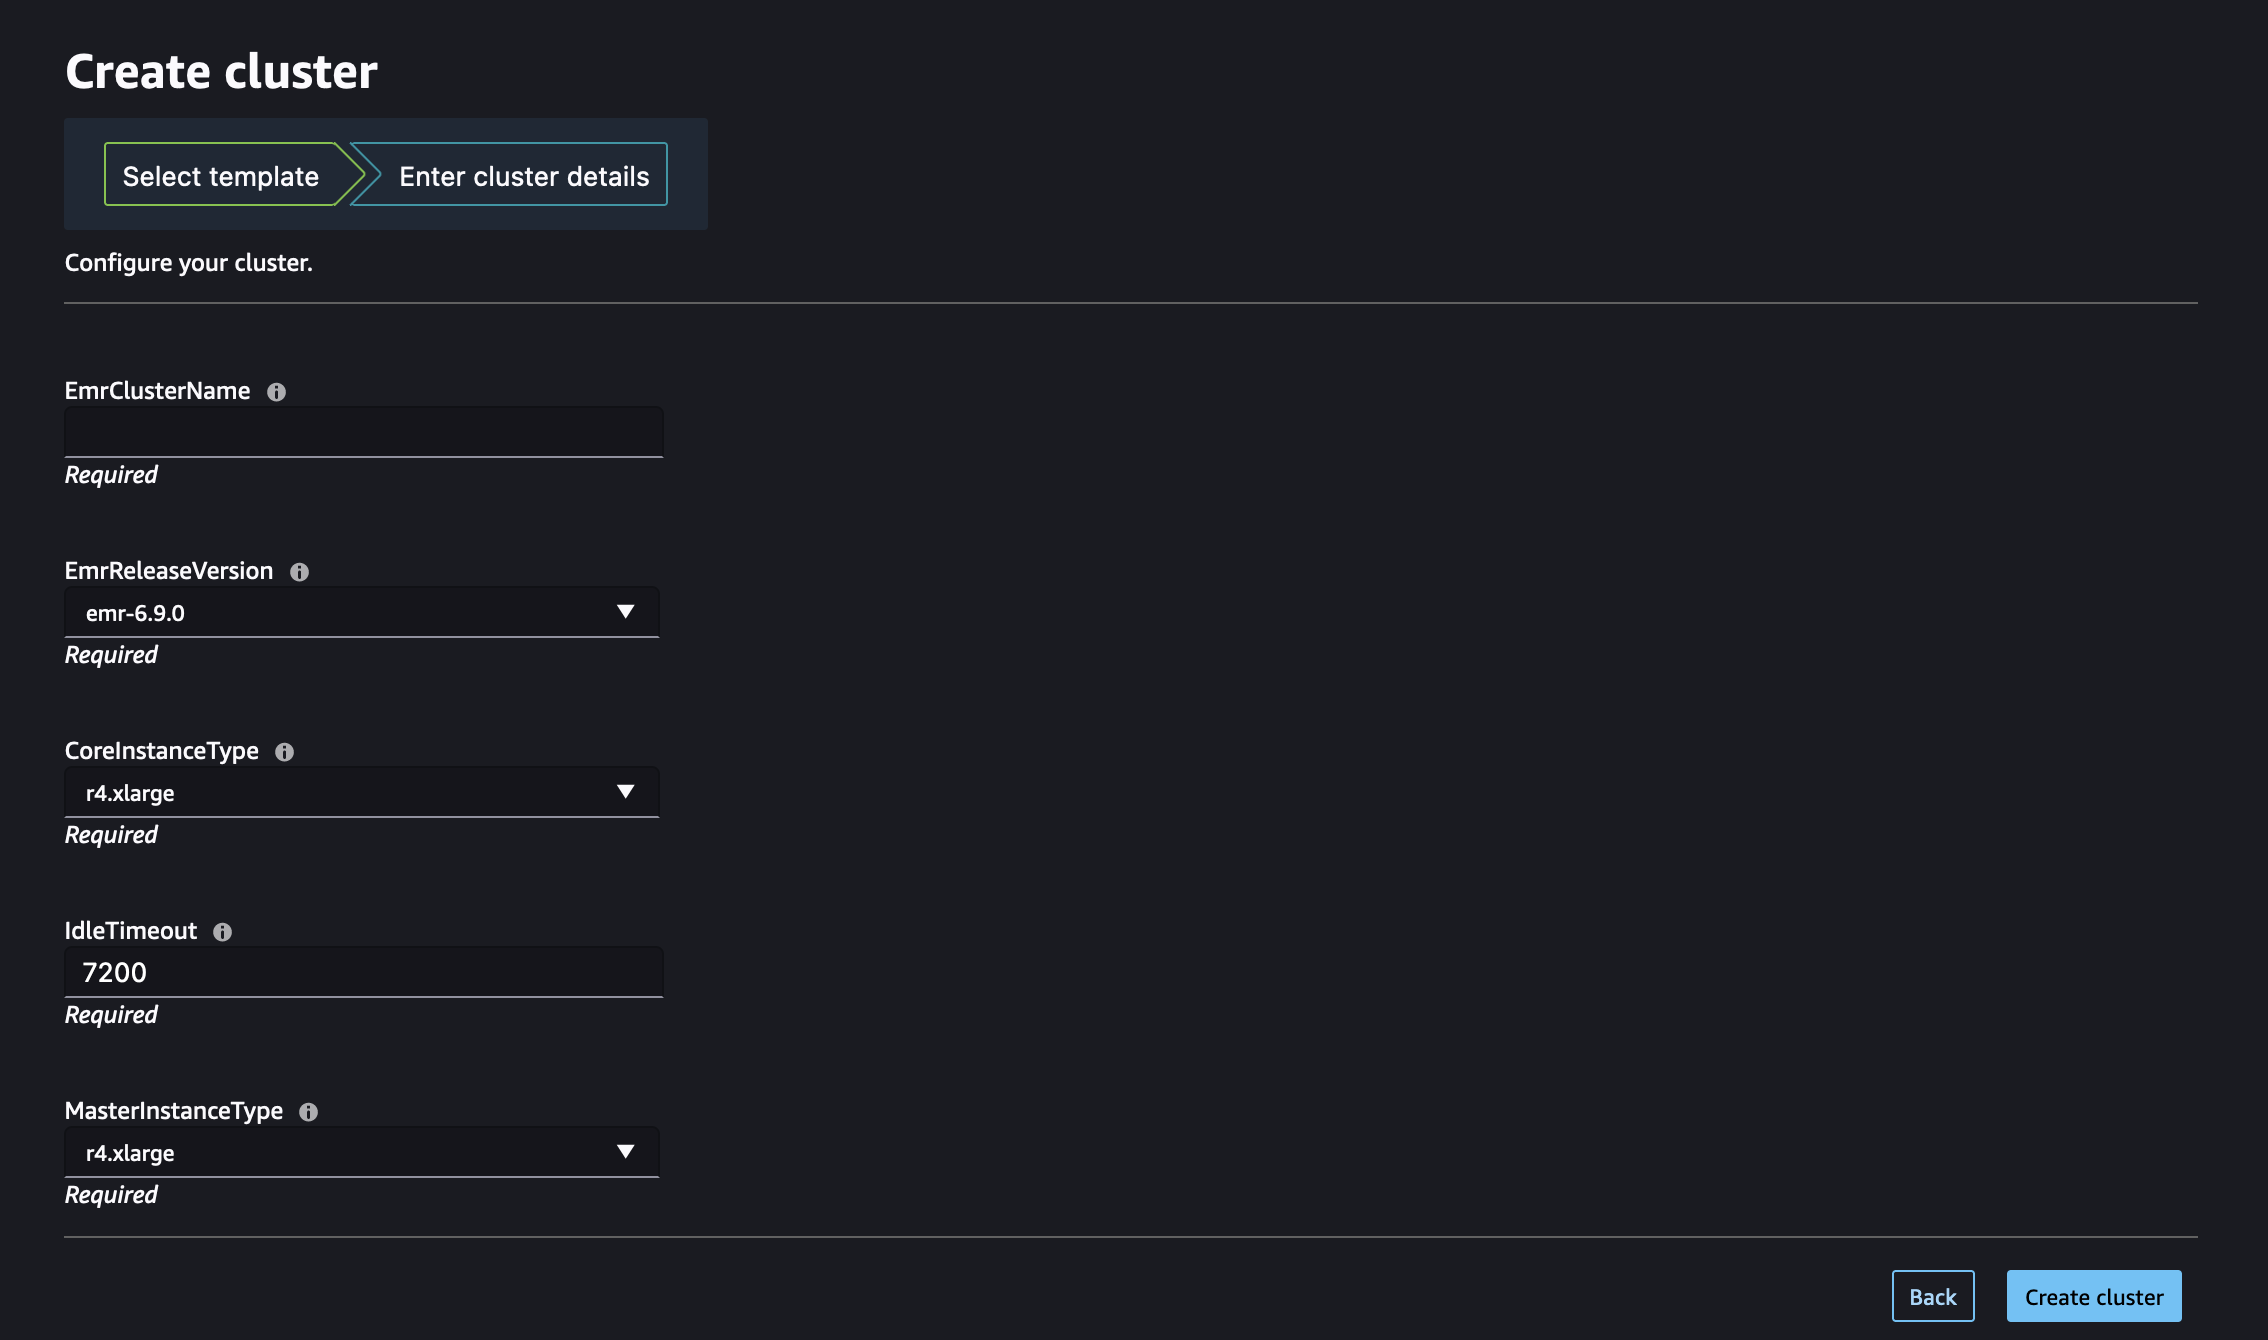
The following example illustrates additional input parameters that administrators can set when creating an Amazon EMR template.
"Parameters": {
    "EmrClusterName": {
      "Type": "String",
      "Description": "EMR cluster Name."
    },
    "MasterInstanceType": {
      "Type": "String",
      "Description": "Instance type of the EMR master node.",
      "Default": "m5.xlarge",
      "AllowedValues": [
        "m5.xlarge",
        "m5.2xlarge",
        "m5.4xlarge"
      ]
    },
    "CoreInstanceType": {
      "Type": "String",
      "Description": "Instance type of the EMR core nodes.",
      "Default": "m5.xlarge",
      "AllowedValues": [
        "m5.xlarge",
        "m5.2xlarge",
        "m5.4xlarge",
        "m3.medium",
        "m3.large",
        "m3.xlarge",
        "m3.2xlarge"
      ]
    },
    "CoreInstanceCount": {
      "Type": "String",
      "Description": "Number of core instances in the EMR cluster.",
      "Default": "2",
      "AllowedValues": [
        "2",
        "5",
        "10"
      ]
    },
    "EmrReleaseVersion": {
      "Type": "String",
      "Description": "The release version of EMR to launch.",
      "Default": "emr-5.33.1",
      "AllowedValues": [
        "emr-5.33.1",
        "emr-6.4.0"
      ]
    }
  }
After administrators have made the Amazon EMR CloudFormation templates available within
Studio, data scientists can use them to self-provision Amazon EMR clusters. The
Parameters section defined in the template translates into input
fields on the cluster creation form within Studio or Studio Classic. For each
parameter, data scientists can either enter a custom value into the input box or
select from the predefined options listed in a dropdown menu, which corresponds to
the AllowedValues specified in the template.
The following illustration shows the dynamic form assembled from a CloudFormation Amazon EMR template to create an Amazon EMR cluster in Studio or Studio Classic.
Visit Launch an Amazon EMR cluster from Studio or Studio Classic to learn about how to launch a cluster from Studio or Studio Classic using those Amazon EMR templates.
Step 4: Set up the permissions to enable listing and launching Amazon EMR clusters from Studio
Last, attach the required IAM permissions to enable listing existing running Amazon EMR clusters and self-provisioning new clusters from Studio or Studio Classic.
The role(s) to which you must add those permissions depends on whether Studio or Studio Classic and Amazon EMR are deployed in the same account (choose Single Account) or in different accounts (choose Cross account).
Important
You can only discover and connect to Amazon EMR clusters for JupyterLab and Studio Classic applications that are launched from private spaces. Ensure that the Amazon EMR clusters are located in the same Amazon region as your Studio environment.
If your Amazon EMR clusters and Studio or Studio Classic are deployed in the same Amazon account, attach the following permissions to the SageMaker AI execution role accessing your cluster.
-
Step 1: Retrieve the ARN of the SageMaker AI execution role used by your private space.
For information on spaces and execution roles in SageMaker AI, see Understanding domain space permissions and execution roles.
For more information about how to retrieve the ARN of SageMaker AI's execution role, see Get your execution role.
-
Step 2: Attach the following permissions to the SageMaker AI execution role accessing your Amazon EMR clusters.
-
Navigate to the IAM console
. -
Choose Roles and then search for your execution role by name in the Search field. The role name is the last part of the ARN, after the last forward slash (/).
-
Follow the link to your role.
-
Choose Add permissions and then Create inline policy.
-
In the JSON tab, add the Amazon EMR permissions allowing Amazon EMR access and operations. For details on the policy document, see List Amazon EMR policies in Reference policies. Replace the
region, andaccountIDwith their actual values before copying the list of statements to the inline policy of your role. -
Choose Next and then provide a Policy name.
-
Choose Create policy.
-
Repeat the Create inline policy step to add another policy granting the execution role the permissions to provision new Amazon EMR clusters using Amazon CloudFormation templates. For details on the policy document, see Create Amazon EMRclusters policies in Reference policies. Replace the
regionandaccountIDwith their actual values before copying the list of statements to the inline policy of your role.
-
Note
Users of role-based access control (RBAC) connectivity to Amazon EMR clusters should also refer to Configure runtime role authentication when your Amazon EMR cluster and Studio are in the same account.
Before you get started, retrieve the ARN of the SageMaker AI execution role used by your private space.
For information on spaces and execution roles in SageMaker AI, see Understanding domain space permissions and execution roles.
For more information about how to retrieve the ARN of SageMaker AI's execution role, see Get your execution role.
If your Amazon EMR clusters and Studio or Studio Classic are deployed in separate Amazon accounts, you configure the permissions on both accounts.
Note
Users of role-based access control (RBAC) connectivity to Amazon EMR clusters should also refer to Configure runtime role authentication when your cluster and Studio are in different accounts.
On the Amazon EMR cluster account
Follow these steps to create the necessary roles and policies on the account where Amazon EMR is deployed, also referred to as the trusting account:
-
Step 1: Retrieve the ARN of the service role of your Amazon EMR cluster.
To learn about how to find the ARN of the service role of a cluster, see Configure IAM service roles for Amazon EMR permissions to Amazon services and resources.
-
Step 2: Create a custom IAM role named
AssumableRolewith the following configuration:-
Permissions: Grant the necessary permissions to
AssumableRoleto allow accessing Amazon EMR resources. This role is also known as an Access role in scenarios involving cross-account access. -
Trust relationship: Configure the trust policy for
AssumableRoleto allow assuming the execution role (TheSageMakerExecutionRolein the cross-account diagram) from the Studio account that requires access.
By assuming the role, Studio or Studio Classic can gain temporary access to the permissions it needs in Amazon EMR.
For detailed instructions on how to create a new
AssumableRolein your Amazon EMR Amazon account, follow these steps:-
Navigate to the IAM console
. -
In the left navigation pane, choose Policy, and then Create policy.
-
In the JSON tab, add the Amazon EMR permissions allowing Amazon EMR access and operations. For details on the policy document, see List Amazon EMR policies in Reference policies. Replace the
region, andaccountIDwith their actual values before copying the list of statements to the inline policy of your role. -
Choose Next and then provide a Policy name.
-
Choose Create policy.
-
In the left navigation pane, choose Roles and then Create role.
-
On the Create role page, choose Custom trust policy as the trusted entity.
-
Paste in the following JSON document in the Custom trust policy section and then choose Next.
-
In the Add permissions page, add the permission you just created and then choose Next.
-
On the Review page, enter a name for the role such as
AssumableRoleand an optional description. -
Review the role details and choose Create role.
For more information about creating a role on an Amazon account, see Creating an IAM role (console).
-
On the Studio account
On the account where Studio is deployed, also referred to as the trusted account, update the SageMaker AI execution role accessing your clusters with the required permissions to access resources in the trusting account.
-
Step 1: Retrieve the ARN of the SageMaker AI execution role used by your private space.
For information on spaces and execution roles in SageMaker AI, see Understanding domain space permissions and execution roles.
For more information about how to retrieve the ARN of SageMaker AI's execution role, see Get your execution role.
-
Step 2: Attach the following permissions to the SageMaker AI execution role accessing your Amazon EMR clusters.
-
Navigate to the IAM console
. -
Choose Roles and then search for your execution role by name in the Search field. The role name is the last part of the ARN, after the last forward slash (/).
-
Follow the link to your role.
-
Choose Add permissions and then Create inline policy.
-
In the JSON tab, add the inline policy granting the role permissions to update the domains, user profiles, and spaces. For details on the policy document, see Domain, user profile, and space update actions policy in Reference policies. Replace the
regionandaccountIDwith their actual values before copying the list of statements to the inline policy of your role. -
Choose Next and then provide a Policy name.
-
Choose Create policy.
-
Repeat the Create inline policy step to add another policy granting the execution role the permissions to assume the
AssumableRoleand then perform actions permitted by the role's access policy. Replaceemr-accountwith the Amazon EMR account ID, andAssumableRolewith the name of the assumable role created in the Amazon EMR account. -
Repeat the Create inline policy step to add another policy granting the execution role the permissions to provision new Amazon EMR clusters using Amazon CloudFormation templates. For details on the policy document, see Create Amazon EMRclusters policies in Reference policies. Replace the
regionandaccountIDwith their actual values before copying the list of statements to the inline policy of your role. -
(Optional) To allow listing Amazon EMR clusters deployed in the same account as Studio, add an additional inline policy to your Studio execution role as defined in List Amazon EMR policies in Reference policies.
-
-
Step 3: Associate your assumable role(s) (access role) with your domain or user profile. JupyterLab users in Studio can use the SageMaker AI console or the provided script.
Choose the tab that corresponds to your use case.