Create an FTP-enabled server
File Transfer Protocol (FTP) is a network protocol used for the transfer of data. FTP uses a separate channel for control and data transfers. The control channel is open until terminated or inactivity timeout. The data channel is active for the duration of the transfer. FTP uses clear text and does not support encryption of traffic.
Note
When you enable FTP, you must choose the internal access option for the VPC-hosted endpoint. If you need your server to have data traverse the public network, you must use secure protocols, such as SFTP or FTPS.
Note
For important considerations about Network Load Balancers, see Avoid placing NLBs and NATs in front of Amazon Transfer Family servers.
To create an FTP-enabled server
-
Open the Amazon Transfer Family console at https://console.amazonaws.cn/transfer/
and select Servers from the navigation pane, then choose Create server. -
In Choose protocols, select FTP, and then choose Next.
-
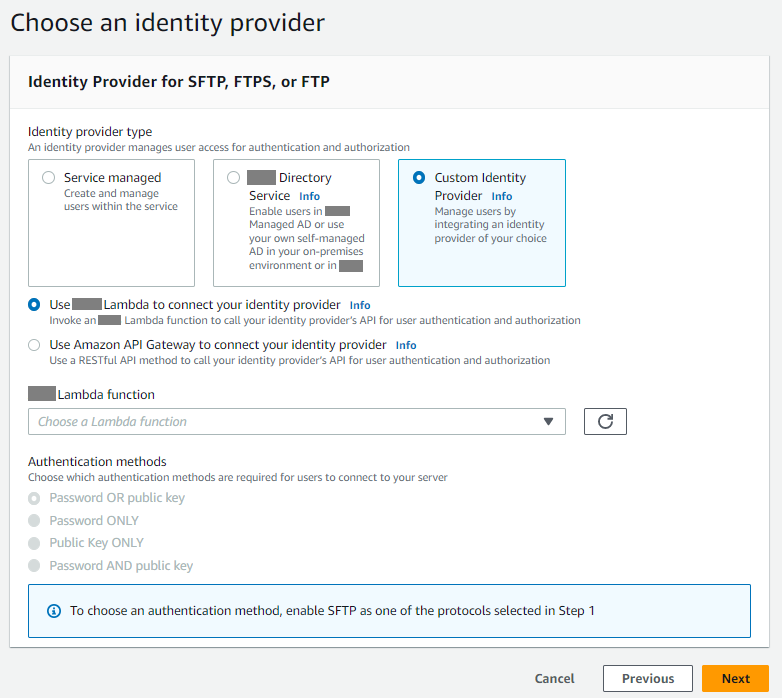
In Choose an identity provider, choose the identity provider that you want to use to manage user access. You have the following options:
-
Amazon Directory Service for Microsoft Active Directory – You provide an Amazon Directory Service directory to access the endpoint. By doing so, you can use credentials stored in your Active Directory to authenticate your users. To learn more about working with Amazon Managed Microsoft AD identity providers, see Using Amazon Directory Service for Microsoft Active Directory.
Note
-
Cross-Account and Shared directories are not supported for Amazon Managed Microsoft AD.
-
To set up a server with Directory Service as your identity provider, you need to add some Amazon Directory Service permissions. For details, see Before you start using Amazon Directory Service for Microsoft Active Directory.
-
-
Custom identity provider – Choose either of the following options:
-
Use Amazon Lambda to connect your identity provider – You can use an existing identity provider, backed by a Lambda function. You provide the name of the Lambda function. For more information, see Using Amazon Lambda to integrate your identity provider.
-
Use Amazon API Gateway to connect your identity provider – You can create an API Gateway method backed by a Lambda function for use as an identity provider. You provide an Amazon API Gateway URL and an invocation role. For more information, see Using Amazon API Gateway to integrate your identity provider.
-
-
-
Choose Next.
-
In Choose an endpoint, do the following:
Note
FTP servers for Transfer Family operate over Port 21 (Control Channel) and Port Range 8192–8200 (Data Channel).
-
For Endpoint type, choose VPC hosted to host your server's endpoint. For information about setting up your VPC hosted endpoint, see Create a server in a virtual private cloud.
Note
Publicly accessible endpoints are not supported.
-
For FIPS Enabled, keep the FIPS Enabled endpoint check box cleared.
Note
FIPS-enabled endpoints are not supported for FTP servers.
-
Choose Next.

-
-
On the Choose domain page, choose the Amazon storage service that you want to use to store and access your data over the selected protocol.
-
Choose Amazon S3 to store and access your files as objects over the selected protocol.
-
Choose Amazon EFS to store and access your files in your Amazon EFS file system over the selected protocol.
Choose Next.
-
-
In Configure additional details, do the following:
-
For logging, specify an existing log group or create a new one (the default option).
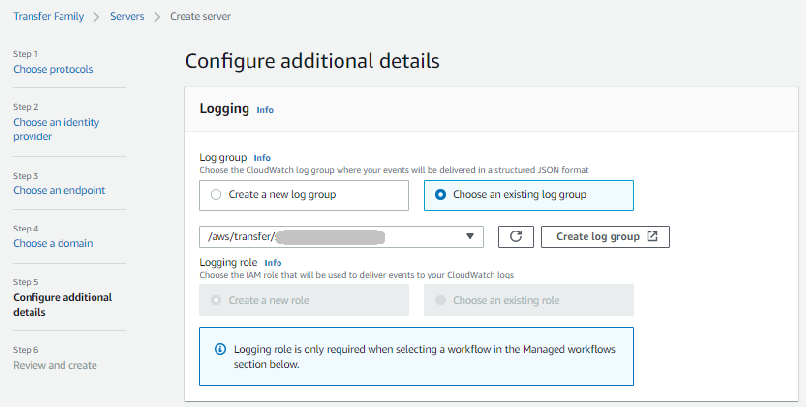
If you choose Create log group, the CloudWatch console (https://console.amazonaws.cn/cloudwatch/
) opens to the Create log group page. For details, see Create a log group in CloudWatch Logs. -
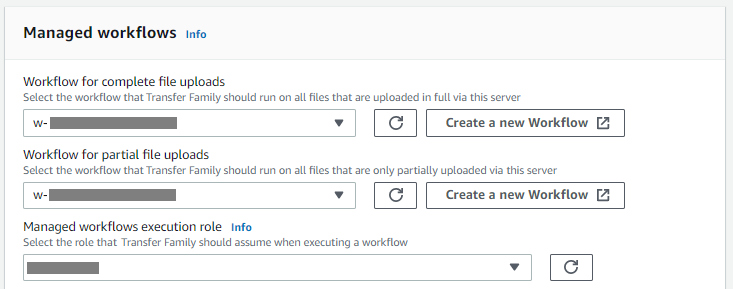
(Optional) For Managed workflows, choose workflow IDs (and a corresponding role) that Transfer Family should assume when executing the workflow. You can choose one workflow to execute upon a complete upload, and another to execute upon a partial upload. To learn more about processing your files by using managed workflows, see Amazon Transfer Family managed workflows.
-
For Cryptographic algorithm options, choose a security policy that contains the cryptographic algorithms enabled for use by your server.
Note
Transfer Family assigns the latest security policy to your FTP server. However, since the FTP protocol doesn't use any encryption, FTP servers do not use any of the security policy algorithms. Unless your server also uses the FTPS or SFTP protocol, the security policy remains unused.
-
For Server Host Key, keep it blank.
-
(Optional) For Tags, for Key and Value, enter one or more tags as key-value pairs, and then choose Add tag.
-
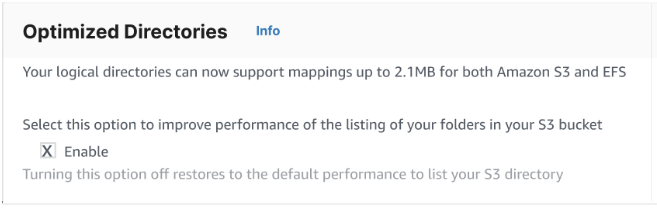
You can optimize performance for your Amazon S3 directories. For example, suppose that you go into your home directory, and you have 10,000 subdirectories. In other words, your Amazon S3 bucket has 10,000 folders. In this scenario, if you run the
ls(list) command, the list operation takes between six and eight minutes. However, if you optimize your directories, this operation takes only a few seconds.When you create your server using the console, optimized directories is enabled by default. If you create your server using the API, this behavior is not enabled by default.
-
Choose Next.
-
(Optional) You can configure Amazon Transfer Family servers to display customized messages such as organizational policies or terms and conditions to your end users. You can also display customized Message of The Day (MOTD) to users who have successfully authenticated.
For Display banner, in the Pre-authentication display banner text box, enter the text message that you want to display to your users before they authenticate, and in the Post-authentication display banner text box, enter the text that you want to display to your users after they successfully authenticate.
-
(Optional) You can configure the following additional options.
-
SetStat option: enable this option to ignore the error that is generated when a client attempts to use
SETSTATon a file you are uploading to an Amazon S3 bucket. For additional details, see theSetStatOptiondocumentation in the ProtocolDetails topic. -
TLS session resumption: provides a mechanism to resume or share a negotiated secret key between the control and data connection for an FTPS session. For additional details, see the
TlsSessionResumptionModedocumentation in the ProtocolDetails topic. -
Passive IP: indicates passive mode, for FTP and FTPS protocols. Enter a single IPv4 address, such as the public IP address of a firewall, router, or load balancer. For additional details, see the
PassiveIpdocumentation in the ProtocolDetails topic.

-
-
-
In Review and create, review your choices.
-
If you want to edit any of them, choose Edit next to the step.
Note
You must review each step after the step that you chose to edit.
-
If you have no changes, choose Create server to create your server. You are taken to the Servers page, shown following, where your new server is listed.
-
It can take a couple of minutes before the status for your new server changes to Online. At that point, your server can perform file operations for your users.
Next steps – For the next step, continue on to Working with custom identity providers to set up users.