Create an SFTP-enabled server
Secure Shell (SSH) File Transfer Protocol (SFTP) is a network protocol used for secure transfer of data over the internet. The protocol supports the full security and authentication functionality of SSH. It's widely used to exchange data, including sensitive information between business partners in a variety of industries such as financial services, healthcare, retail, and advertising.
Note the following
-
SFTP servers for Transfer Family operate over port 22. For VPC-hosted endpoints, SFTP Transfer Family servers can also operate over port 2222, 2223 or 22000. For details, see Create a server in a virtual private cloud.
-
Public endpoints cannot restrict traffic via security groups. To use security groups with your Transfer Family server, you must host your server's endpoint inside a virtual private cloud (VPC) as described in Create a server in a virtual private cloud.
See also
-
We provide an Amazon CDK example for creating an SFTP Transfer Family server. The example uses TypeScript, and is available on GitHub here
. -
For a walkthrough of how to deploy a Transfer Family server inside of a VPC, see Use IP allow list to secure your Amazon Transfer Family servers
.
To create an SFTP-enabled server
-
Open the Amazon Transfer Family console at https://console.amazonaws.cn/transfer/
and select Servers from the navigation pane, then choose Create server. -
In Choose protocols, select SFTP, and then choose Next.
-
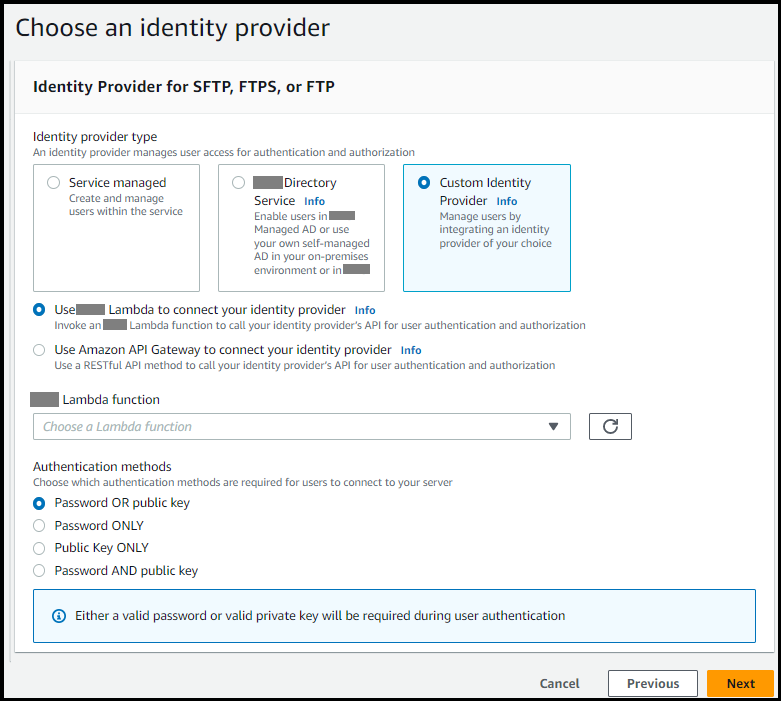
In Choose an identity provider, choose the identity provider that you want to use to manage user access. You have the following options:
-
Service managed – You store user identities and keys in Amazon Transfer Family.
-
Amazon Directory Service for Microsoft Active Directory – You provide an Amazon Directory Service directory to access the endpoint. By doing so, you can use credentials stored in your Active Directory to authenticate your users. To learn more about working with Amazon Managed Microsoft AD identity providers, see Using Amazon Directory Service for Microsoft Active Directory.
Note
-
Cross-Account and Shared directories are not supported for Amazon Managed Microsoft AD.
-
To set up a server with Directory Service as your identity provider, you need to add some Amazon Directory Service permissions. For details, see Before you start using Amazon Directory Service for Microsoft Active Directory.
-
-
Custom identity provider – Choose either of the following options:
-
Use Amazon Lambda to connect your identity provider – You can use an existing identity provider, backed by a Lambda function. You provide the name of the Lambda function. For more information, see Using Amazon Lambda to integrate your identity provider.
-
Use Amazon API Gateway to connect your identity provider – You can create an API Gateway method backed by a Lambda function for use as an identity provider. You provide an Amazon API Gateway URL and an invocation role. For more information, see Using Amazon API Gateway to integrate your identity provider.
-
-
-
Choose Next.
-
In Choose an endpoint, do the following:
-
For Endpoint type, choose the Publicly accessible endpoint type. For a VPC hosted endpoint, see Create a server in a virtual private cloud.
-
For IP address type, choose IPv4 (default) for backwards compatibility or Dual-stack to enable both IPv4 and IPv6 connections to your endpoint.
Note
Dual-stack mode allows your Transfer Family endpoint to communicate with both IPv4 and IPv6 enabled clients. This enables you to gradually transition from IPv4 to IPv6 based systems without needing to switch all at once.
-
(Optional) For Custom hostname, choose None.
You get a server hostname provided by Amazon Transfer Family. The server hostname takes the form
serverId.server.transfer.regionId.amazonaws.comFor a custom hostname, you specify a custom alias for your server endpoint. To learn more about working with custom hostnames, see Working with custom hostnames.
-
(Optional) For FIPS Enabled, select the FIPS Enabled endpoint check box to ensure that the endpoint complies with Federal Information Processing Standards (FIPS).
Note
FIPS-enabled endpoints are only available in North American Amazon Regions. For available Regions, see Amazon Transfer Family endpoints and quotas in the Amazon Web Services General Reference. For more information about FIPS, see Federal Information Processing Standard (FIPS) 140-2
. -
Choose Next.
-
-
On the Choose domain page, choose the Amazon storage service that you want to use to store and access your data over the selected protocol:
-
Choose Amazon S3 to store and access your files as objects over the selected protocol.
-
Choose Amazon EFS to store and access your files in your Amazon EFS file system over the selected protocol.
Choose Next.
-
-
In Configure additional details, do the following:
-
For logging, specify an existing log group or create a new one (the default option). If you choose an existing log group, you must select one that is associated with your Amazon Web Services account.
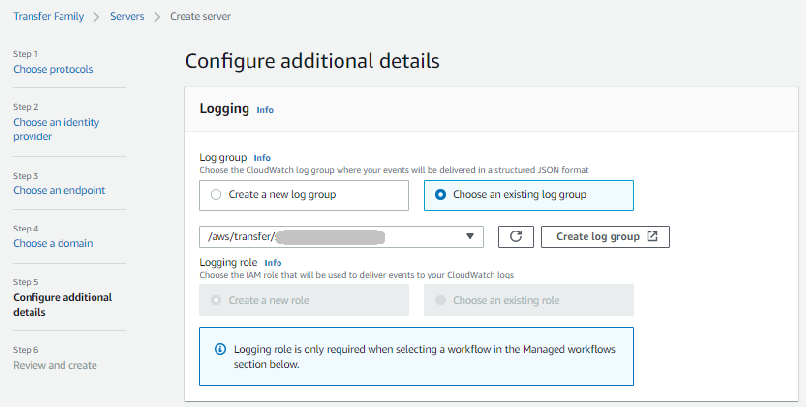
If you choose Create log group, the CloudWatch console (https://console.amazonaws.cn/cloudwatch/
) opens to the Create log group page. For details, see Create a log group in CloudWatch Logs. -
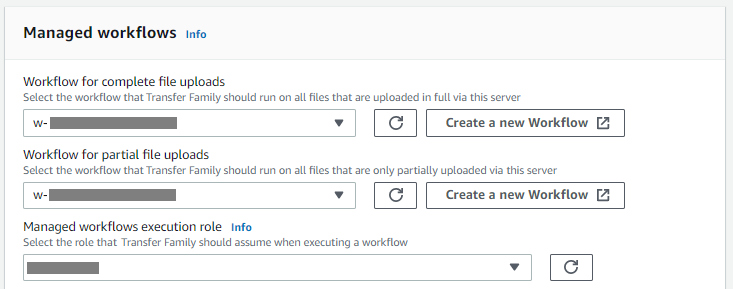
(Optional) For Managed workflows, choose workflow IDs (and a corresponding role) that Transfer Family should assume when executing the workflow. You can choose one workflow to execute upon a complete upload, and another to execute upon a partial upload. To learn more about processing your files by using managed workflows, see Amazon Transfer Family managed workflows.
-
For Cryptographic algorithm options, choose a security policy that contains the cryptographic algorithms enabled for use by your server. Our latest security policy is the default: for details, see Security policies for Amazon Transfer Family servers.
-
(Optional) For Server Host Key, enter an RSA, ED25519, or ECDSA private key that will be used to identify your server when clients connect to it over SFTP. You can also add a description to differentiate among multiple host keys.
After you create your server, you can add additional host keys. Having multiple host keys is useful if you want to rotate keys or if you want to have different types of keys, such as an RSA key and also an ECDSA key.
Note
The Server Host Key section is used only for migrating users from an existing SFTP-enabled server.
-
(Optional) For Tags, for Key and Value, enter one or more tags as key-value pairs, and then choose Add tag.
-
Choose Next.
-
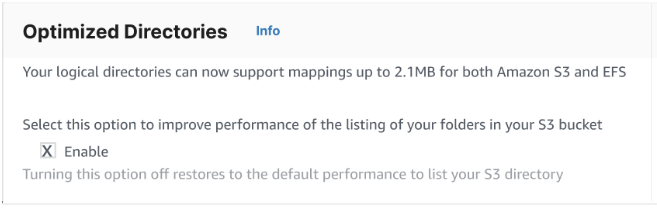
You can optimize performance for your Amazon S3 directories. For example, suppose that you go into your home directory, and you have 10,000 subdirectories. In other words, your Amazon S3 bucket has 10,000 folders. In this scenario, if you run the
ls(list) command, the list operation takes between six and eight minutes. However, if you optimize your directories, this operation takes only a few seconds.When you create your server using the console, optimized directories is enabled by default. If you create your server using the API, this behavior is not enabled by default.
-
(Optional) Configure Amazon Transfer Family servers to display customized messages such as organizational policies or terms and conditions to your end users. For Display banner, in the Pre-authentication display banner text box, enter the text message that you want to display to your users before they authenticate.
-
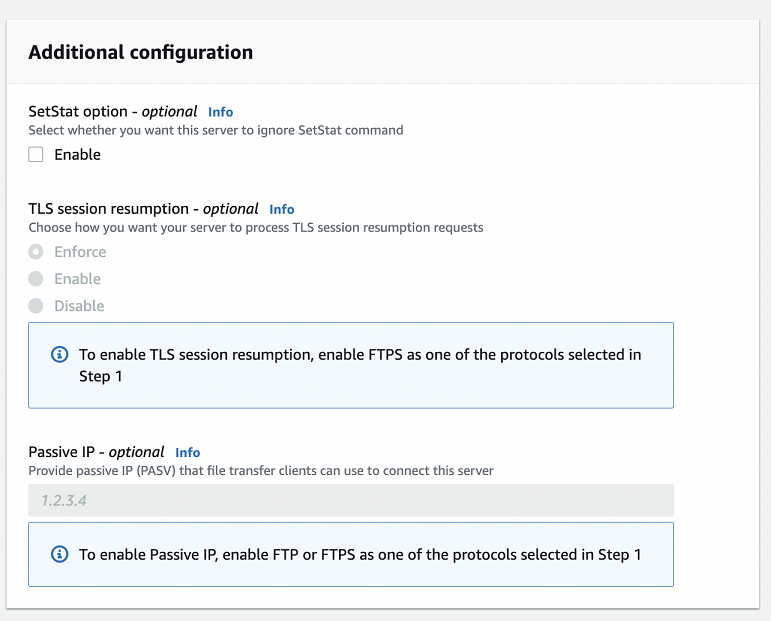
(Optional) You can configure the following additional options.
-
SetStat option: enable this option to ignore the error that is generated when a client attempts to use
SETSTATon a file you are uploading to an Amazon S3 bucket. For additional details, see theSetStatOptiondocumentation in the ProtocolDetails. -
TLS session resumption: this option is only available if you have enabled FTPS as one of the protocols for this server.
-
Passive IP: this option is only available if you have enabled FTPS or FTP as one of the protocols for this server.
-
-
-
In Review and create, review your choices.
-
If you want to edit any of them, choose Edit next to the step.
Note
You must review each step after the step that you chose to edit.
-
If you have no changes, choose Create server to create your server. You are taken to the Servers page, shown following, where your new server is listed.
-
It can take a couple of minutes before the status for your new server changes to Online. At that point, your server can perform file operations, but you'll need to create a user first. For details on creating users, see Managing users for server endpoints.