Getting started with the Scorekeep sample application
Note
X-Ray SDK/Daemon Maintenance Notice – On February 25th, 2026, the Amazon X-Ray SDKs/Daemon will enter maintenance mode, where Amazon will limit X-Ray SDK and Daemon releases to address security issues only. For more information on the support timeline, see X-Ray SDK and Daemon Support timeline. We recommend to migrate to OpenTelemetry. For more information on migrating to OpenTelemetry, see Migrating from X-Ray instrumentation to OpenTelemetry instrumentation .
This tutorial uses the xray-gettingstarted branch of the Scorekeep sample application, which uses Amazon CloudFormation to create and
configure the resources that run the sample application and X-Ray daemon on Amazon ECS. The
application uses the Spring framework to implement a JSON web API and the Amazon SDK for Java to persist
data to Amazon DynamoDB. A servlet filter in the application instruments all incoming requests served
by the application, and a request handler on the Amazon SDK client instruments downstream calls
to DynamoDB.
You can follow this tutorial using either the Amazon Web Services Management Console or the Amazon CLI.
Sections
Prerequisites
This tutorial uses Amazon CloudFormation to create and configure the resources that run the sample application and X-Ray daemon. The following prerequisites are required to install and run through the tutorial:
-
If you use an IAM user with limited permissions, add the following user policies in the IAM console
: -
AWSCloudFormationFullAccess– to access and use CloudFormation -
AmazonS3FullAccess– to upload a template file to CloudFormation using the Amazon Web Services Management Console -
IAMFullAccess– to create the Amazon ECS and Amazon EC2 instance roles -
AmazonEC2FullAccess– to create the Amazon EC2 resources -
AmazonDynamoDBFullAccess– to create the DynamoDB tables -
AmazonECS_FullAccess– to create Amazon ECS resources -
AmazonSNSFullAccess– to create the Amazon SNS topic -
AWSXrayReadOnlyAccess– for permission to view the trace map and traces in the X-Ray console
-
-
To run through the tutorial using the Amazon CLI, install the CLI version 2.7.9 or later, and configure the CLI with the user from the previous step. Make sure the region is configured when configuring the Amazon CLI with the user. If a region is not configured, you will need to append
--regionto every CLI command.AWS-REGION -
Ensure that Git
is installed, in order to clone the sample application repo. -
Use the following code example to clone the
xray-gettingstartedbranch of the Scorekeep repository:git clone https://github.com/aws-samples/eb-java-scorekeep.git xray-scorekeep -b xray-gettingstarted
Install the Scorekeep application using CloudFormation
Generate trace data
The sample application includes a front-end web app. Use the web app to generate traffic to the API and send trace data to X-Ray. First, retrieve the web app URL using the Amazon Web Services Management Console or the Amazon CLI:
Use the web application to generate trace data
-
Choose Create to create a user and session.
-
Type a game name, set the Rules to Tic Tac Toe, and then choose Create to create a game.
-
Choose Play to start the game.
-
Choose a tile to make a move and change the game state.
Each of these steps generates HTTP requests to the API, and downstream calls to DynamoDB to read and write user, session, game, move, and state data.
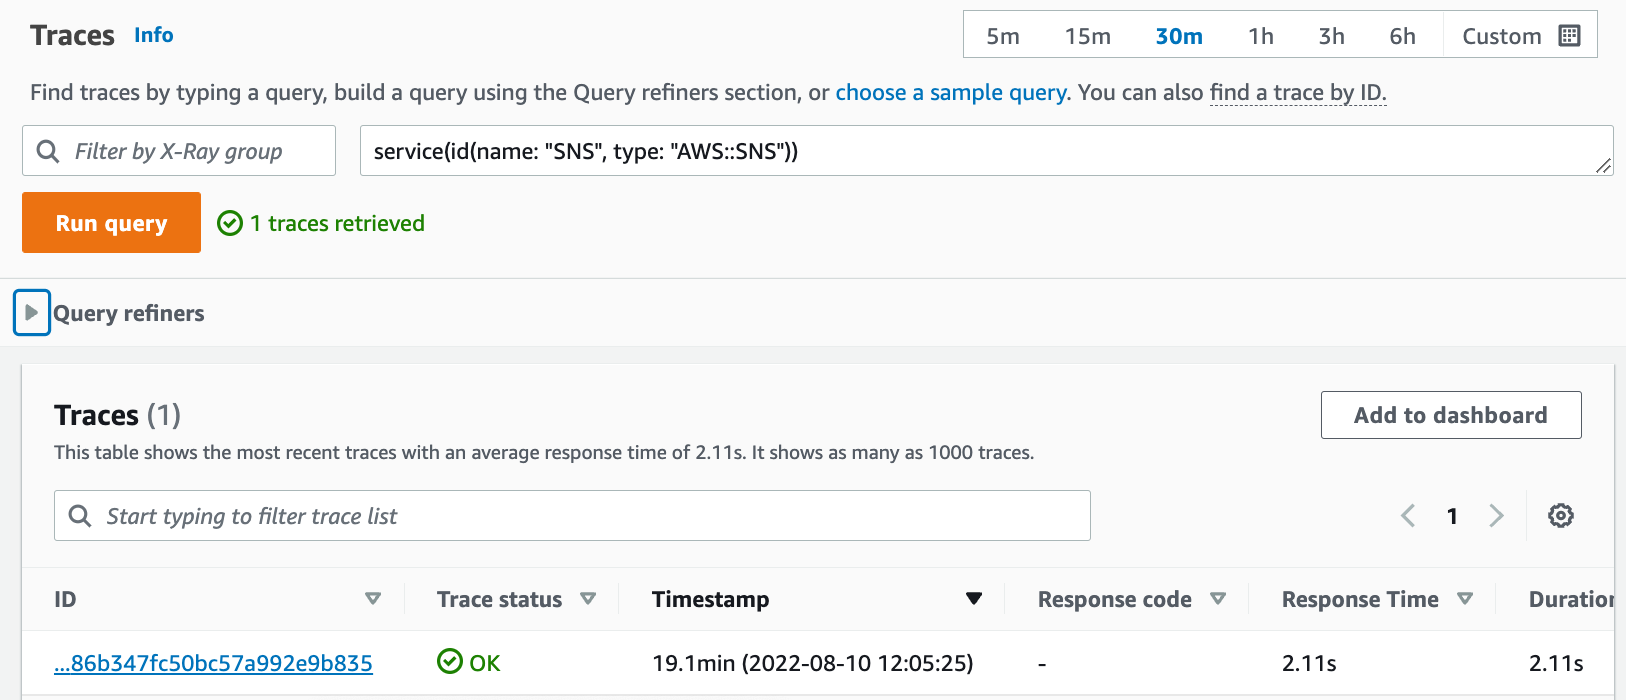
View the trace map in the Amazon Web Services Management Console
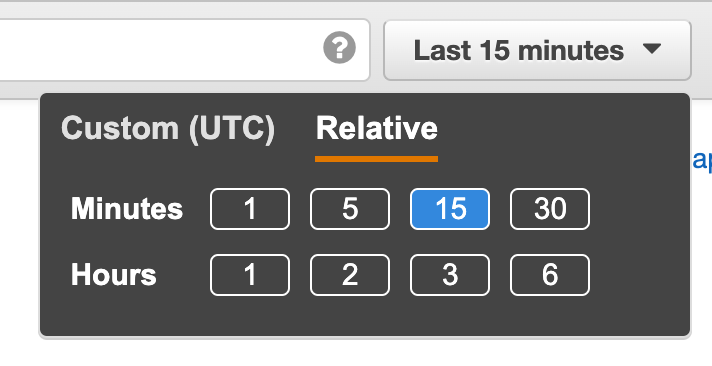
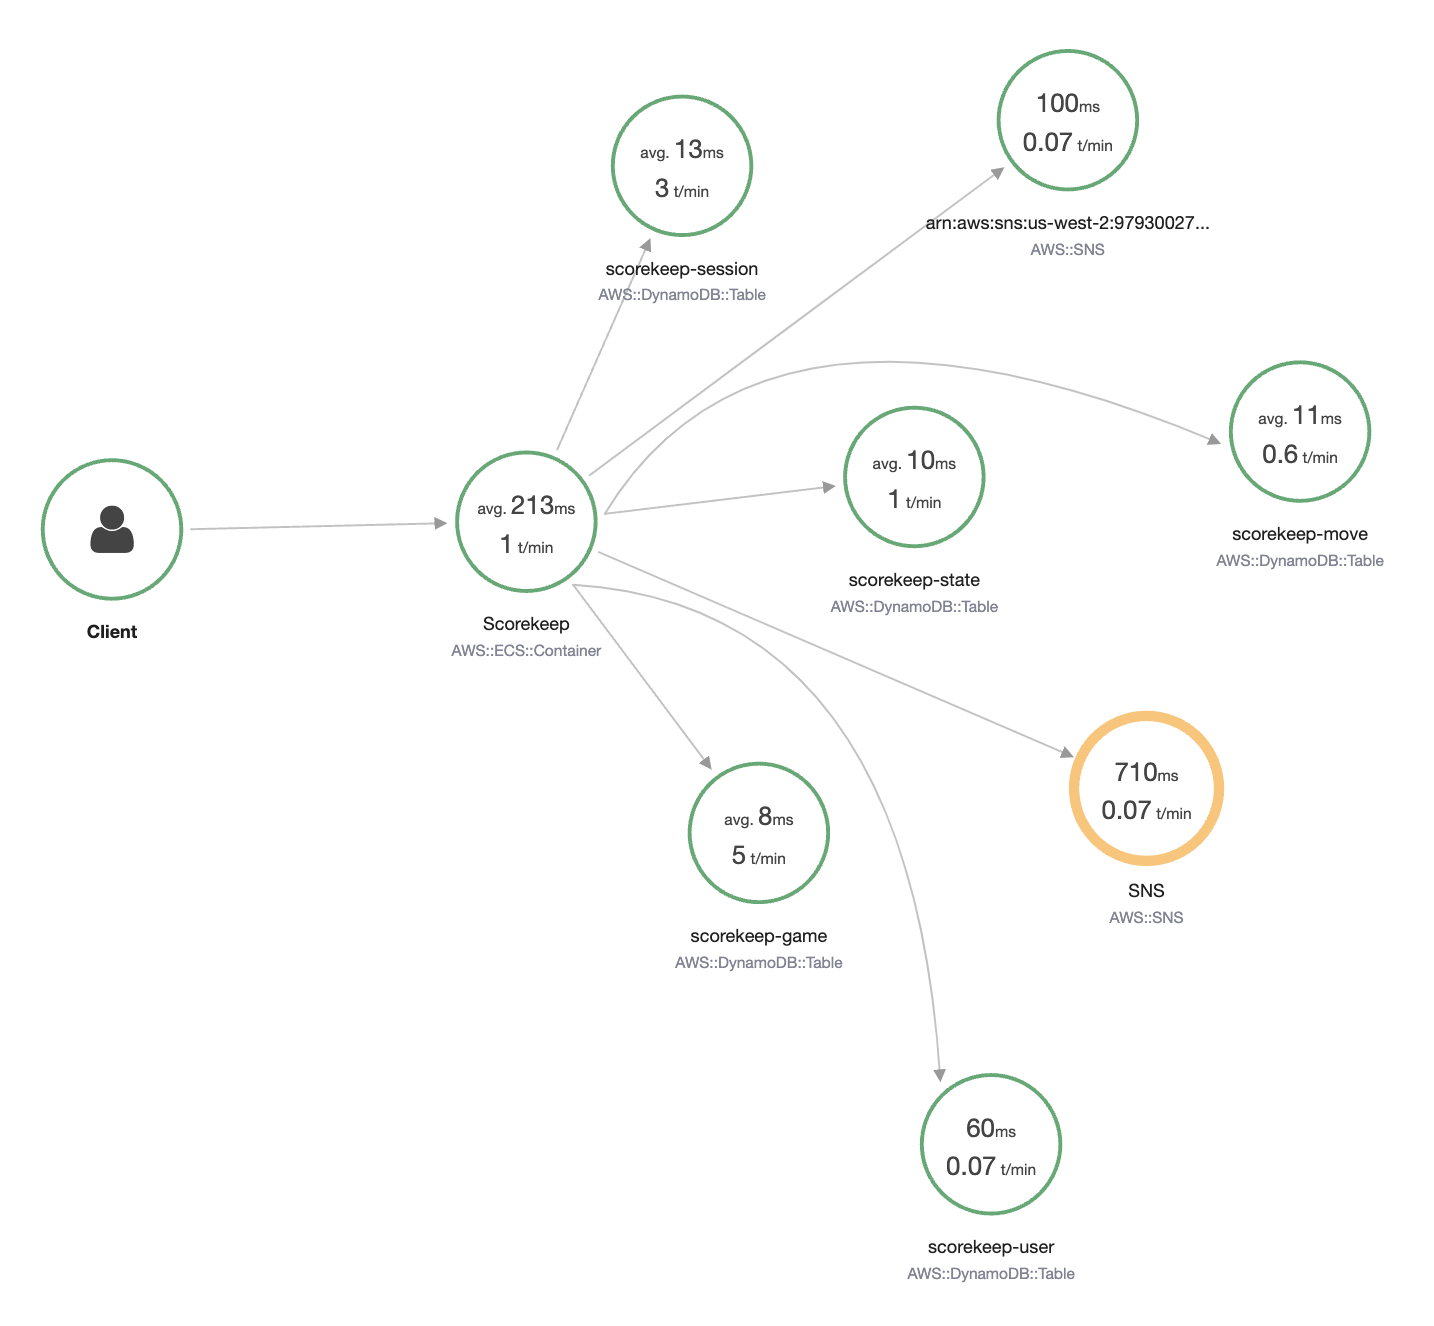
You can see the trace map and traces generated by the sample application in the X-Ray and CloudWatch consoles.
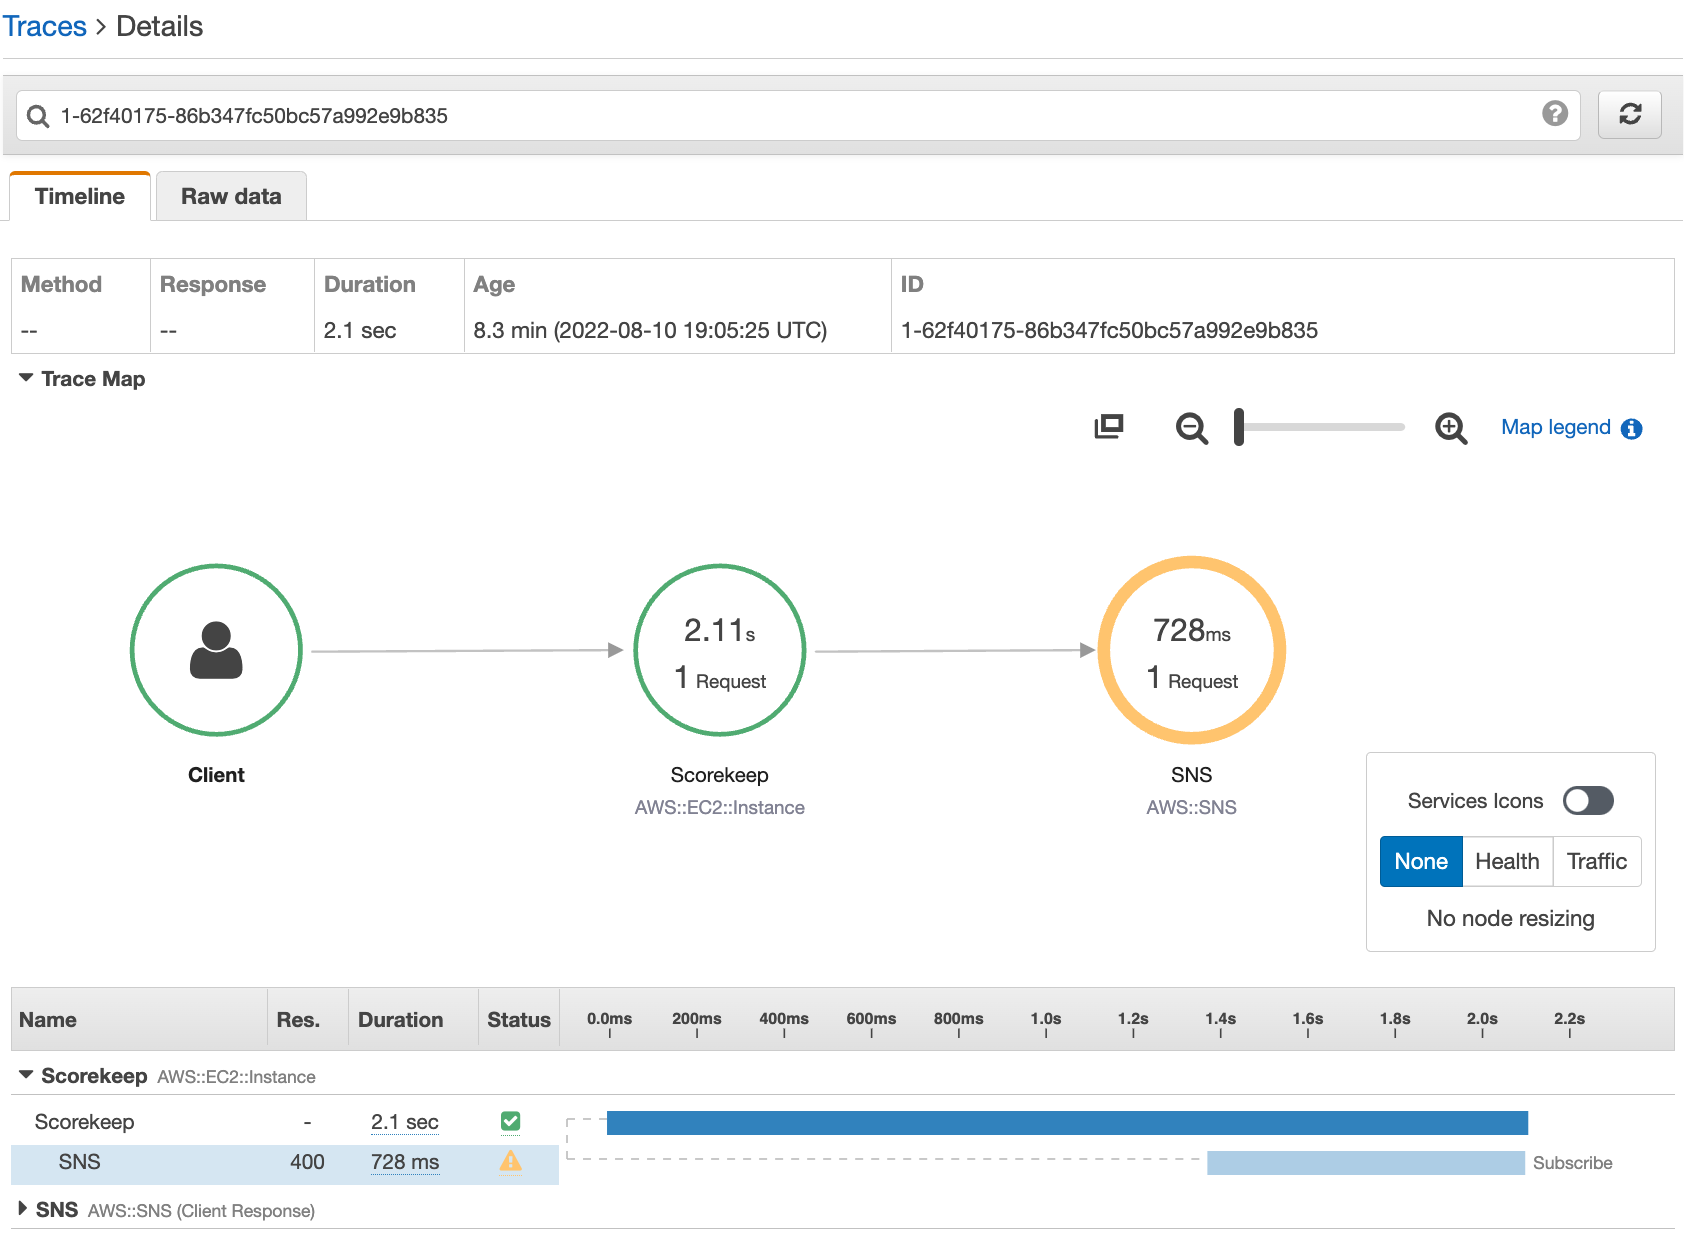
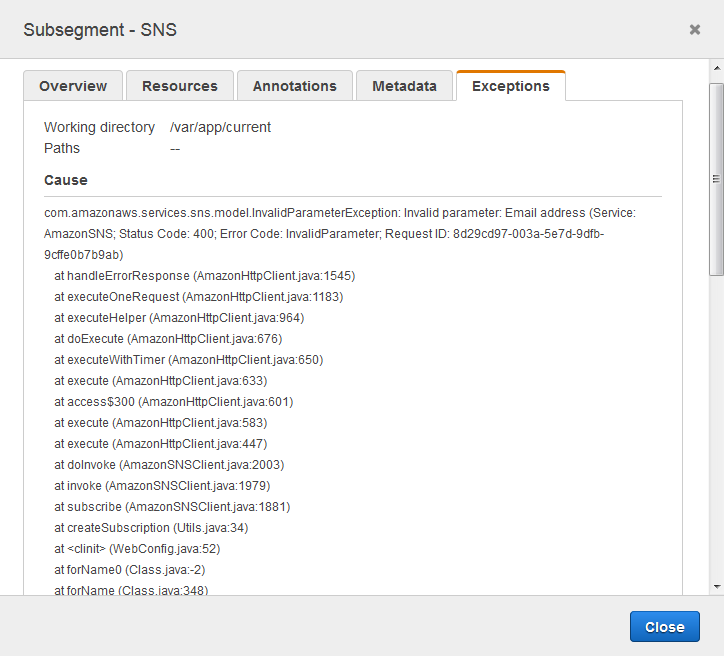


The cause indicates that the email address provided in a call to
createSubscription made in the WebConfig class was invalid. In the
next section, we'll fix that.
Configuring Amazon SNS notifications
Scorekeep uses Amazon SNS to send notifications when users complete a game. When the application starts up, it tries to create a subscription for an email address defined in a CloudFormation stack parameter. That call is currently failing. Configure a notification email to enable notifications, and resolve the failures highlighted in the trace map.

When the update completes, Scorekeep restarts and creates a subscription to the SNS topic. Check your email and confirm the subscription to see updates when you complete a game. Open the trace map to verify that the calls to SNS are no longer failing.
Explore the sample application
The sample application is an HTTP web API in Java that is configured to use the X-Ray SDK for Java. When you deploy the application with the CloudFormation template, it creates the DynamoDB tables, Amazon ECS Cluster, and other services required to run Scorekeep on ECS. A task definition file for ECS is created through CloudFormation. This file defines the container images used per task in an ECS cluster. These images are obtained from the official X-Ray public ECR. The scorekeep API container image has the API compiled with Gradle. The container image of the Scorekeep frontend container serves the frontend using the nginx proxy server. This server routes requests to paths starting with /api to the API.
To instrument incoming HTTP requests, the application adds the TracingFilter
provided by the SDK.
Example src/main/java/scorekeep/WebConfig.java - servlet filter
import javax.servlet.Filter;
import com.amazonaws.xray.javax.servlet.AWSXRayServletFilter;
...

@Configuration
public class WebConfig {

  @Bean
  public Filter TracingFilter() {
    return new AWSXRayServletFilter("Scorekeep");
  }
...
This filter sends trace data about all incoming requests that the application serves, including request URL, method, response status, start time, and end time.
The application also makes downstream calls to DynamoDB using the Amazon SDK for Java. To instrument these calls, the application simply takes the Amazon SDK-related submodules as dependencies, and the X-Ray SDK for Java automatically instruments all Amazon SDK clients.
The application uses Docker to build the source code on-instance with
the Gradle Docker Image and the Scorekeep API Dockerfile
file to run the executable JAR that Gradle generates at its ENTRYPOINT.
Example use of Docker to build via Gradle Docker Image
docker run --rm -v /PATH/TO/SCOREKEEP_REPO/home/gradle/project -w /home/gradle/project gradle:4.3 gradle buildExample Dockerfile ENTRYPOINT
ENTRYPOINT [ "sh", "-c", "java -Dserver.port=5000 -jar scorekeep-api-1.0.0.jar" ]The build.gradle file downloads the SDK submodules from Maven during
compilation by declaring them as dependencies.
Example build.gradle -- dependencies
...
dependencies {
    compile("org.springframework.boot:spring-boot-starter-web")
    testCompile('org.springframework.boot:spring-boot-starter-test')
    compile('com.amazonaws:aws-java-sdk-dynamodb')
    compile("com.amazonaws:aws-xray-recorder-sdk-core")
    compile("com.amazonaws:aws-xray-recorder-sdk-aws-sdk")
    compile("com.amazonaws:aws-xray-recorder-sdk-aws-sdk-instrumentor")
    ...
}
dependencyManagement {
    imports {
        mavenBom("com.amazonaws:aws-java-sdk-bom:1.11.67")
        mavenBom("com.amazonaws:aws-xray-recorder-sdk-bom:2.11.0")
    }
}
The core, Amazon SDK, and Amazon SDK Instrumentor submodules are all that's required to automatically instrument any downstream calls made with the Amazon SDK.
To relay the raw segment data to the X-Ray API, the X-Ray daemon is required to listen for traffic on UDP port 2000. To do so, the application has the X-Ray daemon run in a container that is deployed alongside the Scorekeep application on ECS as a sidecar container. Check out the X-Ray daemon topic for more information.
Example X-Ray Daemon Container Definition in an ECS Task Definition
...
Resources:
  ScorekeepTaskDefinition:
    Type: AWS::ECS::TaskDefinition
    Properties:
      ContainerDefinitions:
      ...

      - Cpu: '256'
        Essential: true
        Image: amazon/aws-xray-daemon
        MemoryReservation: '128'
        Name: xray-daemon
        PortMappings:
          - ContainerPort: '2000'
            HostPort: '2000'
            Protocol: udp
      ...
The X-Ray SDK for Java provides a class named AWSXRay that provides the global
recorder, a TracingHandler that you can use to instrument your code. You can
configure the global recorder to customize the AWSXRayServletFilter that creates
segments for incoming HTTP calls. The sample includes a static block in the
WebConfig class that configures the global recorder with plugins and sampling
rules.
Example src/main/java/scorekeep/WebConfig.java - recorder
import com.amazonaws.xray.AWSXRay;
import com.amazonaws.xray.AWSXRayRecorderBuilder;
import com.amazonaws.xray.javax.servlet.AWSXRayServletFilter;
import com.amazonaws.xray.plugins.ECSPlugin;
import com.amazonaws.xray.plugins.EC2Plugin;
import com.amazonaws.xray.strategy.sampling.LocalizedSamplingStrategy;
...

@Configuration
public class WebConfig {
  ...

  static {
    AWSXRayRecorderBuilder builder = AWSXRayRecorderBuilder.standard().withPlugin(new ECSPlugin()).withPlugin(new EC2Plugin());

    URL ruleFile = WebConfig.class.getResource("/sampling-rules.json");
    builder.withSamplingStrategy(new LocalizedSamplingStrategy(ruleFile));

    AWSXRay.setGlobalRecorder(builder.build());
    ...

  }
}
This example uses the builder to load sampling rules from a file named
sampling-rules.json. Sampling rules determine the rate at which the SDK
records segments for incoming requests.
Example src/main/java/resources/sampling-rules.json
{
  "version": 1,
  "rules": [
    {
      "description": "Resource creation.",
      "service_name": "*",
      "http_method": "POST",
      "url_path": "/api/*",
      "fixed_target": 1,
      "rate": 1.0
    },
    {
      "description": "Session polling.",
      "service_name": "*",
      "http_method": "GET",
      "url_path": "/api/session/*",
      "fixed_target": 0,
      "rate": 0.05
    },
    {
      "description": "Game polling.",
      "service_name": "*",
      "http_method": "GET",
      "url_path": "/api/game/*/*",
      "fixed_target": 0,
      "rate": 0.05
    },
    {
      "description": "State polling.",
      "service_name": "*",
      "http_method": "GET",
      "url_path": "/api/state/*/*/*",
      "fixed_target": 0,
      "rate": 0.05
    }
  ],
  "default": {
    "fixed_target": 1,
    "rate": 0.1
  }
}
The sampling rules file defines four custom sampling rules and the default rule. For each incoming request, the SDK evaluates the custom rules in the order in which they are defined. The SDK applies the first rule that matches the request's method, path, and service name. For Scorekeep, the first rule catches all POST requests (resource creation calls) by applying a fixed target of one request per second and a rate of 1.0, or 100 percent of requests after the fixed target is satisfied.
The other three custom rules apply a five percent rate with no fixed target to session, game, and state reads (GET requests). This minimizes the number of traces for periodic calls that the front end makes automatically every few seconds to ensure the content is up to date. For all other requests, the file defines a default rate of one request per second and a rate of 10 percent.
The sample application also shows how to use advanced features such as manual SDK client instrumentation, creating additional subsegments, and outgoing HTTP calls. For more information, see Amazon X-Ray sample application.
Optional: Least privilege policy
The Scorekeep ECS containers access resources using full access policies, such as
AmazonSNSFullAccess and AmazonDynamoDBFullAccess. Using full
access policies is not the best practice for production applications. The following example
updates the DynamoDB IAM policy to improve the security of the application. To learn more about
security best practices in IAM policies, see Identity and
access management for Amazon X-Ray.
Example cf-resources.yaml template ECSTaskRole definition
ECSTaskRole:
    Type: AWS::IAM::Role
    Properties:
      AssumeRolePolicyDocument:
        Version: "2012-10-17"
        Statement:
          -
            Effect: "Allow"
            Principal:
              Service:
                - "ecs-tasks.amazonaws.com"
            Action:
              - "sts:AssumeRole"
      ManagedPolicyArns:
        - "arn:aws:iam::aws:policy/AmazonDynamoDBFullAccess"
        - "arn:aws:iam::aws:policy/AmazonSNSFullAccess"
        - "arn:aws:iam::aws:policy/AWSXrayFullAccess"
      RoleName: "scorekeepRole"
To update your policy, first you identify the ARN of your DynamoDB resources. Then you use the ARN in a custom IAM policy. Finally, you apply that policy to your instance profile.
To identify the ARN of your DynamoDB resource:
-
Open the DynamoDB console
. -
Choose Tables from the left navigation bar.
-
Choose any of the
scorekeep-*to display the table detail page. -
Under the Overview tab, choose Additional info to expand the section and view the Amazon Resource Name (ARN). Copy this value.
-
Insert the ARN into the following IAM policy, replacing the
AWS_REGIONandAWS_ACCOUNT_IDvalues with your specific region and account ID. This new policy allows only the actions specified, instead of theAmazonDynamoDBFullAccesspolicy which allows any action.Example
The tables that the application creates follow a consistent naming convention. You can use the
scorekeep-*format to indicate all Scorekeep tables.
Change your IAM policy
-
Open the Scorekeep task role (scorekeepRole)
from the IAM console. -
Choose the check box next to the
AmazonDynamoDBFullAccesspolicy and choose Remove to remove this policy. -
Choose Add permissions, and then Attach policies, and finally Create policy.
-
Choose the JSON tab and paste in the policy created above.
-
Choose Next: Tags at the bottom of the page.
-
Choose Next: Review at the bottom of the page.
-
For Name, assign a name for the policy.
-
Choose Create policy at the bottom of the page.
-
Attach the newly created policy to the
scorekeepRolerole. It may take a few minutes for the attached policy to take effect.
If you have attached the new policy to the scorekeepRole role, you must
detach it before deleting the CloudFormation stack, since this attached policy will block the
stack from being deleted. The policy can be automatically detached by deleting the
policy.
Remove your custom IAM policy
-
Open the IAM console
. -
Choose Policies from the left navigation bar.
-
Search for the custom policy name you created earlier in this section, and choose the radio button next to the policy name to highlight it.
-
Choose the Actions drop-down and then choose Delete.
-
Type the name of the custom policy and then choose Delete to confirm deletion . This will automatically detach the policy from the
scorekeepRolerole.
Clean up
Follow these steps to delete the Scorekeep application resources:
Note
If you created and attached custom policies using the prior section of this tutorial,
you must remove the policy from the scorekeepRole before deleting the
CloudFormation stack.
Next steps
Learn more about X-Ray in the next chapter, Amazon X-Ray concepts.
To instrument your own app, learn more about the X-Ray SDK for Java or one of the other X-Ray SDKs:
-
X-Ray SDK for Java – Amazon X-Ray SDK for Java
-
X-Ray SDK for Node.js – Amazon X-Ray SDK for Node.js
-
X-Ray SDK for .NET – Amazon X-Ray SDK for .NET
To run the X-Ray daemon locally or on Amazon, see Amazon X-Ray daemon.
To contribute to the sample application on GitHub, see eb-java-scorekeep