本文属于机器翻译版本。若本译文内容与英语原文存在差异,则一律以英文原文为准。
使用 Amazon S3 配置 Amazon DataSync 传输
要将数据传输到您的 Amazon S3 存储桶或从中传输数据,您需要创建一个 Amazon DataSync 传输位置。 DataSync 可以将此位置用作传输数据的源或目的地。
提供 DataSync 对 S3 存储桶的访问权限
DataSync 需要访问您要传入或传出的 S3 存储桶。为此,您必须创建一个具有访问存储桶所需权限的 Amazon Identity and Access Management (IAM) 角色。 DataSync 然后,您可以在为创建 Amazon S3 营业地点时指定此角色 DataSync。
所需的权限
您的 IAM 角色所需的权限可能取决于存储桶是 DataSync 源位置还是目标位置。Outposts 上的 Amazon S3 需要一组不同的权限。
为创建 IAM 角色 DataSync 以访问您的 Amazon S3 位置
在控制台中创建您的 Amazon S3 位置时, DataSync 可以自动创建并代入一个 IAM 角色,该角色通常具有访问您的 S3 存储桶的正确权限。
在某些情况下,您可能需要手动创建此角色(例如,访问具有额外安全层的存储分区,或者在其他存储桶中向存储桶传送或从存储桶传出 Amazon Web Services 账户)。
使用 https://console.aws.amazon.com/iam/
打开 IAM 控制台。 -
在左侧导航窗格的访问管理下,选择角色,然后选择创建角色。
-
在选择可信实体页面中,为可信实体类型选择 Amazon Web Services 服务。
-
对于 “用例”,DataSync在下拉列表中进行选择,然后选择DataSync。选择下一步。
-
在添加权限页面上,选择下一步。输入角色名称,然后选择创建角色。
-
在角色页面上,搜索您刚刚创建的角色并选择其名称。
-
在角色的详情页面上,选择权限选项卡。选择添加权限,然后选择创建内联策略。
-
选择 JSON 选项卡,然后在策略编辑器中添加访问存储桶所需的权限。
-
选择下一步。为您的策略输入名称,然后选择创建策略。
-
(推荐)为防止出现跨服务混淆代理问题,请执行以下操作:
-
在角色的详情页面上,选择信任关系选项卡。选择编辑信任策略。
-
使用以下示例更新信任策略,其中包括
aws:SourceArn和aws:SourceAccount全局条件上下文键: -
选择更新策略。
-
您可以在创建您的 Amazon S3 位置时指定此角色。
使用服务器端加密访问 S3 存储桶
DataSync 可以将数据传输到使用服务器端加密的 S3 存储桶或从中传输数据。存储桶使用的加密密钥类型可以决定您是否需要 DataSync 允许访问存储桶的自定义策略。
DataSync 与使用服务器端加密的 S3 存储桶一起使用时,请记住以下几点:
-
如果您的 S3 存储桶使用 Amazon 托管密钥加密,则默认情况下,如果您的所有资源都在同一个存储桶中,则 DataSync 可以访问该存储桶的对象 Amazon Web Services 账户。
-
如果您的 S3 存储桶使用客户托管 Amazon Key Management Service (Amazon KMS) 密钥 (SSE-KMS) 加密,则密钥的策略必须包含 DataSync 用于访问存储桶的 IAM 角色。
-
如果您的 S3 存储桶使用客户托管的 SSE-KMS 密钥和其他密钥进行加密,则 DataSync 需要获得访问另一个 Amazon Web Services 账户存储桶的权限。 Amazon Web Services 账户您可以通过以下步骤完成上述设置:
-
在使用的 IAM 角色中,您必须 DataSync 使用该密钥的完全限定的 Amazon 资源名称 (ARN) 来指定跨账户存储桶的 SSE-KMS 密钥。该密钥 ARN 与您用来配置存储桶默认加密的密钥 ARN 相同。在这种情况下,您不能指定密钥 ID、别名名称或别名 ARN。
下面是一个密钥 ARN 示例:
arn:aws:kms:us-west-2:111122223333:key/1234abcd-12ab-34cd-56ef-1234567890ab有关在 IAM 策略声明中指定 KMS 密钥的更多信息,请参阅 Amazon Key Management Service 开发人员指南。
-
在 SSE-KMS 密钥策略中,指定使用的 IAM 角色。 DataSync
-
-
如果您的 S3 存储桶使用客户托管 Amazon KMS 密钥 (DSSE-KMS) 进行加密以进行双层服务器端加密,则密钥的策略必须包括 DataSync 用于访问存储桶的 IAM 角色。(请记住,DSSE-KMS 不支持 S3 存储桶密钥,这可以降低 Amazon KMS 请求成本。)
-
如果您的 S3 存储桶使用客户提供的加密密钥 (SSE-C) 进行加密,则 DataSync无法访问此存储桶。
以下示例是客户托管的 SSE-KMS 密钥的密钥政策。此政策与使用服务器端加密的 S3 存储桶关联。
如果要使用此示例,请将以下值替换为您自己的值:
-
account-id— 你的 Amazon Web Services 账户。 -
admin-role-name— 可以管理密钥的 IAM 角色的名称。 -
datasync-role-name— 允许 DataSync 在访问存储桶时使用密钥的 IAM 角色的名称。
访问受限的 S3 存储桶
如果您需要向通常拒绝所有访问权限的 S3 存储桶进行传输,则可以编辑存储桶策略, DataSync 使其只能在传输时访问该存储桶。
-
复制以下 S3 存储桶策略。
-
在策略中,替换以下值:
-
amzn-s3-demo-bucket -
datasync-iam-role-id运行以下 Amazon CLI 命令获取 IAM 角色 ID:
aws iam get-role --role-namedatasync-iam-role-name在输出中,查找
RoleId值:"RoleId": "ANPAJ2UCCR6DPCEXAMPLE" -
your-iam-role-id运行以下命令以创建 IAM 角色 ID:
aws iam get-role --role-nameyour-iam-role-name在输出中,查找
RoleId值:"RoleId": "AIDACKCEVSQ6C2EXAMPLE"
-
-
将此策略添加到 S3 存储桶策略中。
-
使用 DataSync 完受限存储桶后,请从存储桶策略中移除两个 IAM 角色的条件。
通过受限 VPC 的访问权限访问 S3 存储库
一个 Amazon S3 存储桶,用于限制对特定虚拟私有云 (VPC) 终端节点的访问或 VPCs拒绝 DataSync 向该存储桶传输或从该存储桶传输数据。要在这些情况下启用传输,您可以更新存储桶的策略,将您在 DataSync 位置中指定的 IAM 角色包括在内。
Amazon S3 传输的存储类别注意事项
当 Amazon S3 是您的目标位置时, DataSync 可以将您的数据直接传输到特定的 Amazon S3 存储类别
有些存储类别的行为会影响您的 Amazon S3 存储成本。使用可能会因覆盖、删除或检索对象而产生额外费用的存储类别时,更改对象数据或元数据会产生此类费用。有关更多信息,请参阅 Amazon S3 定价
重要
| Amazon S3 存储类 | 注意事项 |
|---|---|
| S3 标准 | 选择“S3 标准”将您经常访问的文件冗余存储在地理上分开的多个可用区中。如果您没有指定存储类别,则这是默认设置。 |
| S3 智能分层 |
选择“S3 智能分层”,可通过自动将数据移动到最具成本效益的存储访问层来优化存储成本。 您需要为存储在 S3 智能分层存储类别中的每个对象按月支付相关费用。这项 Amazon S3 费用包括监控数据访问模式和在层之间移动对象。 |
| S3 标准 - IA |
选择“S3 标准 - IA”将您不常访问的对象冗余存储在地理上分开的多个可用区中。 存储在“S3 标准 - IA”存储类别中的对象可能会因覆盖、删除或检索而产生额外费用。考虑这些对象的更改频率,计划保留这些对象的时间以及需要访问的频率。更改对象数据或元数据等同于删除一个对象后再创建一个新对象来替换它。这将导致存储在“S3 标准 - IA”存储类别中的对象产生额外费用。 小于 128 KB 的对象小于“S3 标准 - IA”存储类别中每个对象的最小容量费用。这些对象存储在 S3 标准存储类别中。 |
| S3 单区 - IA |
选择“S3 单区 - IA”:将您不常访问的对象存储在单个可用区中。 存储在“S3 单区 - IA”存储类别中的对象可能会因覆盖、删除或检索而产生额外费用。考虑这些对象的更改频率,计划保留这些对象的时间以及需要访问的频率。更改对象数据或元数据等同于删除一个对象后再创建一个新对象来替换它。这会导致存储在“S3 单区 - IA”存储类别中的对象产生额外费用。 小于 128 KB 的对象小于“S3 单区 - IA”存储类别中每个对象的最小容量费用。这些对象存储在 S3 标准存储类别中。 |
| S3 Glacier Instant Retrieval |
选择“S3 Glacier 即时检索”可存档很少访问但需要在毫秒内检索的对象。 与“S3 标准-IA”存储类别相比,存储在“S3 Glacier 即时检索”存储类中的数据可以节省成本,同时享有与“S3 标准-IA”存储类别相同的延迟和吞吐量性能。“S3 Glacier 即时检索”的数据访问成本高于“S3 标准-IA”。 存储在“S3 Glacier 即时检索”存储类中的对象可能会因覆盖、删除或检索而产生额外费用。考虑这些对象的更改频率,计划保留这些对象的时间以及需要访问的频率。更改对象数据或元数据等同于删除一个对象后再创建一个新对象来替换它。这会导致存储在“S3 Glacier 即时检索”存储类别中的对象产生额外费用。 小于 128 KB 的对象小于“S3 Glacier 即时检索”存储类别中每个对象的最小容量费用。这些对象存储在 S3 标准存储类别中。 |
| S3 Glacier 灵活检索 | 选择“S3 Glacier 灵活检索”,获取更多活跃档案。 存储在“S3 Glacier 灵活检索”存储类中的对象可能会因覆盖、删除或检索而产生额外费用。考虑这些对象的更改频率,计划保留这些对象的时间以及需要访问的频率。更改对象数据或元数据等同于删除一个对象后再创建一个新对象来替换它。这会导致存储在“S3 Glacier 灵活检索”存储类别中的对象产生额外费用。 S3 Glacier 灵活检索存储类需要为每个存档对象提供 40 KB 的额外元数据。 DataSync 将小于 40 KB 的对象归入 S3 标准存储类别。 必须先恢复以该存储类别存档的对象,然后 DataSync 才能读取它们。有关信息,请参阅《Amazon S3 用户指南》中的使用已归档的对象。使用“S3 Glacier 灵活检索”时,请选择仅验证传输的数据任务选项,以便在传输结束时比较数据和元数据校验和。不能对此存储类别使用验证目标中的所有数据选项,因为它需要检索目标中的所有现有对象。 |
| S3 Glacier 深度存档 |
选择“S3 Glacier 深度存档”来存档文件,以提供长期数据留存和数字保留,每年可以在其中访问一次或两次数据。 存储在“S3 Glacier 深度存档”存储类中的对象可能会因覆盖、删除或检索而产生额外费用。考虑这些对象的更改频率,计划保留这些对象的时间以及需要访问的频率。更改对象数据或元数据等同于删除一个对象后再创建一个新对象来替换它。这会导致存储在“S3 Glacier 深度存档”存储类别中的对象产生额外费用。 S3 Glacier Deep Archive Deep Archive 存储类需要为每个存档对象提供 40 KB 的额外元数据。 DataSync 将小于 40 KB 的对象归入 S3 标准存储类别。 必须先恢复以该存储类别存档的对象,然后 DataSync 才能读取它们。有关信息,请参阅《Amazon S3 用户指南》中的使用已归档的对象。 使用“S3 Glacier 深度存档”时,请选择仅验证传输的数据任务选项,以便在传输结束时比较数据和元数据校验和。不能对此存储类别使用验证目标中的所有数据选项,因为它需要检索目标中的所有现有对象。 |
|
S3 Outposts |
Amazon S3 on Outposts 的存储类别。 |
使用时评估 S3 请求成本 DataSync
在 Amazon S3 分支机构 DataSync中,您会产生与发出 S3 API 请求相关的费用。本节可帮助您了解这些请求的 DataSync 使用方式以及它们可能如何影响您的 Amazon S3 成本
发出的 S3 请求由 DataSync
下表描述了您在向 Amazon S3 位置复制数据或从中复制数据时 DataSync 可能发出的 S3 请求。
| S3 请求 | 怎么 DataSync 用 |
|---|---|
|
DataSync 对每个以正斜杠 ( |
|
DataSync 在任务的准备和验证阶段发出检索对象元数据的 |
|
|
DataSync 在任务的传输阶段发出从对象读取数据的 |
|
|
DataSync 在任务的传输阶段, |
|
|
DataSync 仅当对象的元数据发生变化时,才会 |
成本注意事项
DataSync 每次运行任务时,都会在 S3 存储桶上发出 S3 请求。在某些情况下,这可能会导致费用增加。例如:
-
您经常将对象传入或传出 S3 存储桶。
-
您可能没有传输太多数据,但是您的 S3 存储桶里有很多对象。在这种情况下,您仍然可以看到高额费用,因为 DataSync 对存储桶的每个对象发出 S3 请求。
-
您在 S3 存储桶之间进行传输,在源存储桶和目标上发出 S3 请求 DataSync 也是如此。
为了帮助最大限度地降低与之相关的 S3 请求成本 DataSync,请考虑以下几点:
我使用的是哪些 S3 存储类别?
S3 请求费用可能因对象使用的 Amazon S3 存储类别而有所不同,特别是对于存储对象的存储类别(例如 S3 Glacier 即时检索、S3 Glacier 灵活检索和 S3 Glacier 深度存档)。
以下是一些使用存储类会影响您的 S3 请求费用的场景 DataSync:
-
每次运行任务时,都会 DataSync 发出检索对象元数据的
HEAD请求。即使您没有移动任何对象,这些请求也会产生费用。这些请求对账单的影响程度取决于您的对象使用的存储类别以及 DataSync 扫描的对象数量。 -
如果您将对象移至 S3 Glacier 即时检索存储类别(直接或通过存储桶生命周期配置),则对该类中对象的请求比其他存储类别中的对象更昂贵。
-
如果您将 DataSync 任务配置为验证源位置和目标位置是否完全同步,则所有存储类别(S3 Glacier 灵活检索和 S3 Glacier Deep Archive Deep Archive 除外)中的每个对象都将
GET收到请求。 -
除了
GET请求之外,您还会产生 S3 标准-IA、S3 单区-IA 或 S3 Glacier 即时检索存储类别中的对象的数据检索成本。
有关更多信息,请参阅 Amazon S3 定价
我需要多久传输一次数据?
如果您需要定期移动数据,请考虑一个不会超出所需任务的时间表。
您也可以考虑限制传输范围。例如,您可以配置为聚焦 DataSync 于某些前缀中的对象,或者筛选要传输的数据。这些选项可以帮助减少每次运行 DataSync 任务时发出的 S3 请求数量。
Amazon S3 传输的对象注意事项
-
如果您要从 S3 存储桶中传输,请使用 S3 Storage Lens 存储分析功能确定要移动的对象数量。
-
DataSync 可能无法传输名称中包含非标准字符的对象。有关更多信息,请参阅《Amazon S3 用户指南》中的对象键命名指南。
-
DataSync 与使用版本控制的 S3 存储桶一起使用时,请记住以下几点:
-
传输到 S3 存储桶时,如果在源位置修改了对象,则 DataSync 会创建该对象的新版本。这会导致额外收费。
-
对象在源存储桶和目标存储桶 IDs 中的版本不同。
-
只有每个对象的最新版本才会从源存储桶传输。早期版本不会复制到目标。
-
-
最初将数据从 S3 存储桶传输到文件系统(例如 NFS 或 Amazon FSx)后,后续运行的同一 DataSync 任务将不包括已修改但大小与第一次传输时大小相同的对象。
为 Amazon S3 通用存储桶创建传输位置
要创建用于传输的位置,您需要一个现有的 S3 通用存储桶。如果还没有存储桶,请参阅《Amazon S3 用户指南》。
重要
在创建位置之前,请确保阅读以下部分:
打开 Amazon DataSync 控制台,网址为https://console.aws.amazon.com/datasync/
。 -
在左侧导航窗格中,展开数据传输,然后选择 位置和 创建位置。
-
对于位置类型,选择 Amazon S3,然后选择通用存储桶。
-
对于 S3 URI,输入或选择要用于相应位置的存储桶和前缀。
警告
DataSync 无法传输前缀以斜杠 (
/) 开头或包含///./、或/../模式的对象。例如:-
/photos -
photos//2006/January -
photos/./2006/February -
photos/../2006/March
-
-
对于 用作目标时的 S3 存储类别,请选择您希望对象在以 Amazon S3 为传输目标时使用的存储类别。
有关更多信息,请参阅 Amazon S3 传输的存储类别注意事项。
-
对于 IAM 角色,执行以下操作之一:
-
选择 “自动生成” DataSync 以自动创建具有访问 S3 存储桶所需权限的 IAM 角色。
如果 DataSync 之前为此 S3 存储桶创建了 IAM 角色,则默认情况下会选择该角色。
-
选择您创建的自定义 IAM 角色。有关更多信息,请参阅 为创建 IAM 角色 DataSync 以访问您的 Amazon S3 位置。
-
-
(可选)选择添加新标签以标记您的 Amazon S3 位置。
标签可帮助您管理、筛选和搜索资源。我们建议为您的位置创建一个名称标签。
-
选择创建位置。
-
复制以下
create-location-s3命令:aws datasync create-location-s3 \ --s3-bucket-arn 'arn:aws:s3:::amzn-s3-demo-bucket' \ --s3-storage-class 'your-S3-storage-class' \ --s3-config 'BucketAccessRoleArn=arn:aws:iam::account-id:role/role-allowing-datasync-operations' \ --subdirectory /your-prefix-name -
对于
--s3-bucket-arn,指定要用作位置的 S3 存储桶的 ARN。 -
对于
--s3-storage-class,指定您希望对象在以 Amazon S3 为传输目标时使用的存储类别。 -
对于
--s3-config,请指定 DataSync 需要访问您的存储桶的 IAM 角色的 ARN。有关更多信息,请参阅 为创建 IAM 角色 DataSync 以访问您的 Amazon S3 位置。
-
对于
--subdirectory,在 S3 存储桶中指定 DataSync 读取或写入的前缀(取决于存储桶是源位置还是目标位置)。警告
DataSync 无法传输前缀以斜杠 (
/) 开头或包含///./、或/../模式的对象。例如:-
/photos -
photos//2006/January -
photos/./2006/February -
photos/../2006/March
-
-
运行
create-location-s3命令。如果命令成功,您将收到一条响应,显示您创建位置的 ARN。例如:
{
    "LocationArn": "arn:aws:datasync:us-east-1:111222333444:location/loc-0b3017fc4ba4a2d8d"
}
您可以将此位置用作 DataSync 任务的来源或目的地。
为 S3 on Outposts 存储桶创建传输位置
要创建用于传输的位置,您需要一个现有的 Amazon S3 on Outposts 存储桶。如果还没有存储桶,请参阅《Amazon S3 on Outposts 用户指南》。
你还需要一个 DataSync 代理。有关更多信息,请参阅 在上部署基本模式代理 Amazon Outposts。
从包含大型数据集(例如数十万或数百万个对象)的 S3 on Outposts 存储桶前缀传输时,您的 DataSync 任务可能会超时。为避免这种情况,可以考虑使用DataSync 清单,它允许您指定需要传输的确切对象。
打开 Amazon DataSync 控制台,网址为https://console.aws.amazon.com/datasync/
。 -
在左侧导航窗格中,展开数据传输,然后选择 位置和 创建位置。
-
对于位置类型,选择 Amazon S3,然后选择 Outposts 存储桶。
-
对于 S3 存储桶,请选择一个可以访问 S3 on Outposts 存储桶的 Amazon S3 接入点。
有关更多信息,请参阅 Amazon S3 用户指南。
-
对于 用作目标时的 S3 存储类别,请选择您希望对象在以 Amazon S3 为传输目标时使用的存储类别。
有关更多信息,请参阅Amazon S3 传输的存储类别注意事项。 DataSync 默认情况下,在 Outposts 上使用亚马逊 S3 的 S3 Outposts 存储类。
-
对于代理,请在 Outpos DataSync t 上指定代理的亚马逊资源名称 (ARN)。
-
对于文件夹,在 S3 存储桶中输入 DataSync 读取或写入的前缀(取决于存储桶是源位置还是目标位置)。
警告
DataSync 无法传输前缀以斜杠 (
/) 开头或包含///./、或/../模式的对象。例如:-
/photos -
photos//2006/January -
photos/./2006/February -
photos/../2006/March
-
-
对于 IAM 角色,执行以下操作之一:
-
选择 “自动生成” DataSync 以自动创建具有访问 S3 存储桶所需权限的 IAM 角色。
如果 DataSync 之前为此 S3 存储桶创建了 IAM 角色,则默认情况下会选择该角色。
-
选择您创建的自定义 IAM 角色。有关更多信息,请参阅 为创建 IAM 角色 DataSync 以访问您的 Amazon S3 位置。
-
-
(可选)选择添加新标签以标记您的 Amazon S3 位置。
标签可帮助您管理、筛选和搜索资源。我们建议为您的位置创建一个名称标签。
-
选择创建位置。
-
复制以下
create-location-s3命令:aws datasync create-location-s3 \ --s3-bucket-arn 'bucket-access-point' \ --s3-storage-class 'your-S3-storage-class' \ --s3-config 'BucketAccessRoleArn=arn:aws:iam::account-id:role/role-allowing-datasync-operations' \ --subdirectory /your-folder\ --agent-arns 'arn:aws:datasync:your-region:account-id::agent/agent-agent-id' -
对于
--s3-bucket-arn,指定一个可访问 Amazon S3 on Outposts 存储桶的 Amazon S3 接入点。有关更多信息,请参阅 Amazon S3 用户指南。
-
对于
--s3-storage-class,指定您希望对象在以 Amazon S3 为传输目标时使用的存储类别。有关更多信息,请参阅Amazon S3 传输的存储类别注意事项。 DataSync 默认情况下,在 Outposts 上使用 S3 Outposts 存储类作为 S3。
-
对于
--s3-config,请指定 DataSync 需要访问您的存储桶的 IAM 角色的 ARN。有关更多信息,请参阅 为创建 IAM 角色 DataSync 以访问您的 Amazon S3 位置。
-
对于
--subdirectory,在 S3 存储桶中指定 DataSync 读取或写入的前缀(取决于存储桶是源位置还是目标位置)。警告
DataSync 无法传输前缀以斜杠 (
/) 开头或包含///./、或/../模式的对象。例如:-
/photos -
photos//2006/January -
photos/./2006/February -
photos/../2006/March
-
-
对于
--agent-arns,请指定前哨基地上 DataSync 特工的 ARN。 -
运行
create-location-s3命令。如果命令成功,您将收到一条响应,显示您创建位置的 ARN。例如:
{
    "LocationArn": "arn:aws:datasync:us-east-1:111222333444:location/loc-0b3017fc4ba4a2d8d"
}
您可以将此位置用作 DataSync 任务的来源或目的地。
Amazon S3 在商业版和商业版之间转移 Amazon GovCloud (US) Regions
默认情况下, DataSync 不会在商业版和 S3 存储桶之间进行传输。 Amazon GovCloud (US) Regions但您仍然可以在传输中为一个 S3 存储桶创建对象存储位置,从而设置这种传输。无论使用不使用代理,都可以执行这种类型的传输。如果使用代理,必须将任务配置为基本模式。要在没有代理的情况下进行传输,就必须使用增强模式。
开始之前:请确保了解在区域间进行传输的成本影响。有关更多信息,请参阅Amazon DataSync
定价
提供对您的对象存储位置的存储桶的 DataSync 访问权限
在为此转移创建对象存储位置时,您必须提供有权访问 DataSync 该位置的 S3 存储桶的 IAM 用户的证书。有关更多信息,请参阅 所需的权限。
警告
IAM 用户具有长期凭证,这会带来安全风险。为帮助减轻这种风险,我们建议仅向这些用户提供执行任务所需的权限,并在不再需要这些用户时将其移除。
创建您的 DataSync 代理(可选)
如果要使用基本模式运行传输,就需要使用代理。由于您要在商业版和之间进行转移 Amazon GovCloud (US) Region,因此您可以将 DataSync 代理作为 Amazon EC2 实例部署到其中一个区域。我们建议您的代理使用 VPC 服务端点,以避免将数据传输至公共互联网时产生的费用。有关更多信息,请参阅 Amazon EC2 数据传输定价
选择以下情景之一,描述如何根据您计划运行 DataSync 任务的区域创建代理。
下图显示了您的 DataSync 任务和代理位于商业区域的转移。
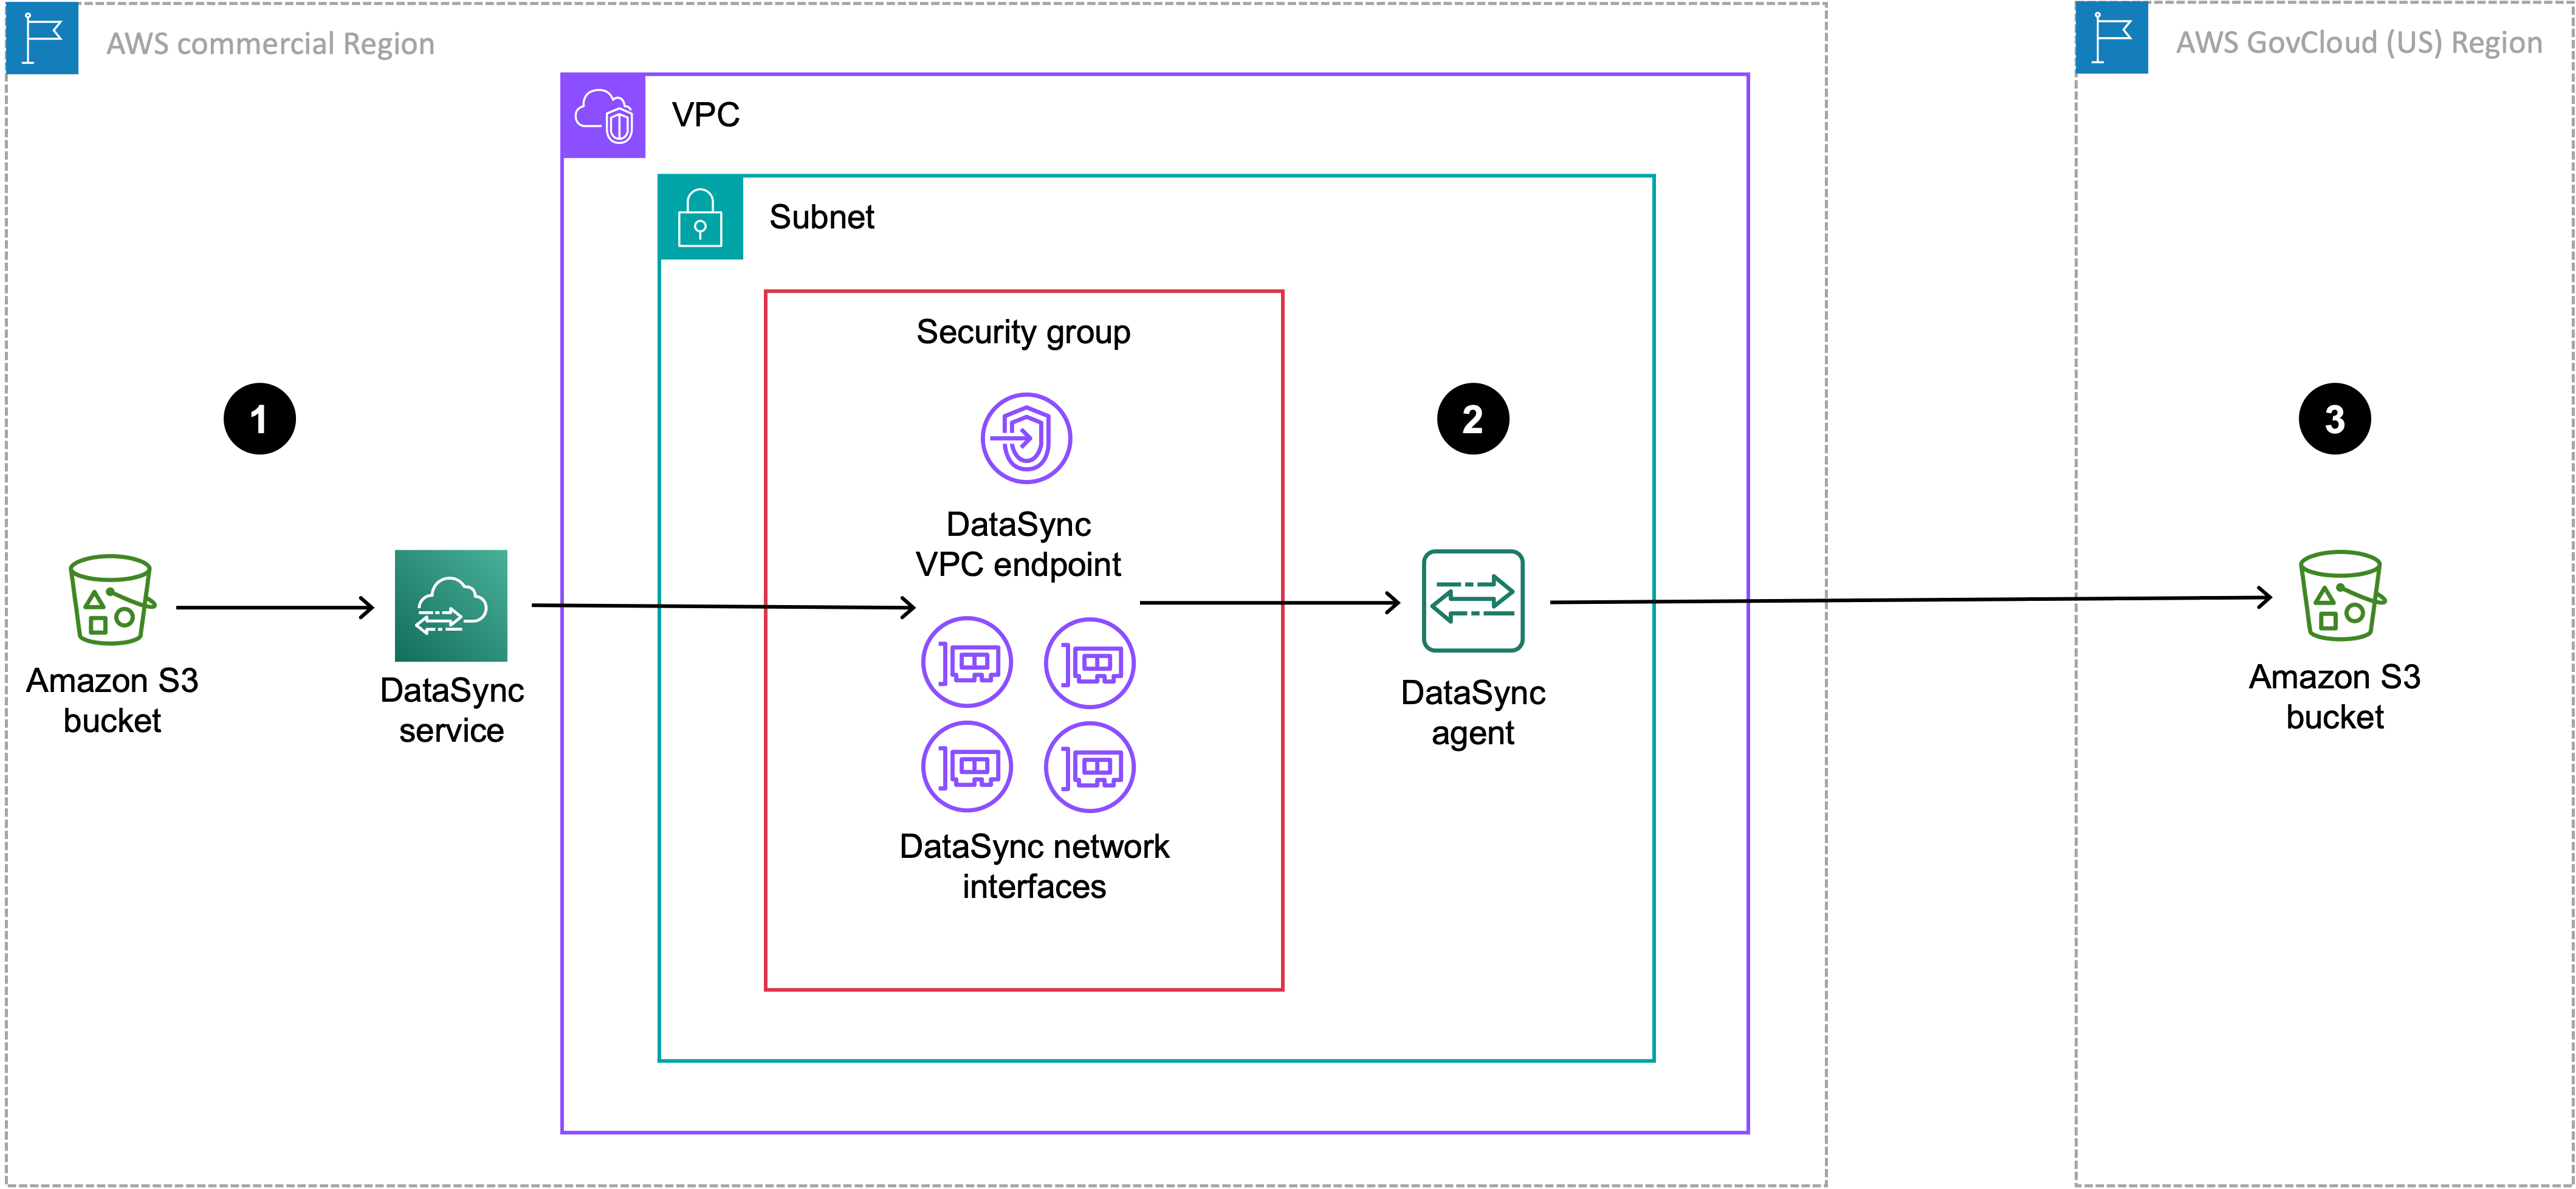
| 参考 | 说明 |
|---|---|
| 1 | 在您运行 DataSync任务的商业区域中,数据从源 S3 存储桶传输。源存储桶配置为商业区域中的 Amazon S3 位置。 |
| 2 | 通过代理传输数据, DataSync 代理位于 VPC 服务终端节点和网络接口所在的 VPC 和子网中。 |
| 3 | 数据传输至 Amazon GovCloud (US) Region中的目标 S3 存储桶。目标存储桶配置为商业区域中的对象存储位置。 |
您也可以使用相同的设置将相反的方向从转移 Amazon GovCloud (US) Region 到商业区域。
创建您的 DataSync 代理
-
在您的商业区域部署 Amazon EC2 代理。
-
将您的代理配置为使用 VPC 服务端点。
下图显示了您的 DataSync 任务和代理所在的转移 Amazon GovCloud (US) Region。
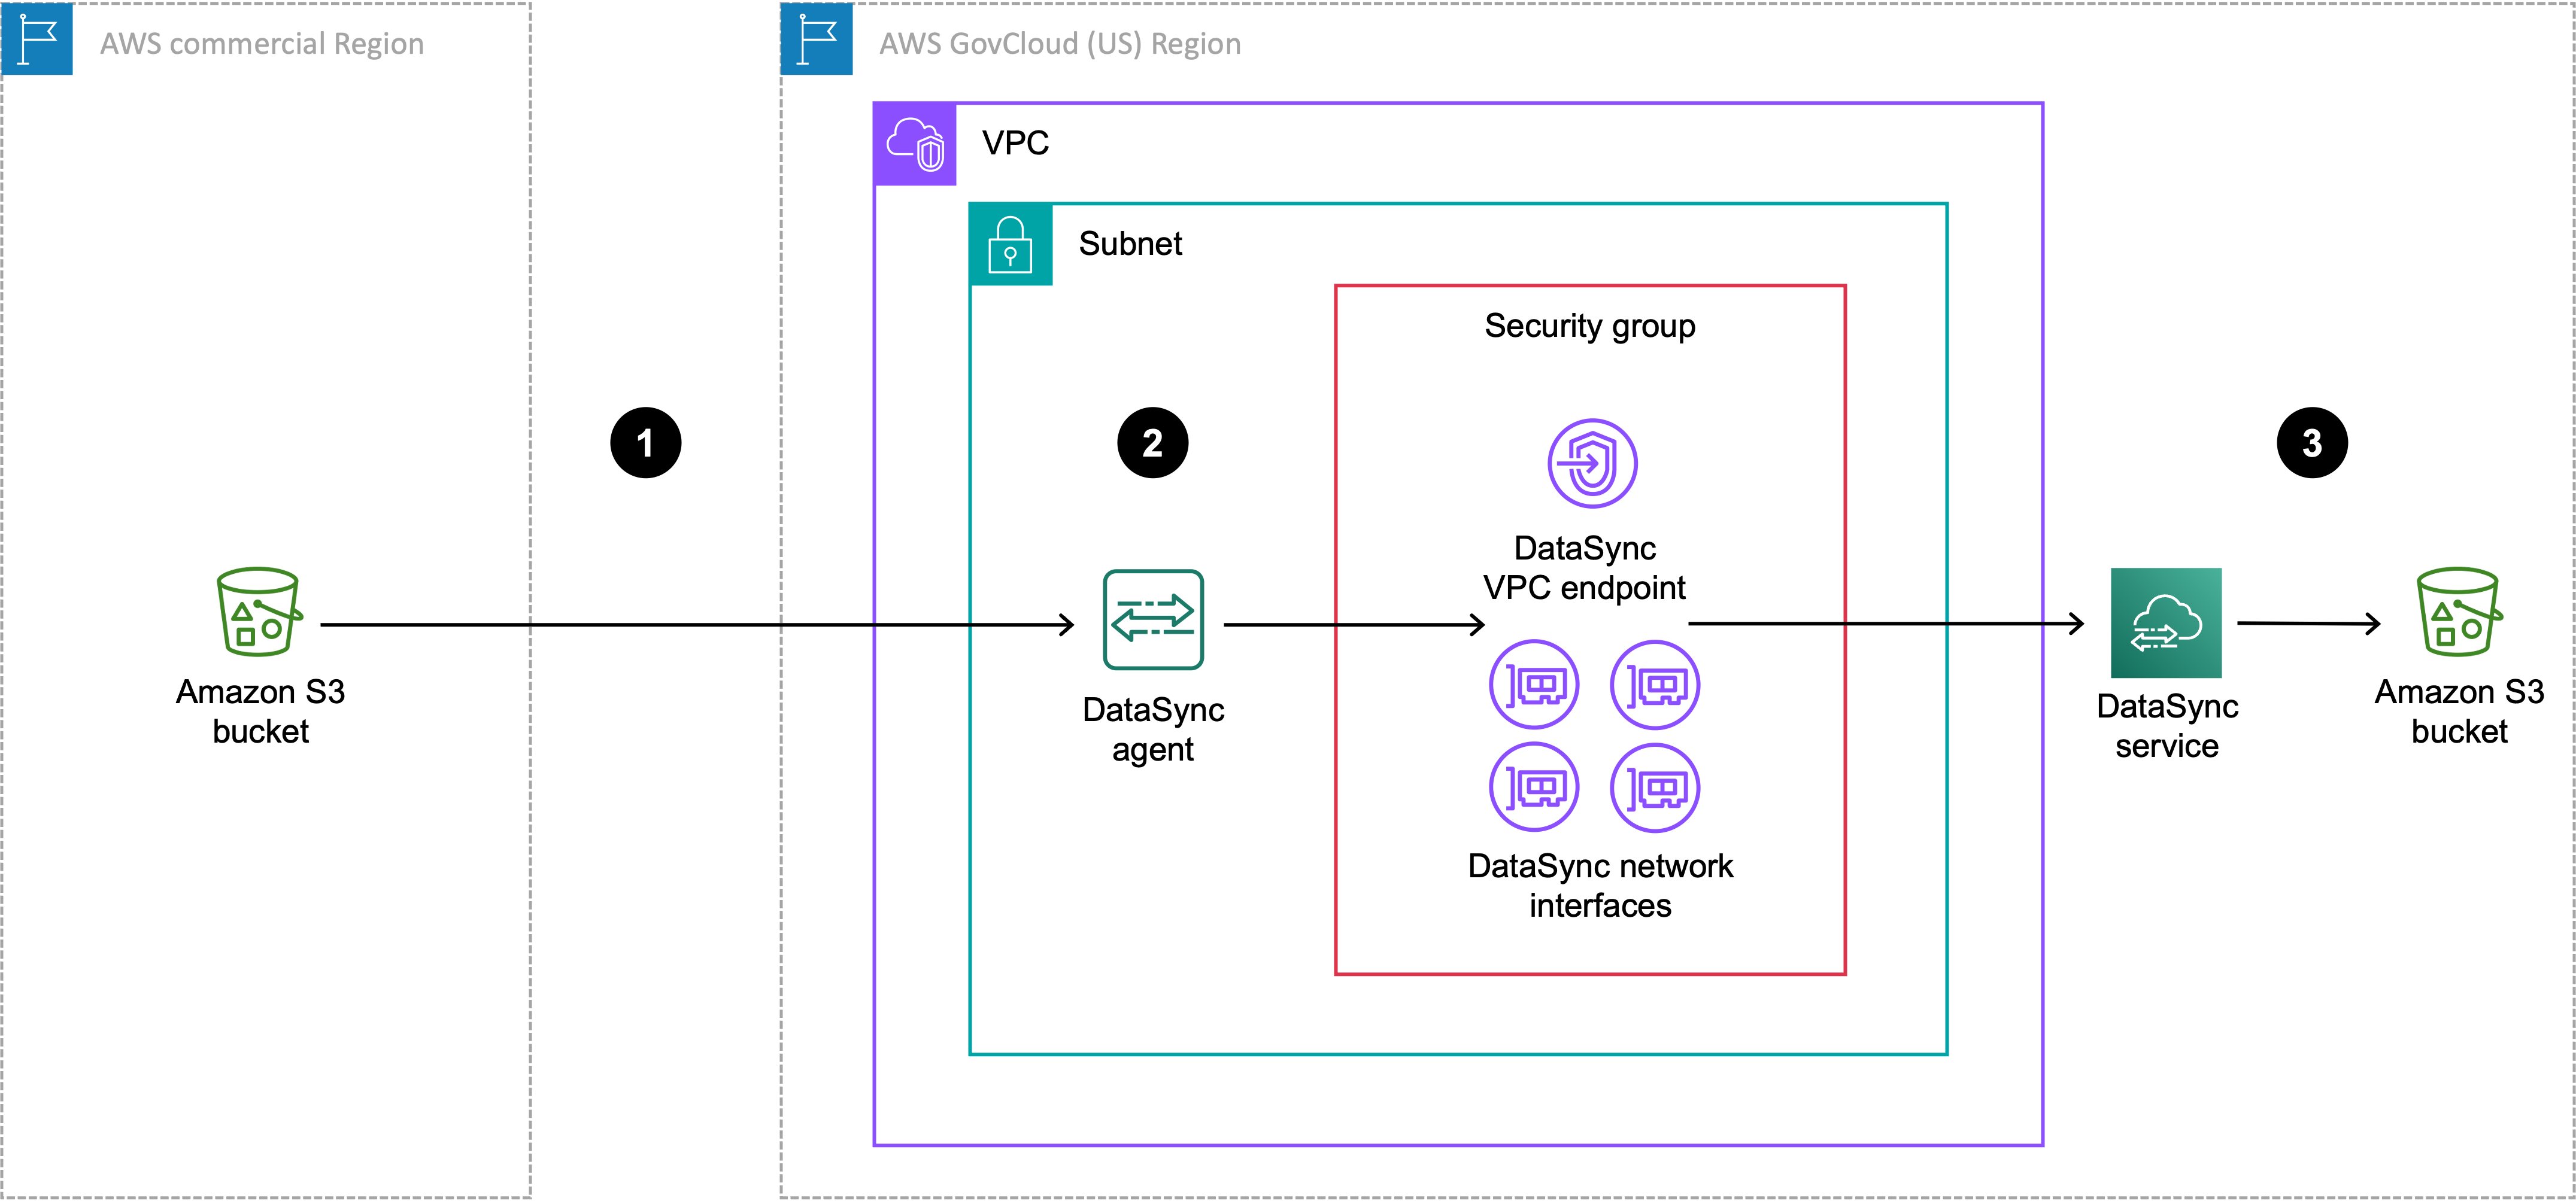
| 参考 | 说明 |
|---|---|
| 1 | 数据从商业区域的源 S3 存储桶传输到您正在运行 DataSync 任务 Amazon GovCloud (US) Region 的地方。源存储桶配置为 Amazon GovCloud (US) Region中的对象存储位置。 |
| 2 | 在中 Amazon GovCloud (US) Region,通过 VPC 服务终端节点和网络接口所在的同一 VPC 和子网中的 DataSync 代理进行数据传输。 |
| 3 | 数据传输至 Amazon GovCloud (US) Region中的目标 S3 存储桶。目标存储桶被配置为 Amazon GovCloud (US) Region中的 Amazon S3 位置。 |
您也可以使用相同的设置将相反的方向从转移 Amazon GovCloud (US) Region 到商业区域。
创建您的 DataSync 代理
-
在您的@@ 中部署 Amazon EC2 代理 Amazon GovCloud (US) Region。
-
将您的代理配置为使用 VPC 服务端点。
如果您的数据集具有高度可压缩性,您可以在商业区域创建代理,同时在 Amazon GovCloud (US) Region运行任务,这样可能会降低成本。与通常情况相比,创建此代理需要进行更多的设置,包括为在商业区域使用代理做好准备。有关为此设置创建代理的信息,请参阅Amazon GovCloud (US) 使用迁入和移出数据 Amazon DataSync
为 S3 存储桶创建对象存储位置
您需要为未运行 DataSync 任务的区域中的 S3 存储桶设置一个对象存储位置。
打开 Amazon DataSync 控制台,网址为https://console.aws.amazon.com/datasync/
。 -
确保您处于计划运行任务的同一区域。
在左侧导航窗格中,展开数据传输,然后选择 位置和 创建位置。
-
对于 位置类型,选择 对象存储。
-
对于代理,请选择您为此转移创建的 DataSync 代理。
-
对于服务器,使用以下格式之一为存储桶输入 Amazon S3 端点:
-
商业区域存储桶:
s3.your-region.amazonaws.com -
Amazon GovCloud (US) Region 存储桶:
s3.your-gov-region.amazonaws.com
有关 Amazon S3 端点的列表,请参阅 Amazon Web Services 一般参考。
-
-
对于存储桶名称,请输入 S3 存储桶的名称。
-
对于文件夹,在 S3 存储桶中输入 DataSync 读取或写入的前缀(取决于存储桶是源位置还是目标位置)。
警告
DataSync 无法传输前缀以斜杠 (
/) 开头或包含///./、或/../模式的对象。例如:-
/photos -
photos//2006/January -
photos/./2006/February -
photos/../2006/March
-
-
选择需要凭证,然后执行以下操作:
-
对于访问密钥,输入可以访问存储桶的 IAM 用户的访问密钥。
-
对于私有密钥,输入同一 IAM 用户的私有密钥。
-
-
(可选)选择 添加标签来标记您的位置。
标签可帮助您管理、筛选和搜索资源。我们建议为您的位置创建一个名称标签。
-
选择创建位置。
-
复制以下
create-location-object-storage命令:aws datasync create-location-object-storage \ --server-hostnames3-endpoint\ --bucket-nameamzn-s3-demo-bucket\ --agent-arns arn:aws:datasync:your-region:123456789012:agent/agent-01234567890deadfb -
对于
--server-hostname参数,使用以下格式之一,为存储桶指定 Amazon S3 端点:-
商业区域存储桶:
s3.your-region.amazonaws.com -
Amazon GovCloud (US) Region 存储桶:
s3.your-gov-region.amazonaws.com
对于端点中的区域,确保指定的区域与计划运行任务的区域相同。
有关 Amazon S3 端点的列表,请参阅 Amazon Web Services 一般参考。
-
-
对于
--bucket-name参数,指定 S3 存储桶的名称。 -
在
--agent-arns参数中,指定您为此传输创建的 DataSync代理。 -
对于
--access-key参数,指定可以访问存储桶的 IAM 用户的访问密钥。 -
对于
--secret-key参数,输入同一 IAM 用户的私有密钥。 -
(可选)在
--subdirectory参数中,在 S3 存储桶中指定 DataSync 读取或写入的前缀(取决于存储桶是源位置还是目标位置)。警告
DataSync 无法传输前缀以斜杠 (
/) 开头或包含///./、或/../模式的对象。例如:-
/photos -
photos//2006/January -
photos/./2006/February -
photos/../2006/March
-
-
(可选)对于
--tags参数,指定代表位置资源标签的键值对。标签可帮助您管理、筛选和搜索资源。我们建议为您的位置创建一个名称标签。
-
运行
create-location-object-storage命令。您会收到一条回复,表明您刚刚创建的位置 ARN。
{
    "LocationArn": "arn:aws:datasync:us-east-1:123456789012:location/loc-01234567890abcdef"
}
您可以将此位置用作 DataSync 任务的来源或目的地。对于此传输中的其他 S3 存储桶,创建一个 Amazon S3 位置。
后续步骤
后续可能采取的一些步骤包括:
-
如果需要,创建其他位置。有关更多信息,请参阅 我可以在哪里传输我的数据 Amazon DataSync?。
-
配置 DataSync 任务设置,例如要传输哪些文件、如何处理元数据以及其他选项。
-
为您的 DataSync任务@@ 设定时间表。
-
为您的 DataSync 任务@@ 配置监控。
-
开始任务。