Configuring a shared Application Load Balancer
When you enable load balancing, your Amazon Elastic Beanstalk environment is equipped with an Elastic Load Balancing load balancer to distribute traffic among the instances in your environment. Elastic Load Balancing supports several load balancer types. To learn about them, see the Elastic Load Balancing User Guide. Elastic Beanstalk can create a load balancer for you, or enable you to specify a shared load balancer that you've created.
This topic describes the configuration of a shared Application Load Balancer that you create and associate with your environment. See also Configuring an Application Load Balancer. For information about configuring all the load balancer types that Elastic Beanstalk supports, see Load balancer for your Elastic Beanstalk environment.
Note
You can choose the type of load balancer that your environment uses only during environment creation. You can change settings to manage the behavior of your running environment's load balancer, but you can't change its type. You also can't switch from a dedicated to a shared load balancer or vice versa.
Introduction
A shared load balancer is a load balancer that you create and manage yourself using the Amazon Elastic Compute Cloud (Amazon EC2) service, and then use in multiple Elastic Beanstalk environments.
When you create a load-balanced, scaling environment and choose to use an Application Load Balancer, Elastic Beanstalk creates a load balancer dedicated to your environment by default. To learn what an Application Load Balancer is and how it works in an Elastic Beanstalk environment, see the introduction to configuring an Application Load Balancer for Elastic Beanstalk.
In some situations you might want to save the cost of having multiple dedicated load balancers. This can be helpful when you have multiple environments, for example, if your application is a suite of microservices instead of a monolithic service. In such cases you can choose to use a shared load balancer.
To use a shared load balancer, first create it in Amazon EC2 and add one or more listeners. During the creation of an Elastic Beanstalk environment, you then provide the load balancer and choose a listener port. Elastic Beanstalk associates the listener with the default process in your environment. You can add custom listener rules to route traffic from specific host headers and paths to other environment processes.
Elastic Beanstalk adds a tag to the shared load balancer. The tag name is elasticbeanstalk:shared-elb-environment-count, and its value is the number
of environments sharing this load balancer.
Using a shared load balancer is different from using a dedicated one in several ways.
| Regarding | Dedicated Application Load Balancer | Shared Application Load Balancer |
|---|---|---|
|
Management |
Elastic Beanstalk creates and manages the load balancer, listeners, listener rules, and processes (target groups). Elastic Beanstalk also removes them when you terminate your environment. Elastic Beanstalk can set load balancer access log capture, if you choose that option. |
You create and manage the load balancer and listeners outside of Elastic Beanstalk. Elastic Beanstalk creates and manages a default rule and a default process, and you can add rules and processes. Elastic Beanstalk removes the listener rules and processes that were added during environment creation. |
|
Listener rules |
Elastic Beanstalk creates a default rule for each listener, to route all traffic to the listener's default process. |
Elastic Beanstalk associates a default rule only with a port 80 listener, if one exists. If you choose a different default listener port, you have to associate the default rule with it (the Elastic Beanstalk console and EB CLI do this for you). To resolve listener rule condition conflicts across environments sharing the load balancer, Elastic Beanstalk adds the environment's CNAME to the listener rule as a host header condition. Elastic Beanstalk treats rule priority settings as relative across environments sharing the load balancer, and maps them to absolute priorities during creation. |
|
Security groups |
Elastic Beanstalk creates a default security group and attaches it to the load balancer. |
You can configure one or more security groups to use for the load balancer. If you don't, Elastic Beanstalk checks if an existing security group that Elastic Beanstalk manages is already attached to the load balancer. If not, Elastic Beanstalk creates a security group and attaches it to the load balancer. Elastic Beanstalk deletes this security group when the last environment sharing the load balancer terminates. |
|
Updates |
You can update your Application Load Balancer after environment creation. You can edit listeners, listener rules, and processes. You can configure load balancer access log capture. |
You can't use Elastic Beanstalk to configure access log capture in your Application Load Balancer, and you can't update listeners and listener rules after environment creation. You can only update processes (target groups). To configure access log capture, and to update listeners and listener rules, use Amazon EC2. |
Configuring a shared Application Load Balancer using the Elastic Beanstalk console
You can use the Elastic Beanstalk console to configure a shared Application Load Balancer during environment creation. You can select one of your account's sharable load balancers for use in the environment, select the default listener port, and configure additional processes and listener rules.
You can't edit your shared Application Load Balancer configuration in the Application Load Balancer console after your environment is created. To configure listeners, listener rules, processes (target groups), and access log capture, use Amazon EC2.
To configure an Application Load Balancer in the Elastic Beanstalk console during environment creation
Open the Elastic Beanstalk console
, and in the Regions list, select your Amazon Web Services Region. -
In the navigation pane, choose Environments.
-
Choose Create a new environment to start creating your environment.
-
On the wizard's main page, before choosing Create environment, choose Configure more options.
-
Choose the High availability configuration preset.
Alternatively, in the Capacity configuration category, configure a Load balanced environment type. For details, see Capacity.
-
In the Load balancer configuration category, choose Edit.
-
Select the Application Load Balancer option, if it isn't already selected, and then select the Shared option.
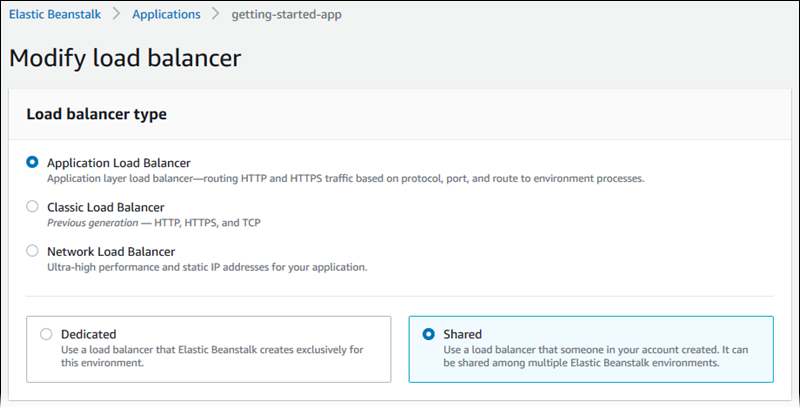
-
Make any shared Application Load Balancer configuration changes that your environment requires.
-
Choose Save, and then make any other configuration changes that your environment requires.
-
Choose Create environment.
Shared Application Load Balancer settings
Shared Application Load Balancer
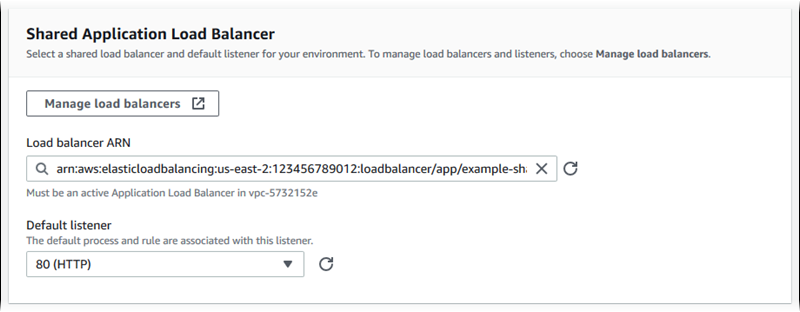
Use this section to choose a shared Application Load Balancer for your environment and configure default traffic routing.
Before you can configure a shared Application Load Balancer here, use Amazon EC2 to define at least one Application Load Balancer for sharing, with at least one listener, in your account. If you haven't done so already, you can choose Manage load balancers. Elastic Beanstalk opens the Amazon EC2 console in a new browser tab.
When you're done configuring shared load balancers outside of Elastic Beanstalk, configure the following settings on this console section:
-
Load balancer ARN – The shared load balancer to use in this environment. Select from a list of load balancers or enter a load balancer Amazon Resource Name (ARN).
-
Default listener port – A listener port that the shared load balancer listens on. Select from a list of existing listener ports. Traffic from this listener with the environment's CNAME in the host header is routed to a default process in this environment.
Processes
Use this list to specify processes for your shared load balancer. A process is a target for listeners to route traffic to. Initially, the list shows the default process, which receives traffic from the default listener.
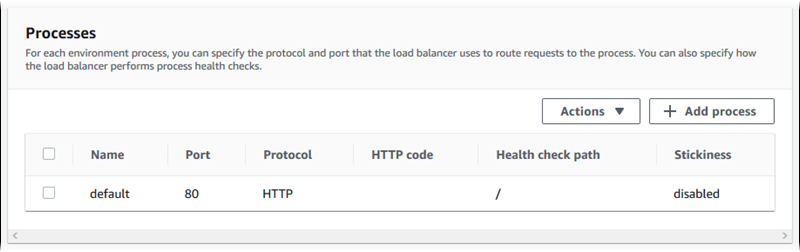
To configure an existing process
-
Select the check box next to its table entry, and then choose Actions, Edit.
-
Use the Environment process dialog box to edit settings, and then choose Save.
To add a process
-
Choose Add process.
-
In the Environment process dialog box, configure the settings you want, and then choose Add.
Application Load Balancer's environment process dialog box settings
Definition
Use these settings to define the process: its Name, and the Port and Protocol on which it listens to requests.

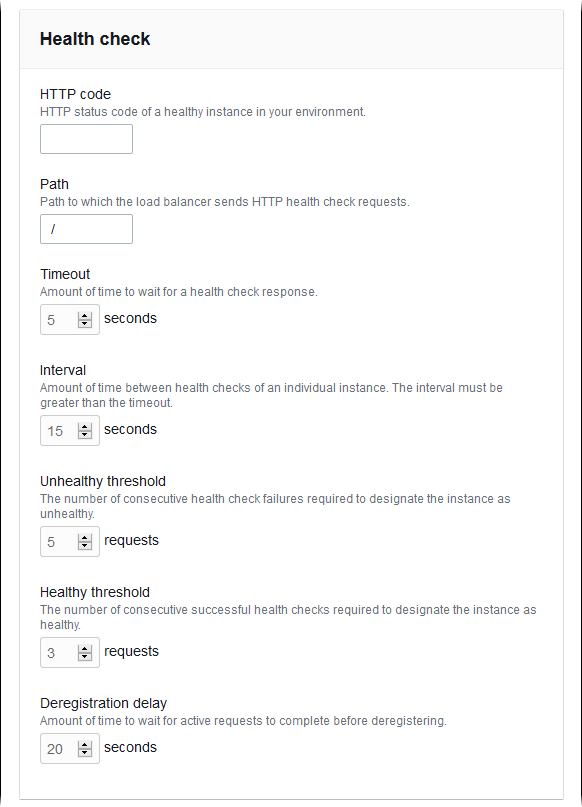
Health check
Use the following settings to configure process health checks:
-
HTTP code – The HTTP status code designating a healthy process.
-
Path – The health check request path for the process.
-
Timeout – The amount of time, in seconds, to wait for a health check response.
-
Interval – The amount of time, in seconds, between health checks of an individual instance. The interval must be greater than the timeout.
-
Unhealthy threshold, Healthy threshold – The number of health checks that must fail or pass, respectively, before Elastic Load Balancing changes an instance's health state.
-
Deregistration delay – The amount of time, in seconds, to wait for active requests to complete before deregistering an instance.
Note
The Elastic Load Balancing health check doesn't affect the health check behavior of an environment's Auto Scaling group. Instances that fail an Elastic Load Balancing health check are not automatically replaced by Amazon EC2 Auto Scaling unless you manually configure Amazon EC2 Auto Scaling to do so. See Auto Scaling health check setting for your Elastic Beanstalk environment for details.
For more information about health checks and how they influence your environment's overall health, see Basic health reporting.
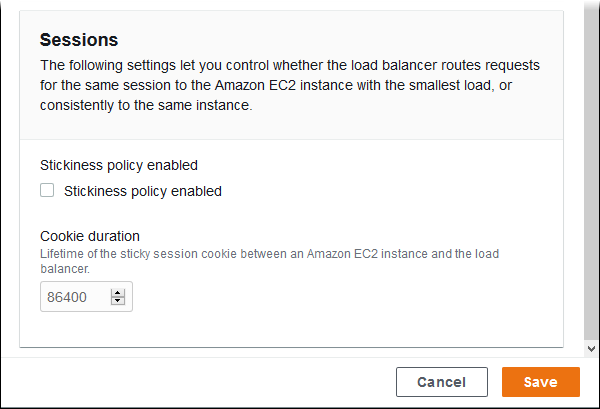
Sessions
Select or clear the Stickiness policy enabled box to enable or disable sticky sessions. Use Cookie
duration to configure a sticky session's duration, up to 604800 seconds.
Rules
Use this list to specify custom listener rules for your shared load balancer. A rule maps requests that the listener receives on a specific path pattern to a target process. Each listener can have multiple rules, routing requests on different paths to different processes on instances of the different environments sharing the listener.
Rules have numeric priorities that determine the precedence in which they are applied to incoming requests. Elastic Beanstalk adds a default rule that routes all the default listener's traffic to the default process of your new environment. The default rule's precedence is the lowest; it's applied if no other rule for the same listener matches the incoming request. Initially, if you haven't added custom rules, the list is empty. The default rule isn't displayed.
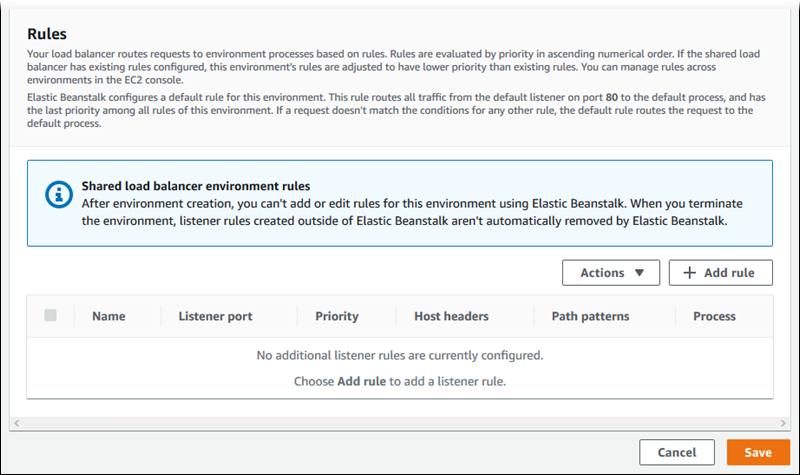
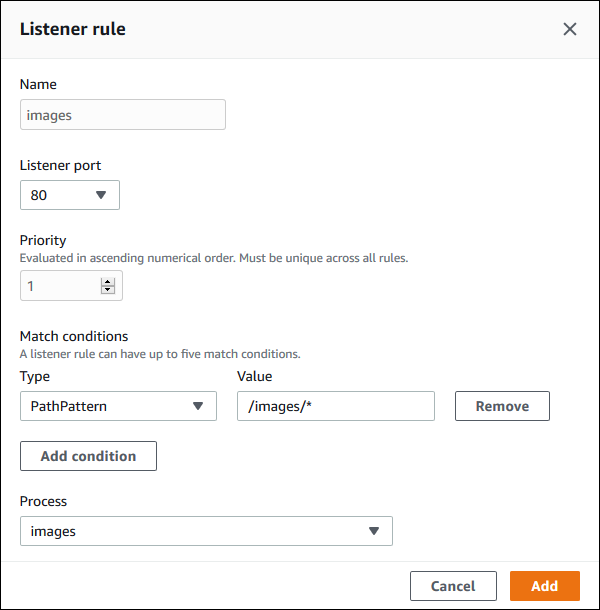
You can edit the settings of an existing rule, or add a new rule. To start editing a rule on the list or adding a rule to it, use the same steps listed for the process list. The Listener rule dialog box opens, with the following settings:
-
Name – The rule's name.
-
Listener port – The port of the listener that the rule applies to.
-
Priority – The rule's priority. A lower priority number has higher precedence. Priorities of a listener's rules must be unique. Elastic Beanstalk treats rule priorities as relative across sharing environments, and maps them to absolute priorities during creation.
-
Match conditions – A list of request URL conditions that the rule applies to. There are two types of conditions: HostHeader (the URL's domain part), and PathPattern (the URL's path part). One condition is reserved for the environment subdomain, and you can add up to four conditions. Each condition value is up to 128 characters in length, and can include wildcard characters.
-
Process – The process to which the load balancer routes requests that match the rule.
Example: use a shared Application Load Balancer for a secure micro-service-based application
In this example, your application consists of several micro services, each implemented as an Elastic Beanstalk environment. In addition, you require end-to-end traffic encryption. We'll demonstrate one of the micro-service environments, which has a main process for user requests and a separate process for handling administrative requests.
To meet these requirements, use Amazon EC2 to create an Application Load Balancer that you'll share among your micro services. Add a secure listener on port 443 and the HTTPS protocol. Then add multiple SSL certificates to the listener—one per micro-service domain. For details about creating the Application Load Balancer and secure listener, see Create an Application Load Balancer and Create an HTTPS listener for your Application Load Balancer in the User Guide for Application Load Balancers.
In Elastic Beanstalk, configure each micro-service environment to use the shared Application Load Balancer and set the default listener port to 443. In the case of the particular environment that we're demonstrating here, indicate that the default process listens to port 443 on HTTPS, and add a process and a listener rule for admin traffic on a different path.
To configure the shared load balancer for this example
-
In the Shared Application Load Balancer section, select your load balancer, and then, for Default listener port, select
443. The listener port should already be selected if it's the only listener that the load balancer has.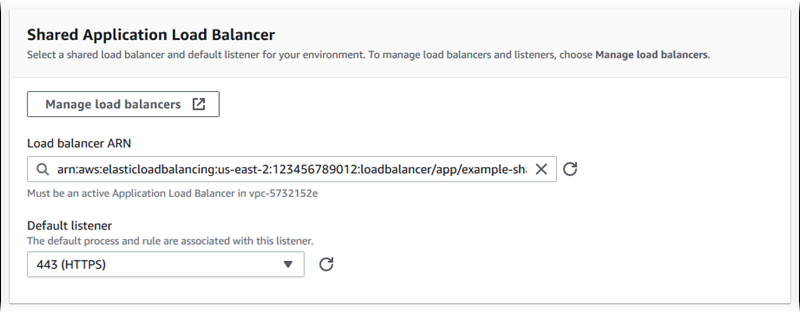
-
Configure the default process to HTTPS. Select the default process, and then for Actions, choose Edit. For Port, enter
443. For Protocol, selectHTTPS.
-
Add an admin process. For Name, enter
admin. For Port, enter443. For Protocol, selectHTTPS. Under Health check, for Path enter/admin.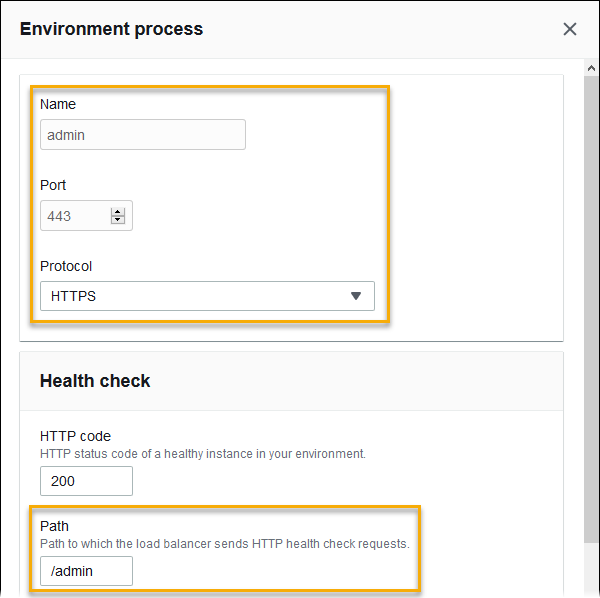
-
Add a rule for admin traffic. For Name, enter
admin. For Listener port, enter443. For Match conditions, add a PathPattern with the value/admin/*. For Process, selectadmin.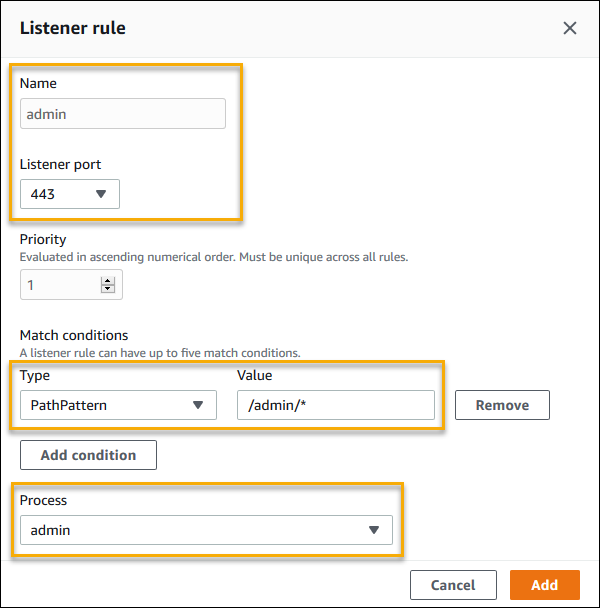
Configuring a shared Application Load Balancer using the EB CLI
The EB CLI prompts you to choose a load balancer type when you run eb create. If you choose
application (the default), and if your account has at least one sharable Application Load Balancer, the EB CLI also asks you if you want to use a shared Application Load Balancer.
If you answer y, you are also prompted to select the load balancer and default port.
$ eb create
Enter Environment Name
(default is my-app): test-env
Enter DNS CNAME prefix
(default is my-app): test-env-DLW24ED23SF

Select a load balancer type
1) classic
2) application
3) network
(default is 2):

Your account has one or more sharable load balancers. Would you like your new environment to use a shared load balancer?(y/N) y

Select a shared load balancer
1)MySharedALB1 - arn:aws-cn:elasticloadbalancing:us-west-2:123456789012:loadbalancer/app/MySharedALB1/6d69caa75b15d46e
2)MySharedALB2 - arn:aws-cn:elasticloadbalancing:us-west-2:123456789012:loadbalancer/app/MySharedALB2/e574ea4c37ad2ec8
(default is 1): 2

Select a listener port for your shared load balancer
1) 80
2) 100
3) 443
(default is 1): 3
You can also specify a shared load balancer using command options.
$ eb create test-env --elb-type application --shared-lb MySharedALB2 --shared-lb-port 443Shared Application Load Balancer namespaces
You can find settings related to shared Application Load Balancers in the following namespaces:
-
aws:elasticbeanstalk:environment– Choose the load balancer type for the environment, and tell Elastic Beanstalk that you'll use a shared load balancer.You can't set these two options in configuration files (.Ebextensions).
-
aws:elbv2:loadbalancer– Configure the shared Application Load Balancer ARN and security groups. -
aws:elbv2:listener– Associate listeners of the shared Application Load Balancer with environment processes by listing listener rules. -
aws:elbv2:listenerrule– Configure listener rules that route traffic to different processes, depending on the request path. Rules are unique to Application Load Balancers—both dedicated and shared. -
aws:elasticbeanstalk:environment:process– Configure health checks and specify the port and protocol for the processes that run on your environment's instances.
Example.ebextensions/application-load-balancer-shared.config
To get started with a shared Application Load Balancer, use the Elastic Beanstalk console, EB CLI, or API to set the load balancer type to application and choose to
use a shared load balancer. Use a configuration file to configure the shared load balancer.
option_settings:
  aws:elbv2:loadbalancer:
    SharedLoadBalancer: arn:aws-cn:elasticloadbalancing:us-west-2:123456789012:loadbalancer/app/MySharedALB2/e574ea4c37ad2ec8
Note
You can configure this option only during environment creation.
Example.ebextensions/alb-shared-secure-listener.config
The following configuration file selects a default secure listener on port 443 for the shared load balancer, and sets the default process to listen to port 443.
option_settings:
  aws:elbv2:loadbalancer:
    SharedLoadBalancer: arn:aws-cn:elasticloadbalancing:us-west-2:123456789012:loadbalancer/app/MySharedALB2/e574ea4c37ad2ec8
  aws:elbv2:listener:443:
    rules: default
  aws:elasticbeanstalk:environment:process:default:
    Port: '443'
    Protocol: HTTPS
Example.ebextensions/alb-shared-admin-rule.config
The following configuration file builds on the previous example and adds a rule that routes traffic with a request path of /admin to a
process named admin that listens on port 4443.
option_settings:
  aws:elbv2:loadbalancer:
    SharedLoadBalancer: arn:aws-cn:elasticloadbalancing:us-west-2:123456789012:loadbalancer/app/MySharedALB2/e574ea4c37ad2ec8
  aws:elbv2:listener:443:
    rules: default,admin
  aws:elasticbeanstalk:environment:process:default:
    Port: '443'
    Protocol: HTTPS
  aws:elasticbeanstalk:environment:process:admin:
    HealthCheckPath: /admin
    Port: '4443'
    Protocol: HTTPS
  aws:elbv2:listenerrule:admin:
    PathPatterns: /admin/*
    Priority: 1
    Process: admin