Download, build, flash and run the FreeRTOS OTA demo on the Renesas RX65N
Important
This reference integration is hosted on the Amazon-FreeRTOS repository which is deprecated. We recommend that you start here when you create a new project. If you already have an existing FreeRTOS project based on the now deprecated Amazon-FreeRTOS repository, see the Amazon-FreeRTOS Github Repository Migration Guide.
This chapter shows you how download, build, flash and run the FreeRTOS OTA demo applications on the Renesas RX65N.
Topics
Set up your operating environment
The procedures in this section use the following environments:
-
IDE: e2 studio 7.8.0, e2 studio 2020-07
-
Toolchains: CCRX Compiler v3.0.1
-
Target devices: RSKRX65N-2MB
-
Debuggers: E2, E2 Lite emulator
-
Software: Renesas Flash Programmer, Renesas Secure Flash Programmer.exe, Tera Term
To set up your hardware
-
Connect the E2 Lite emulator and USB serial port to your RX65N board and PC.
-
Connect the power source to the RX65N.
Set up your Amazon resources
-
To run the FreeRTOS demos, you must have an Amazon account with an IAM user that has permission to access Amazon IoT services. If you haven't already, follow the steps in Setting up your Amazon account and permissions.
-
To set up for OTA updates, follow the steps in OTA update prerequisites. In particular, follow the steps in Prerequisites for OTA updates using MQTT.
-
Open the Amazon IoT console
. -
In the left navigation pane, choose Manage, then choose Things to create a thing.
A thing is a representation of a device or logical entity in Amazon IoT. It can be a physical device or sensor (for example, a light bulb or a switch on a wall). It can also be a logical entity like an instance of an application or physical entity that doesn't connect to Amazon IoT, but is related to devices that do (for example, a car that has engine sensors or a control panel). Amazon IoT provides a thing registry that helps you manage your things.
-
Choose Create, then choose Create a single thing.
-
Enter a Name for your thing, then choose Next.
-
Choose Create certificate.
-
Download the three files that are created and then choose Activate.
-
Choose Attach a policy.

-
Select the policy that you created in Device policy.
Each device that receives an OTA update using MQTT must be registered as a thing in Amazon IoT and the thing must have an attached policy like the one listed. You can find more information about the items in the
"Action"and"Resource"objects at Amazon IoT Core Policy Actions and Amazon IoT Core Action Resources.Notes
-
The
iot:Connectpermissions allow your device to connect to Amazon IoT over MQTT. -
The
iot:Subscribeandiot:Publishpermissions on the topics of Amazon IoT jobs (.../jobs/*) allow the connected device to receive job notifications and job documents, and to publish the completion state of a job execution. -
The
iot:Subscribeandiot:Publishpermissions on the topics of Amazon IoT OTA streams (.../streams/*) allow the connected device to fetch OTA update data from Amazon IoT. These permissions are required to perform firmware updates over MQTT. -
The
iot:Receivepermissions allow Amazon IoT Core to publish messages on those topics to the connected device. This permission is checked on every delivery of an MQTT message. You can use this permission to revoke access to clients that are currently subscribed to a topic.
-
-
-
To create a code-signing profile and register a code-signing certificate on Amazon.
-
To create the keys and certification, see section 7.3 "Generating ECDSA-SHA256 Key Pairs with OpenSSL" in Renesas MCU Firmware Update Design Policy
. -
Open the Amazon IoT console
. In the left navigation pane, select Manage, then Jobs. Select Create a job then Create OTA update Job. -
Under Select devices to update choose Select then choose the thing you created previously. Select Next.
-
On the Create a FreeRTOS OTA update job page, do the following:
-
For Select the protocol for firmware image transfer, choose MQTT.
-
For Select and sign your firmware image, choose Sign a new firmware image for me.
-
For Code signing profile, choose Create.
-
In the Create a code signing profile window, enter a Profile name. For the Device hardware platform select Windows Simulator. For the Code signing certificate choose Import.
-
Browse to select the certificate (
secp256r1.crt), the certificate private key (secp256r1.key), and the certificate chain (ca.crt). -
Enter a Pathname of code signing certificate on device. Then choose Create.
-
-
-
To grant access to code signing for Amazon IoT, follow the steps in Grant access to code signing for Amazon IoT.
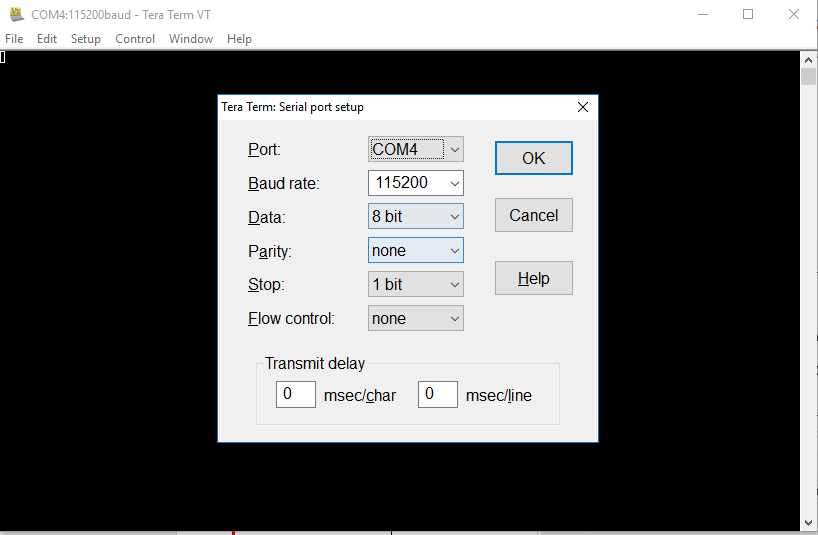
If don't have Tera Term installed on your PC, you can download it from https://ttssh2.osdn.jp/index.html.en
Import, configure the header file and build aws_demos and boot_loader
To begin, you select the latest version of the FreeRTOS package, and this will be downloaded from GitHub and imported automatically into the project. This way you can focus on the configuring FreeRTOS and writing application code.
-
Launch e2 studio.
-
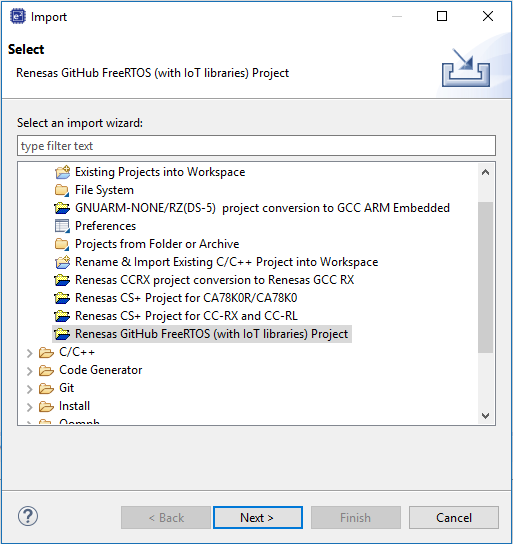
Choose File, and then choose Import….
-
Select Renesas GitHub FreeRTOS (with IoT libraries) Project.
-
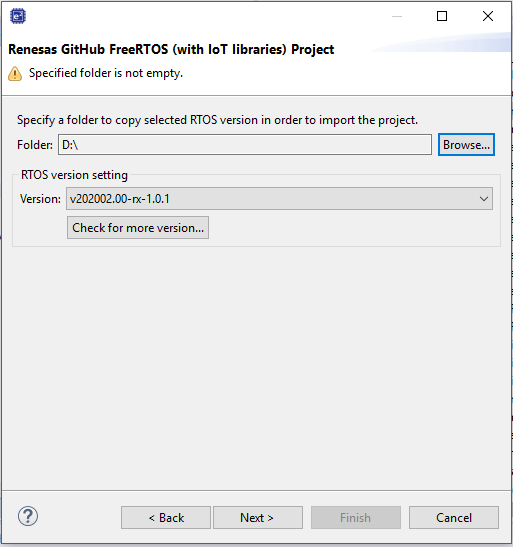
Choose Check for more version… to show the download dialog box.
-
Select the latest package.
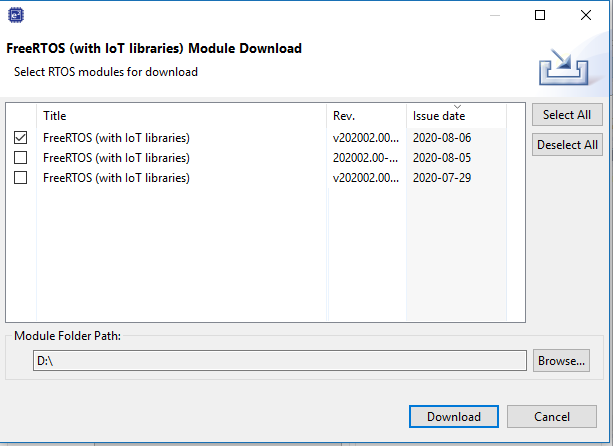
-
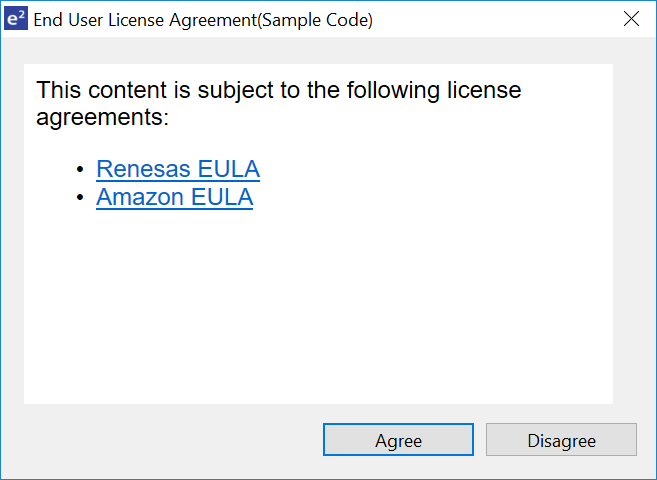
Choose Agree to accept the end user license agreement.
-
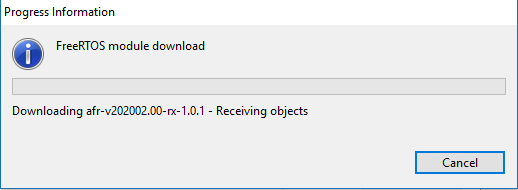
Wait for the download to complete.
-
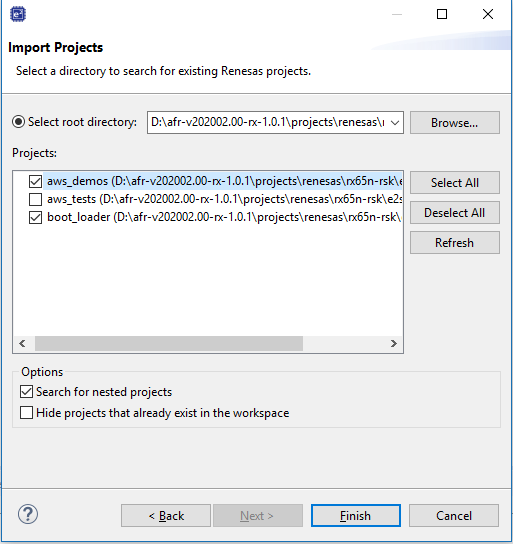
Select the aws_demos and boot_loader projects, then choose Finish to import them.
-
For both projects, open the project properties. In the navigation pane, choose Tool Chain Editor.
-
Choose the Current toolchain.
-
Choose the Current builder.
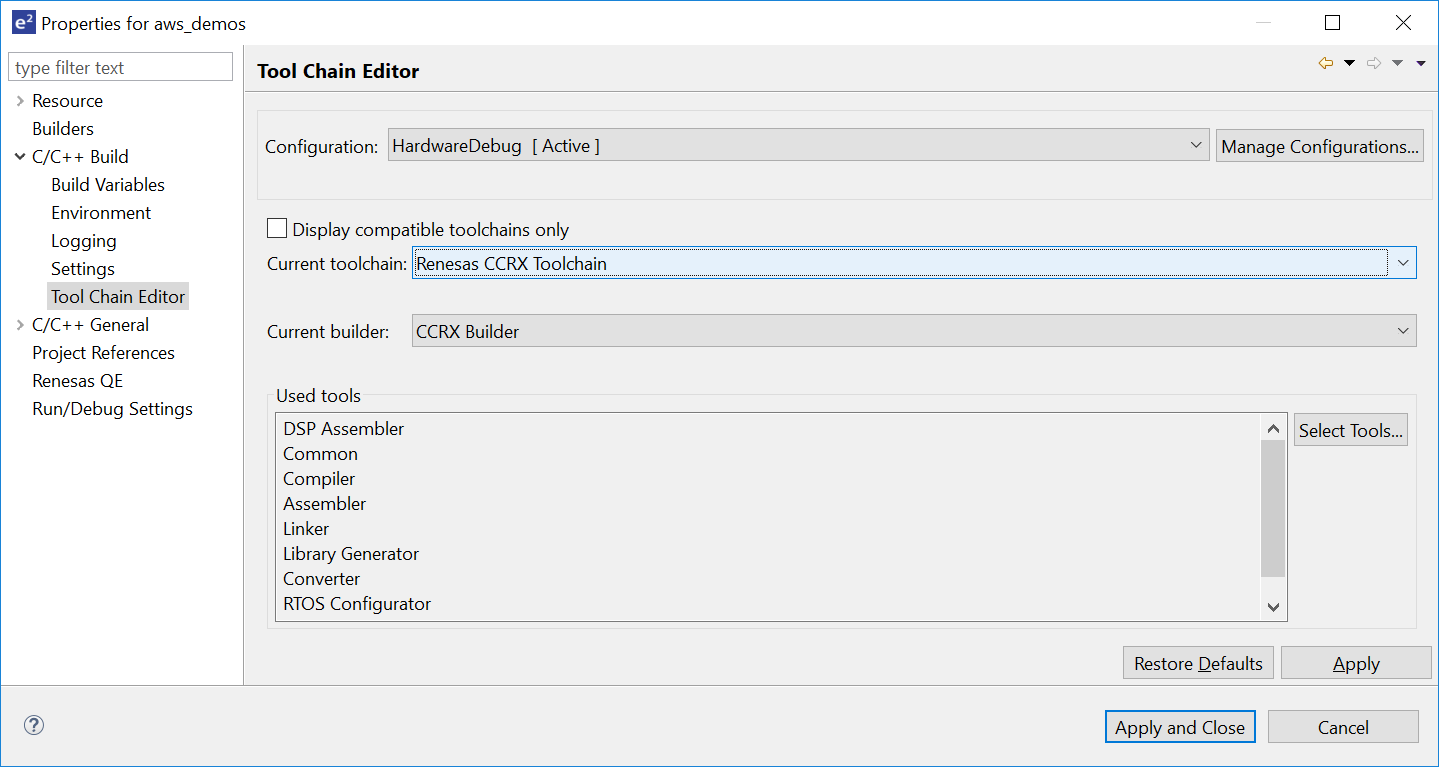
-
-
In the navigation pane, choose Settings. Choose the Toolchain tab, and then choose the toolchain Version.

Choose the Tool Settings tab, expand Converter and then choose Output. In the main window, make sure Output hex file is selected, and then choose the Output file type.


-
In the bootloader project, open
projects\renesas\rx65n-rsk\e2studio\boot_loader\src\key\code_signer_public_key.hand input the public key. For information on how to create a public key, see How to implement FreeRTOS OTA by using Amazon Web Services on RX65Nand section 7.3 "Generating ECDSA-SHA256 Key Pairs with OpenSSL" in Renesas MCU Firmware Update Design Policy . 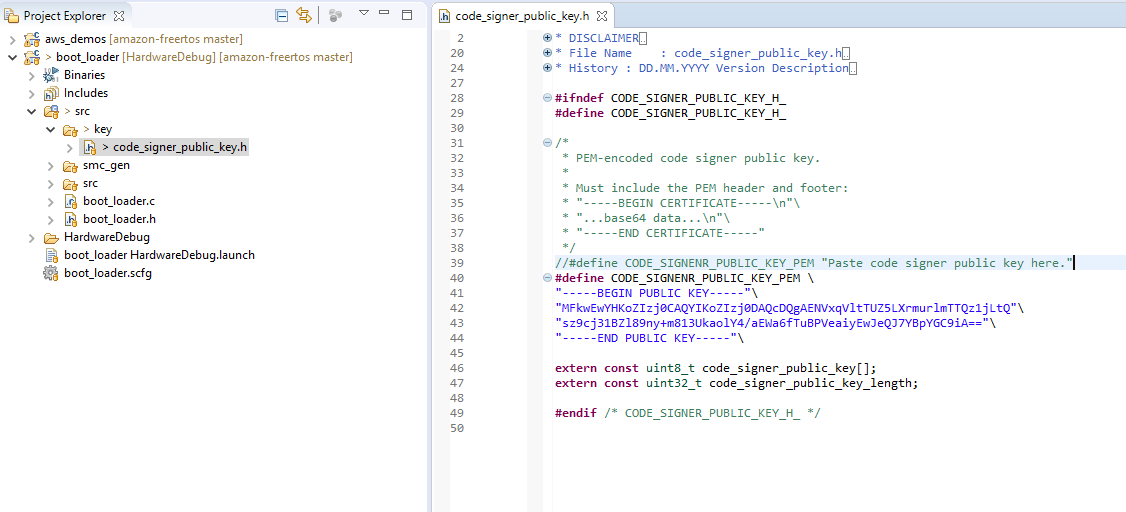
Then build the project to create
boot_loader.mot. -
Open the
aws_demosproject.-
Open the Amazon IoT console
. -
In the left navigation pane, choose Settings. Make a note of your custom endpoint in the Device data endpoint text box.
-
Choose Manage, and then choose Things. Make a note of the Amazon IoT thing name of your board.
-
In the
aws_demosproject, opendemos/include/aws_clientcredential.hand specify the following values.#define clientcredentialMQTT_BROKER_ENDPOINT[] = "Your Amazon IoT endpoint"; #define clientcredentialIOT_THING_NAME "The Amazon IoT thing name of your board"
-
Open the
tools/certificate_configuration/CertificateConfigurator.htmlfile. -
Import the certificate PEM file and Private Key PEM file that you downloaded earlier.
-
Choose Generate and save aws_clientcredential_keys.h and replace this file in the
demos/include/directory.
-
Open the
vendors/renesas/boards/rx65n-rsk/aws_demos/config_files/ota_demo_config.hfile, and specify these values.#define otapalconfigCODE_SIGNING_CERTIFICATE [] = "your-certificate-key";Where
your-certificate-keyis the value from the filesecp256r1.crt. Remember to add "\" after each line in the certification. For more information on creating thesecp256r1.crtfile, see How to implement FreeRTOS OTA by using Amazon Web Services on RX65Nand section 7.3 "Generating ECDSA-SHA256 Key Pairs with OpenSSL" in Renesas MCU Firmware Update Design Policy . 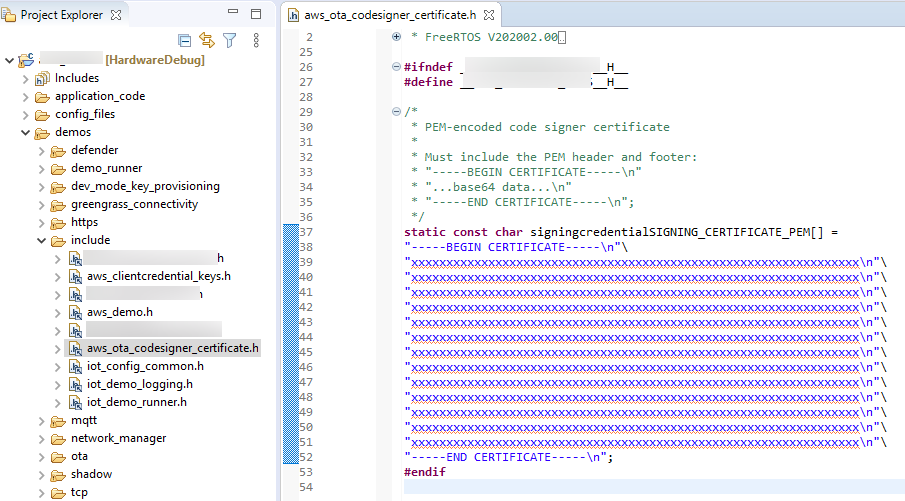
-
-
Task A: Install the initial version of the firmware
-
Open the
vendors/renesas/boards/board/aws_demos/config_files/aws_demo_config.hfile, comment out#define CONFIG_CORE_MQTT_MUTUAL_AUTH_DEMO_ENABLED, and define eitherCONFIG_OTA_MQTT_UPDATE_DEMO_ENABLEDorCONFIG_OTA_HTTP_UPDATE_DEMO_ENABLED. -
Open the
demos/include/ aws_application_version.hfile, and set the initial version of the firmware to0.9.2.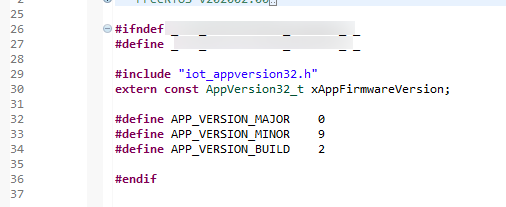
-
Change the following settings in the Section Viewer.

-
Choose Build to create the
aws_demos.motfile.
-
-
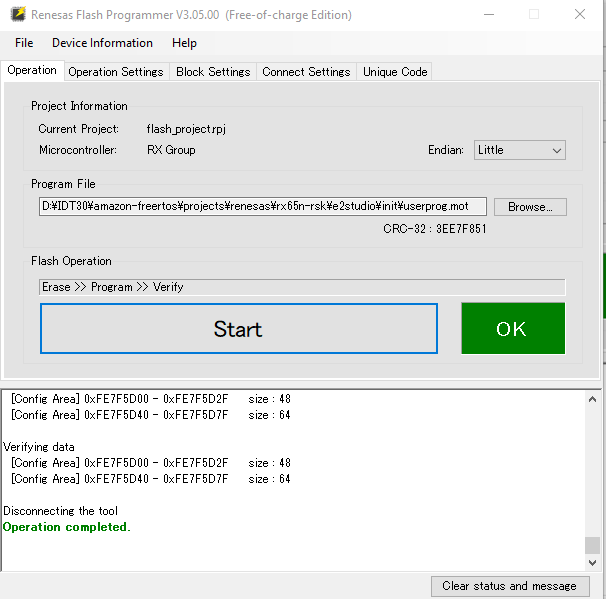
Create the file
userprog.motwith the Renesas Secure Flash Programmer.userprog.motis a combination ofaws_demos.motandboot_loader.mot. You can flash this file to the RX65N-RSK to install the initial firmware.-
Download https://github.com/renesas/Amazon-FreeRTOS-Tools
and open Renesas Secure Flash Programmer.exe. -
Choose the Initial Firm tab and then set the following parameters:
-
Private Key Path – The location of
secp256r1.privatekey. -
Boot Loader File Path– The location of
boot_loader.mot(projects\renesas\rx65n-rsk\e2studio\boot_loader\HardwareDebug). -
File Path – The location of the
aws_demos.mot(projects\renesas\rx65n-rsk\e2studio\aws_demos\HardwareDebug).

-
-
Create a directory named
init_firmware, Generateuserprog.mot, and save it to theinit_firmwaredirectory. Verify that the generate succeeded.
-
-
Flash the initial firmware on the RX65N-RSK.
-
Download the latest version of the Renesas Flash Programmer (Programming GUI) from https://www.renesas.com/tw/en/products/software-tools/tools/programmer/renesas-flash-programmer-programming-gui.html
. -
Open the
vendors\renesas\rx_mcu_boards\boards\rx65n-rsk\aws_demos\flash_project\erase_from_bank\
                                erase.rpj
file to erase data on the bank. -
Choose Start to erase the bank.
-
To flash
userprog.mot, choose Browse... and navigate to theinit_firmwaredirectory, select theuserprog.motfile and choose Start.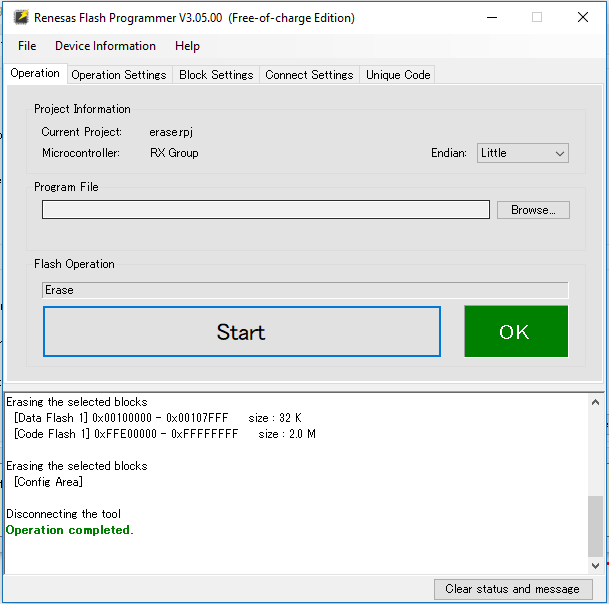
-
-
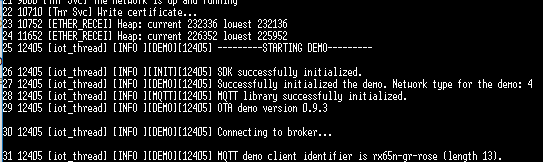
Version 0.9.2 (initial version) of the firmware was installed to your RX65N-RSK. The RX65N-RSK board is now listening for OTA updates. If you have opened Tera Term on your PC, you see something like the following when the initial firmware runs.
------------------------------------------------- RX65N secure boot program ------------------------------------------------- Checking flash ROM status. bank 0 status = 0xff [LIFECYCLE_STATE_BLANK] bank 1 status = 0xfc [LIFECYCLE_STATE_INSTALLING] bank info = 1. (start bank = 0) start installing user program. copy secure boot (part1) from bank0 to bank1...OK copy secure boot (part2) from bank0 to bank1...OK update LIFECYCLE_STATE from [LIFECYCLE_STATE_INSTALLING] to [LIFECYCLE_STATE_VALID] bank1(temporary area) block0 erase (to update LIFECYCLE_STATE)...OK bank1(temporary area) block0 write (to update LIFECYCLE_STATE)...OK swap bank... ------------------------------------------------- RX65N secure boot program ------------------------------------------------- Checking flash ROM status. bank 0 status = 0xf8 [LIFECYCLE_STATE_VALID] bank 1 status = 0xff [LIFECYCLE_STATE_BLANK] bank info = 0. (start bank = 1) integrity check scheme = sig-sha256-ecdsa bank0(execute area) on code flash integrity check...OK jump to user program 0 1 [ETHER_RECEI] Deferred Interrupt Handler Task started 1 1 [ETHER_RECEI] Network buffers: 3 lowest 3 2 1 [ETHER_RECEI] Heap: current 234192 lowest 234192 3 1 [ETHER_RECEI] Queue space: lowest 8 4 1 [IP-task] InitializeNetwork returns OK 5 1 [IP-task] xNetworkInterfaceInitialise returns 0 6 101 [ETHER_RECEI] Heap: current 234592 lowest 233392 7 2102 [ETHER_RECEI] prvEMACHandlerTask: PHY LS now 1 8 3001 [IP-task] xNetworkInterfaceInitialise returns 1 9 3092 [ETHER_RECEI] Network buffers: 2 lowest 2 10 3092 [ETHER_RECEI] Queue space: lowest 7 11 3092 [ETHER_RECEI] Heap: current 233320 lowest 233320 12 3193 [ETHER_RECEI] Heap: current 233816 lowest 233120 13 3593 [IP-task] vDHCPProcess: offer c0a80a09ip 14 3597 [ETHER_RECEI] Heap: current 233200 lowest 233000 15 3597 [IP-task] vDHCPProcess: offer c0a80a09ip 16 3597 [IP-task] IP Address: 192.168.10.9 17 3597 [IP-task] Subnet Mask: 255.255.255.0 18 3597 [IP-task] Gateway Address: 192.168.10.1 19 3597 [IP-task] DNS Server Address: 192.168.10.1 20 3600 [Tmr Svc] The network is up and running 21 3622 [Tmr Svc] Write certificate... 22 3697 [ETHER_RECEI] Heap: current 232320 lowest 230904 23 4497 [ETHER_RECEI] Heap: current 226344 lowest 225944 24 5317 [iot_thread] [INFO ][DEMO][5317] ---------STARTING DEMO--------- 25 5317 [iot_thread] [INFO ][INIT][5317] SDK successfully initialized. 26 5317 [iot_thread] [INFO ][DEMO][5317] Successfully initialized the demo. Network type for the demo: 4 27 5317 [iot_thread] [INFO ][MQTT][5317] MQTT library successfully initialized. 28 5317 [iot_thread] [INFO ][DEMO][5317] OTA demo version 0.9.2 29 5317 [iot_thread] [INFO ][DEMO][5317] Connecting to broker... 30 5317 [iot_thread] [INFO ][DEMO][5317] MQTT demo client identifier is rx65n-gr-rose (length 13). 31 5325 [ETHER_RECEI] Heap: current 206944 lowest 206504 32 5325 [ETHER_RECEI] Heap: current 206440 lowest 206440 33 5325 [ETHER_RECEI] Heap: current 206240 lowest 206240 38 5334 [ETHER_RECEI] Heap: current 190288 lowest 190288 39 5334 [ETHER_RECEI] Heap: current 190088 lowest 190088 40 5361 [ETHER_RECEI] Heap: current 158512 lowest 158168 41 5363 [ETHER_RECEI] Heap: current 158032 lowest 158032 42 5364 [ETHER_RECEI] Network buffers: 1 lowest 1 43 5364 [ETHER_RECEI] Heap: current 156856 lowest 156856 44 5364 [ETHER_RECEI] Heap: current 156656 lowest 156656 46 5374 [ETHER_RECEI] Heap: current 153016 lowest 152040 47 5492 [ETHER_RECEI] Heap: current 141464 lowest 139016 48 5751 [ETHER_RECEI] Heap: current 140160 lowest 138680 49 5917 [ETHER_RECEI] Heap: current 138280 lowest 138168 59 7361 [iot_thread] [INFO ][MQTT][7361] Establishing new MQTT connection. 62 7428 [iot_thread] [INFO ][MQTT][7428] (MQTT connection 81cfc8, CONNECT operation 81d0e8) Wait complete with result SUCCESS. 63 7428 [iot_thread] [INFO ][MQTT][7428] New MQTT connection 4e8c established. 64 7430 [iot_thread] [OTA_AgentInit_internal] OTA Task is Ready. 65 7430 [OTA Agent T] [prvOTAAgentTask] Called handler. Current State [Ready] Event [Start] New state [RequestingJob] 66 7431 [OTA Agent T] [INFO ][MQTT][7431] (MQTT connection 81cfc8) SUBSCRIBE operation scheduled. 67 7431 [OTA Agent T] [INFO ][MQTT][7431] (MQTT connection 81cfc8, SUBSCRIBE operation 818c48) Waiting for operation completion. 68 7436 [ETHER_RECEI] Heap: current 128248 lowest 127992 69 7480 [OTA Agent T] [INFO ][MQTT][7480] (MQTT connection 81cfc8, SUBSCRIBE operation 818c48) Wait complete with result SUCCESS. 70 7480 [OTA Agent T] [prvSubscribeToJobNotificationTopics] OK: $aws/things/rx65n-gr-rose/jobs/$next/get/accepted 71 7481 [OTA Agent T] [INFO ][MQTT][7481] (MQTT connection 81cfc8) SUBSCRIBE operation scheduled. 72 7481 [OTA Agent T] [INFO ][MQTT][7481] (MQTT connection 81cfc8, SUBSCRIBE operation 818c48) Waiting for operation completion. 73 7530 [OTA Agent T] [INFO ][MQTT][7530] (MQTT connection 81cfc8, SUBSCRIBE operation 818c48) Wait complete with result SUCCESS. 74 7530 [OTA Agent T] [prvSubscribeToJobNotificationTopics] OK: $aws/things/rx65n-gr-rose/jobs/notify-next 75 7530 [OTA Agent T] [prvRequestJob_Mqtt] Request #0 76 7532 [OTA Agent T] [INFO ][MQTT][7532] (MQTT connection 81cfc8) MQTT PUBLISH operation queued. 77 7532 [OTA Agent T] [INFO ][MQTT][7532] (MQTT connection 81cfc8, PUBLISH operation 818b80) Waiting for operation completion. 78 7552 [OTA Agent T] [INFO ][MQTT][7552] (MQTT connection 81cfc8, PUBLISH operation 818b80) Wait complete with result SUCCESS. 79 7552 [OTA Agent T] [prvOTAAgentTask] Called handler. Current State [RequestingJob] Event [RequestJobDocument] New state [WaitingForJob] 80 7552 [OTA Agent T] [prvParseJSONbyModel] Extracted parameter [ clientToken: 0:rx65n-gr-rose ] 81 7552 [OTA Agent T] [prvParseJSONbyModel] parameter not present: execution 82 7552 [OTA Agent T] [prvParseJSONbyModel] parameter not present: jobId 83 7552 [OTA Agent T] [prvParseJSONbyModel] parameter not present: jobDocument 84 7552 [OTA Agent T] [prvParseJSONbyModel] parameter not present: afr_ota 85 7552 [OTA Agent T] [prvParseJSONbyModel] parameter not present: protocols 86 7552 [OTA Agent T] [prvParseJSONbyModel] parameter not present: files 87 7552 [OTA Agent T] [prvParseJSONbyModel] parameter not present: filepath 99 7651 [ETHER_RECEI] Heap: current 129720 lowest 127304 100 8430 [iot_thread] [INFO ][DEMO][8430] State: Ready Received: 1 Queued: 0 Processed: 0 Dropped: 0 101 9430 [iot_thread] [INFO ][DEMO][9430] State: WaitingForJob Received: 1 Queued: 0 Processed: 0 Dropped: 0 102 10430 [iot_thread] [INFO ][DEMO][10430] State: WaitingForJob Received: 1 Queued: 0 Processed: 0 Dropped: 0 103 11430 [iot_thread] [INFO ][DEMO][11430] State: WaitingForJob Received: 1 Queued: 0 Processed: 0 Dropped: 0 104 12430 [iot_thread] [INFO ][DEMO][12430] State: WaitingForJob Received: 1 Queued: 0 Processed: 0 Dropped: 0 105 13430 [iot_thread] [INFO ][DEMO][13430] State: WaitingForJob Received: 1 Queued: 0 Processed: 0 Dropped: 0 106 14430 [iot_thread] [INFO ][DEMO][14430] State: WaitingForJob Received: 1 Queued: 0 Processed: 0 Dropped: 0 107 15430 [iot_thread] [INFO ][DEMO][15430] State: WaitingForJob Received: 1 Queued: 0 Processed: 0 Dropped: 0 -
Task B: Update the version of your firmware
-
Open the
demos/include/aws_application_version.hfile and increment theAPP_VERSION_BUILDtoken value to0.9.3. -
Rebuild the project.
-
-
Create the
userprog.rsufile with the Renesas Secure Flash Programmer to update the version of your firmware.-
Open the
Amazon-FreeRTOS-Tools\Renesas Secure Flash Programmer.exefile. -
Choose the Update Firm tab and set the following parameters:
-
File Path – The location of the
aws_demos.motfile (projects\renesas\rx65n-rsk\e2studio\aws_demos\HardwareDebug).
-
-
Create a directory named
update _firmware. Generateuserprog.rsuand save it to theupdate_firmwaredirectory. Verify that the generate succeeded.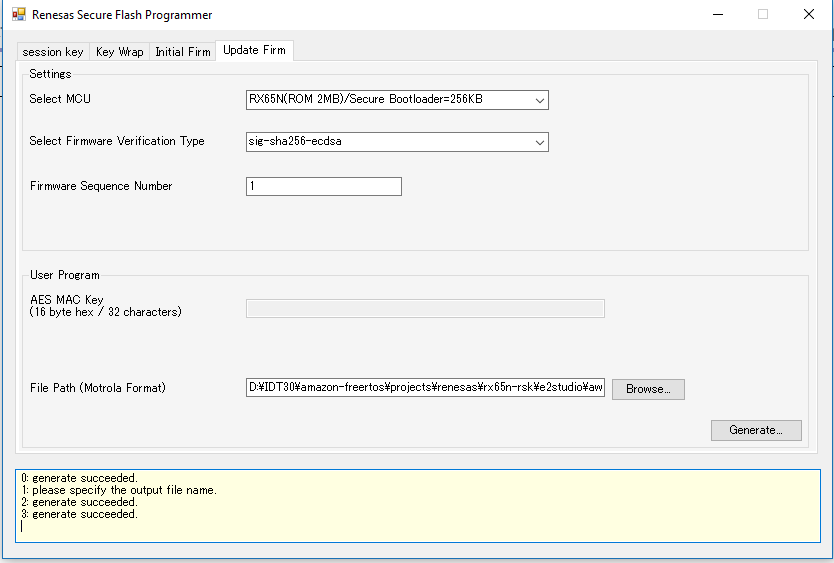
-
-
Upload the firmware update,
userproj.rsu, into an Amazon S3 bucket as described in Create an Amazon S3 bucket to store your update.
-
Create a job to update firmware on the RX65N-RSK.
Amazon IoT Jobs is a service that notifies one or more connected devices of a pending Job. A job can be used to manage a fleet of devices, update firmware and security certificates on devices, or perform administrative tasks such as restarting devices and performing diagnostics.
-
Sign in to the Amazon IoT console
. In the navigation pane, choose Manage, and choose Jobs. -
Choose Create a job, then choose Create OTA Update job. Select a thing, then choose Next.
-
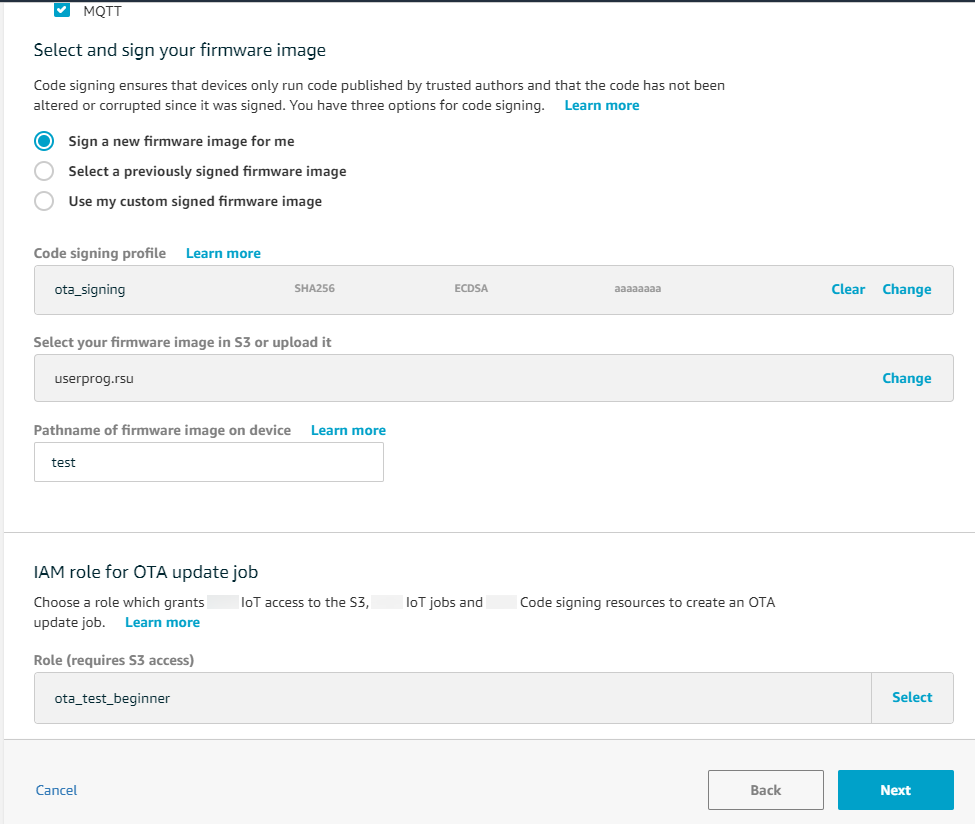
Create a FreeRTOS OTA update job as follows:
-
Choose MQTT.
-
Select the code signing profile you created in the previous section.
-
Select the firmware image that you uploaded to an Amazon S3 bucket.
-
For Pathname of firmware image on device, enter
test. -
Choose the IAM role that you created in the previous section.
-
-
Choose Next.
-
Enter an ID and then choose Create.
-
-
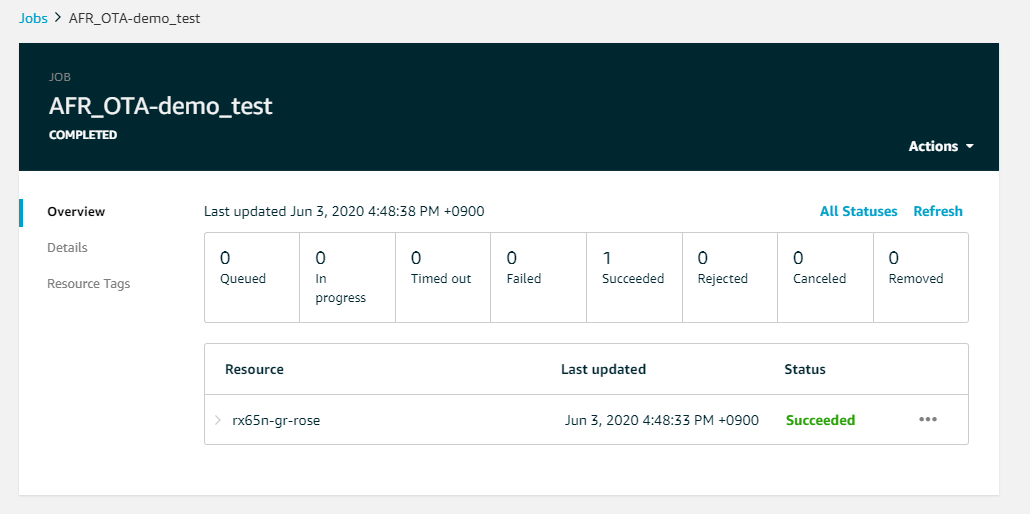
Reopen Tera Term to verify that the firmware was updated successfully to OTA demo version 0.9.3.
-
On the Amazon IoT console, verify that the job status is Succeeded.