Getting started with the Microchip ATECC608A Secure Element with Windows simulator
Important
This reference integration is hosted on the Amazon-FreeRTOS repository which is deprecated. We recommend that you start here when you create a new project. If you already have an existing FreeRTOS project based on the now deprecated Amazon-FreeRTOS repository, see the Amazon-FreeRTOS Github Repository Migration Guide.
This tutorial provides instructions for getting started with the Microchip ATECC608A Secure Element with Windows Simulator.
You need the following hardware:
Before you begin, you must configure Amazon IoT and your FreeRTOS download to connect your device to the Amazon Cloud. See
First steps for instructions. In this tutorial, the path to
the FreeRTOS download directory is referred to as freertos.
Overview
This tutorial contains the following steps:
-
Connect your board to a host machine.
-
Install software on the host machine for developing and debugging embedded applications for your microcontroller board.
-
Cross-compile an FreeRTOS demo application to a binary image.
-
Load the application binary image to your board, and then run the application.
Set up the Microchip ATECC608A hardware
Before you can interact with your Microchip ATECC608A device, you must first program the SAMD21.
To set up the SAMD21 XPlained Pro board
-
Follow the CryptoAuthSSH-XSTK (DM320109) - Latest Firmware
link to download a .zip file containing instructions (PDF) and a binary which can be programmed onto the D21. -
Download and install the Atmel Studio 7
IDP. Make sure that you select the SMART ARM MCU driver architecture during installation. -
Use a USB 2.0 Micro B cable to attach the "Debug USB" connector to your computer, and follow the instructions in the PDF. (The "Debug USB" connector is the USB port closest to the POWER led and pins.)
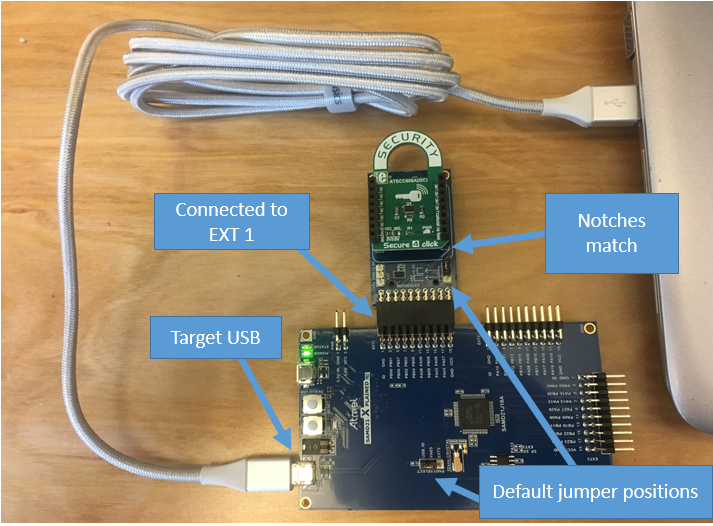
To connect the hardware
-
Unplug the micro USB cable from Debug USB.
-
Plug the mikroBUS XPlained Pro adapter into the SAMD21 board in the EXT1 location.
-
Plug the ATECC608A Secure 4 Click board into the mikroBUSX XPlained Pro adapter. Make sure that the notched corner of the click board matches with the notched icon on the adapter board.
-
Plug the micro USB cable into Target USB.
Your setup should look like the following.
Set up your development environment
Sign up for an Amazon Web Services account
If you do not have an Amazon Web Services account, use the following procedure to create one.
To sign up for Amazon Web Services
Open http://www.amazonaws.cn/
and choose Sign Up. Follow the on-screen instructions.
Amazon sends you a confirmation email after the sign-up process is
complete. At any time, you can view your current account activity and manage your account by
going to http://www.amazonaws.cn/
Secure IAM users
After you sign up for an Amazon Web Services account, safeguard your administrative user by turning on multi-factor authentication (MFA). For instructions, see Enable a virtual MFA device for an IAM user (console) in the IAM User Guide.
To give other users access to your Amazon Web Services account resources, create IAM users. To secure your IAM users, turn on MFA and only give the IAM users the permissions needed to perform their tasks.
For more information about creating and securing IAM users, see the following topics in the IAM User Guide:
To provide access, add permissions to your users, groups, or roles:
-
Users managed in IAM through an identity provider:
Create a role for identity federation. Follow the instructions in Create a role for a third-party identity provider (federation) in the IAM User Guide.
-
IAM users:
-
Create a role that your user can assume. Follow the instructions in Create a role for an IAM user in the IAM User Guide.
-
(Not recommended) Attach a policy directly to a user or add a user to a user group. Follow the instructions in Adding permissions to a user (console) in the IAM User Guide.
-
Setting up
-
Download the FreeRTOS repo from the FreeRTOS GitHub repository
. To download FreeRTOS from GitHub:
-
Browse to the FreeRTOS GitHub repository
. -
Choose Clone or download.
-
From the command line on your computer, clone the repository to a directory on your host machine.
git clone https://github.com/aws/amazon-freertos.git -\-recurse-submodulesImportant
-
In this topic, the path to the FreeRTOS download directory is referred to as
freertos -
Space characters in the
freertos -
The maximum length of a file path on Microsoft Windows is 260 characters. Long FreeRTOS download directory paths can cause build failures.
-
Because the source code may contain symbolic links, if you're using Windows to extract the archive, you may have to:
-
Enable Developer Mode
or, -
Use a console that is elevated as administrator.
In this way, Windows can properly create symbolic links when it extracts the archive. Otherwise, symbolic links will be written as normal files that contain the paths of the symbolic links as text or are empty. For more information, see the blog entry Symlinks in Windows 10!
. If you use Git under Windows, you must enable Developer Mode or you must:
-
Set
core.symlinksto true with the following command:git config -\-global core.symlinks true -
Use a console that is elevated as administrator whenever you use a git command that writes to the system (for example, git pull, git clone, and git submodule update -\-init -\-recursive).
-
-
-
From the
freertos
-
-
Set up your development environment.
-
Install the latest version of WinPCap
. -
Install Microsoft Visual Studio.
Visual Studio versions 2017 and 2019 are known to work. All editions of these Visual Studio versions are supported (Community, Professional, or Enterprise).
In addition to the IDE, install the Desktop development with C++ component. Then, under Optional, install the latest Windows 10 SDK.
-
Make sure that you have an active hard-wired Ethernet connection.
-
Build and run the FreeRTOS demo project
Important
The Microchip ATECC608A device has a one time initialization that is locked onto the device the first
time a project is run (during the call to C_InitToken). However, the FreeRTOS demo project and
test project have different configurations. If the device is locked during the demo project configurations,
it will not be possible for all tests in the test project to succeed.
To build and run the FreeRTOS demo project with the Visual Studio IDE
-
Load the project into Visual Studio.
From the File menu, choose Open. Choose File/Solution, navigate to the
freertos\projects\microchip\ecc608a_plus_winsim\visual_studio\aws_demos\aws_demos.sln -
Retarget the demo project.
The demo project depends on the Windows SDK, but it does not have a Windows SDK version specified. By default, the IDE might attempt to build the demo with an SDK version not present on your machine. To set the Windows SDK version, right-click aws_demos, and then choose Retarget Projects. This opens the Review Solution Actions window. Choose a Windows SDK version that is present on your machine (use the initial value in the drop-down list), and then choose OK.
-
Build and run the project.
From the Build menu, choose Build Solution, and make sure the solution builds without errors. Choose Debug, Start Debugging to run the project. On the first run, you need to configure your device interface and recompile. For more information, see Configure your network interface.
-
Provision the Microchip ATECC608A.
Microchip has provided several scripting tools to help with the setup of the ATECC608A parts. Navigate to
freertos\vendors\microchip\secure_elements\app\example_trust_chain_toolFollow the instructions in the
README.mdfile to provision your device. The steps include the following:-
Create and register a certificate authority with Amazon.
-
Generate your keys on the Microchip ATECC608A and export the public key and device serial number.
-
Generate a certificate for the device and registering that certificate with Amazon.
-
Load the CA certificate and device certificate onto the device.
-
-
Build and run FreeRTOS samples.
Re-run the demo project again. This time you should connect!
Troubleshooting
For general troubleshooting information, see Troubleshooting getting started.