Export
In your Data Wrangler flow, you can export some or all of the transformations that you've made to your data processing pipelines.
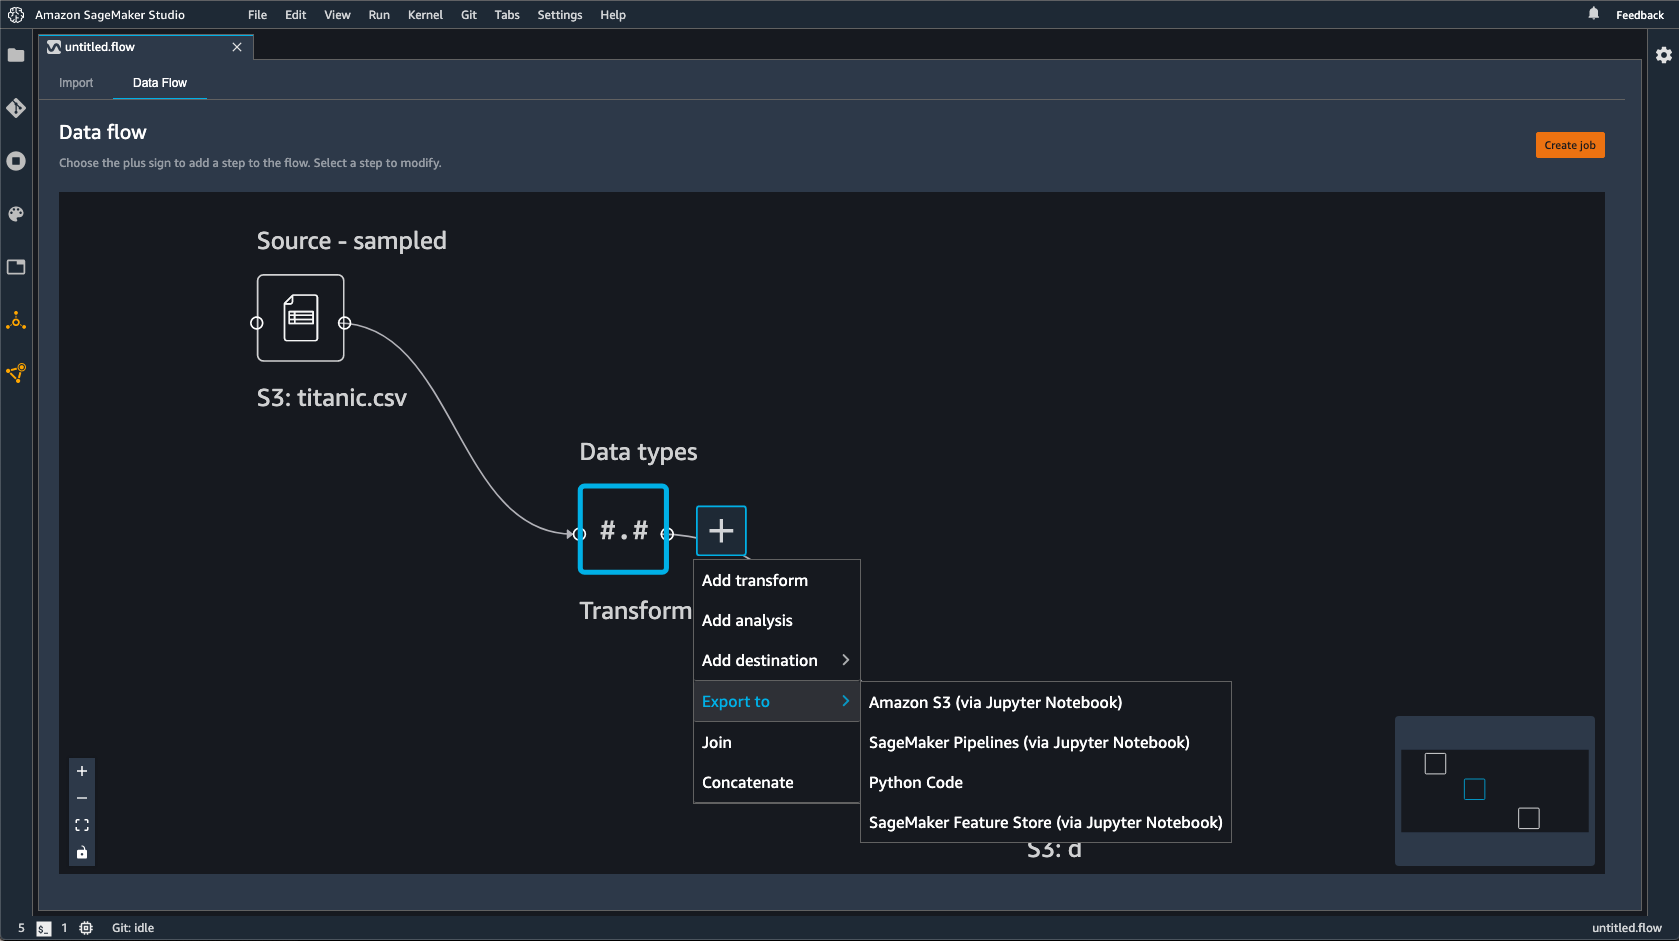
A Data Wrangler flow is the series of data preparation steps that you've performed on your data. In your data preparation, you perform one or more transformations to your data. Each transformation is done using a transform step. The flow has a series of nodes that represent the import of your data and the transformations that you've performed. For an example of nodes, see the following image.
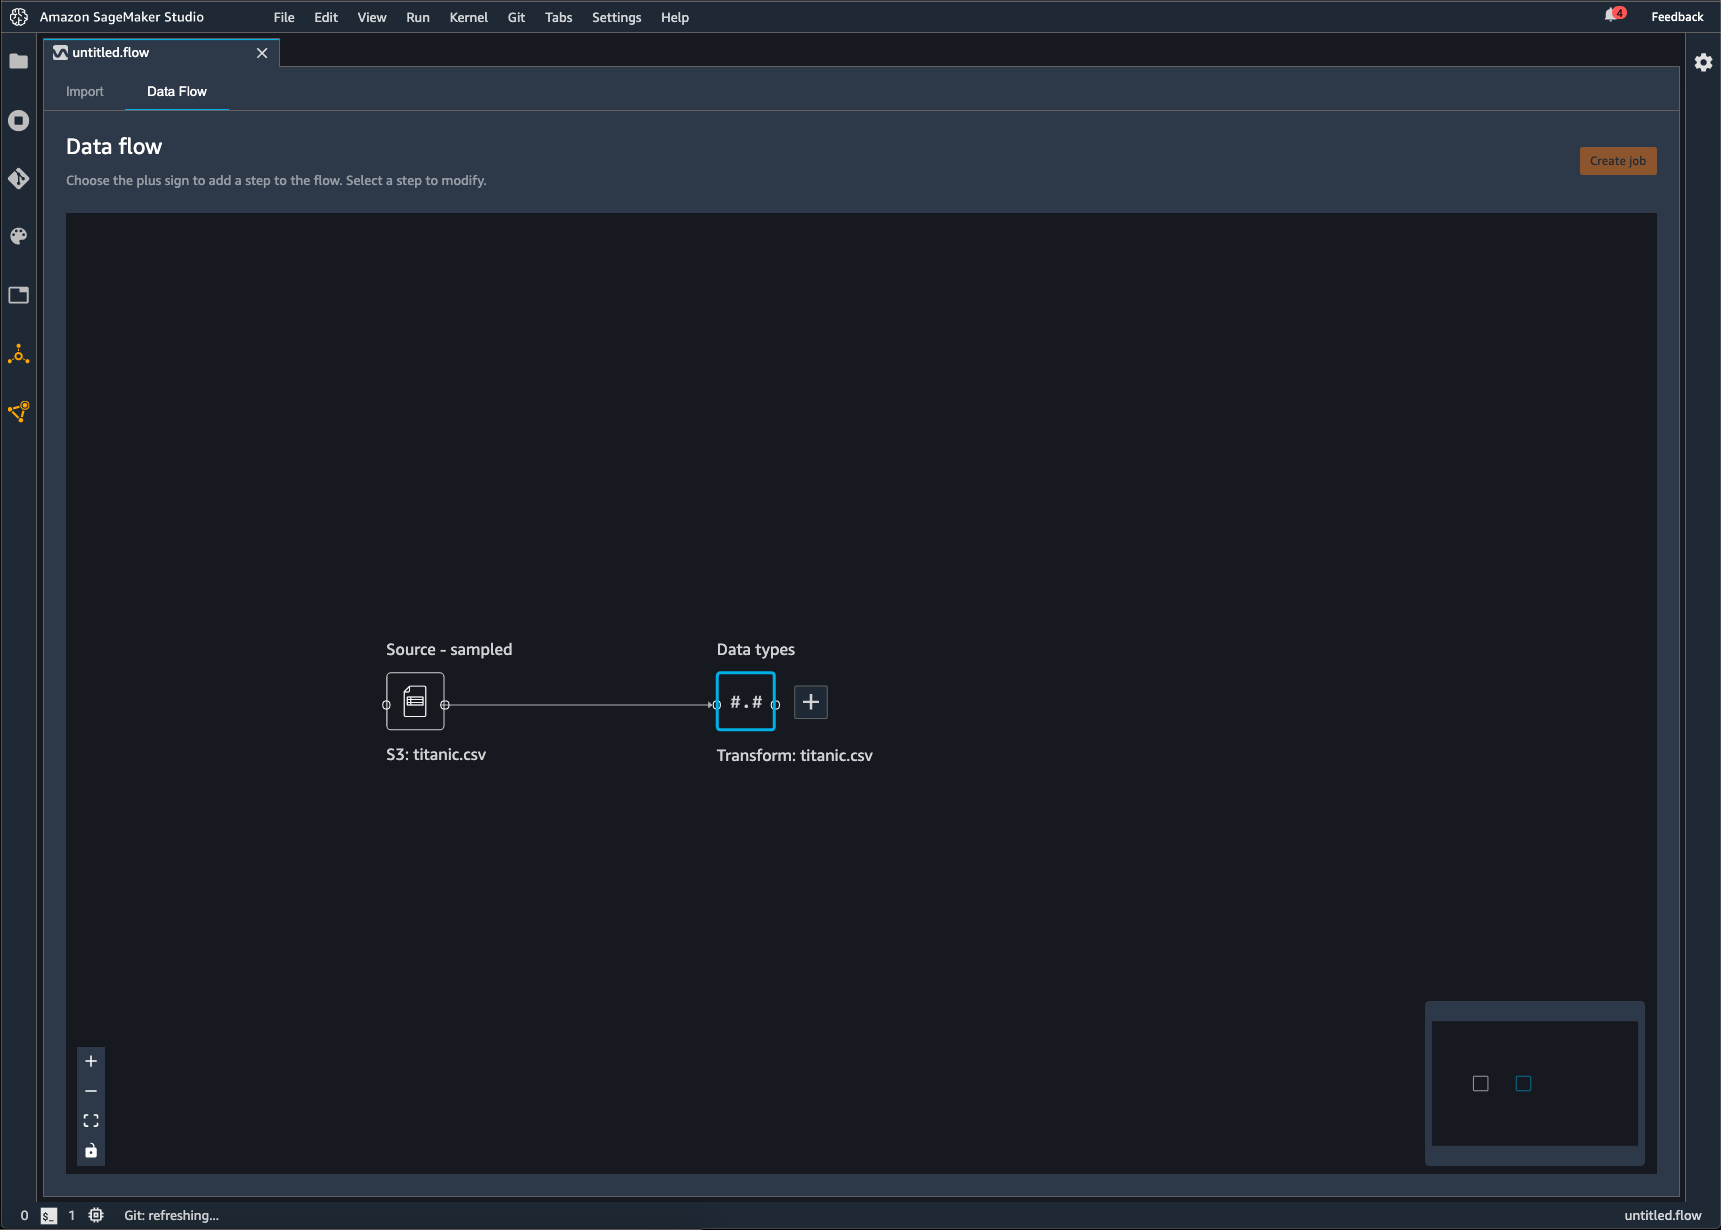
The preceding image shows a Data Wrangler flow with two nodes. The Source - sampled node shows the data source from which you've imported your data. The Data types node indicates that Data Wrangler has performed a transformation to convert the dataset into a usable format.
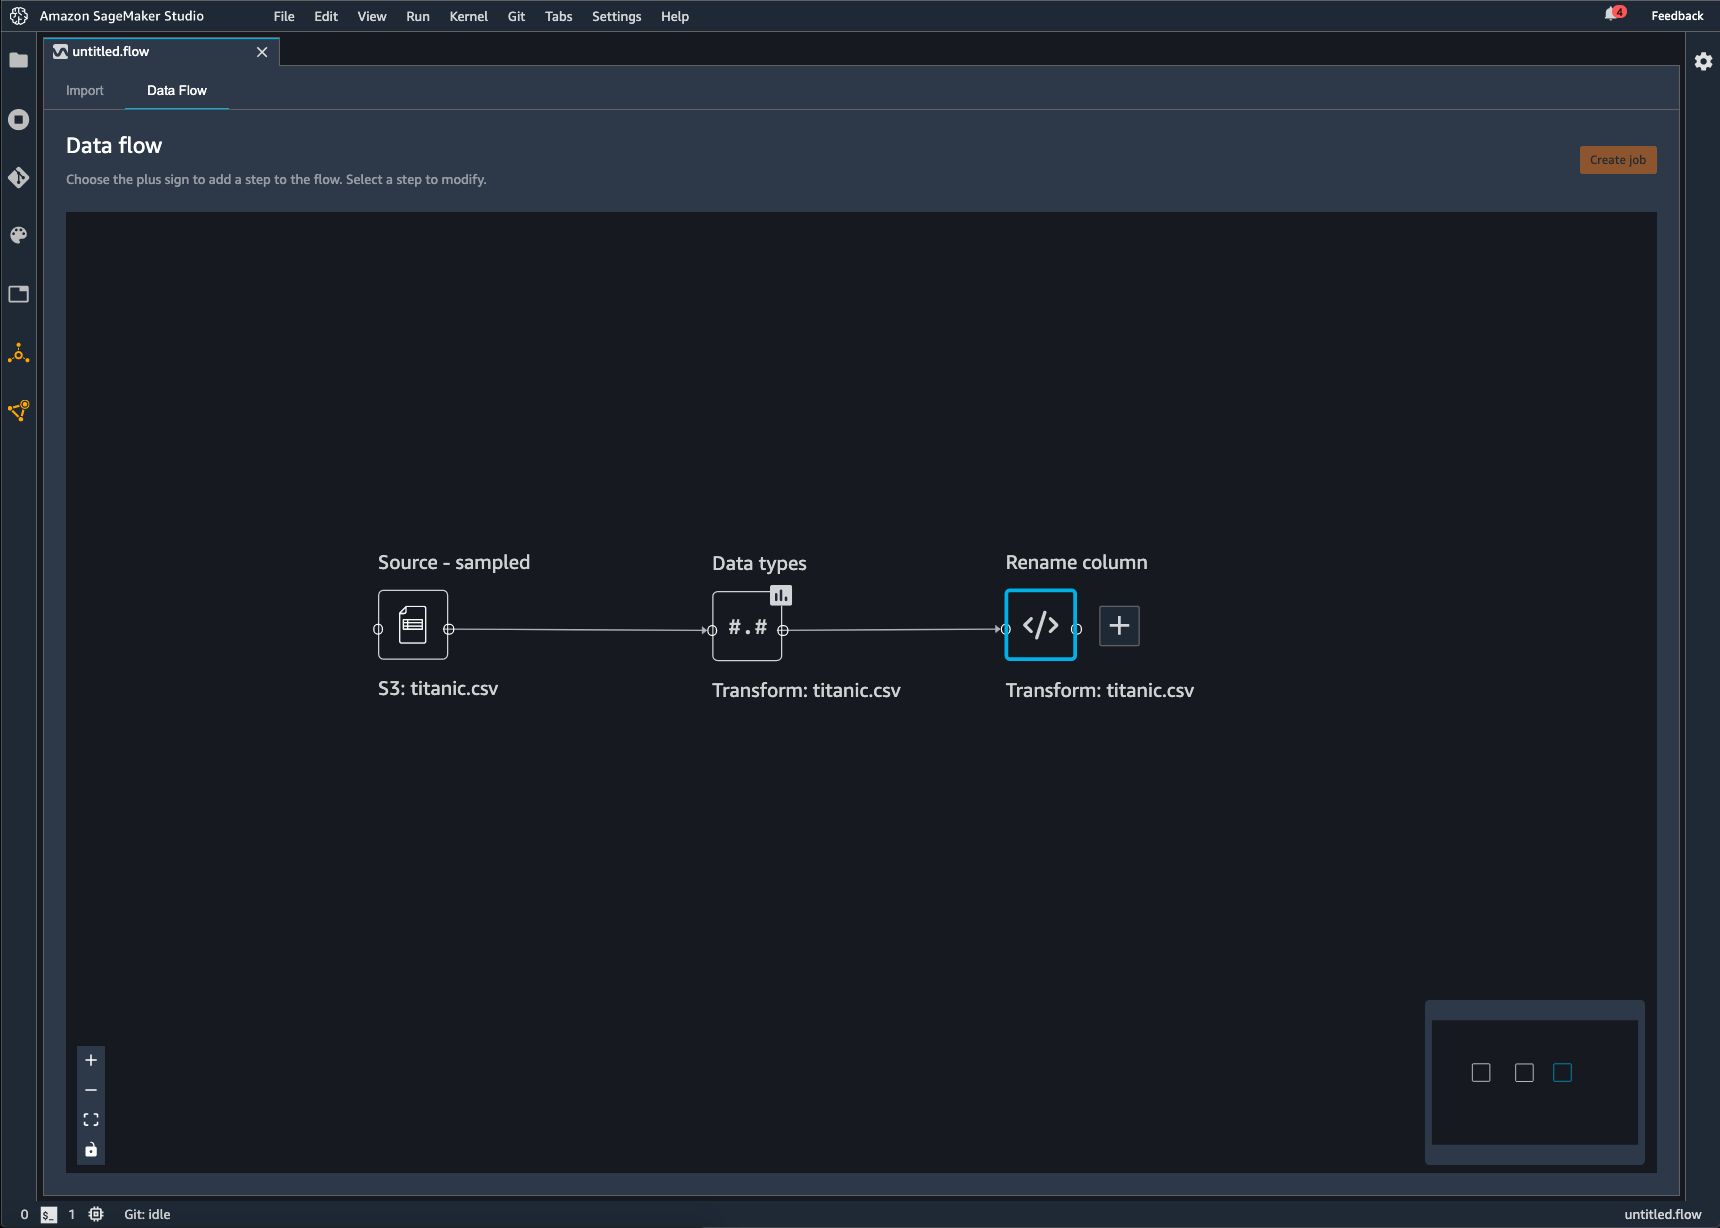
Each transformation that you add to the Data Wrangler flow appears as an additional node. For information on the transforms that you can add, see Transform Data. The following image shows a Data Wrangler flow that has a Rename-column node to change the name of a column in a dataset.
You can export your data transformations to the following:
-
Amazon S3
-
Pipelines
-
Amazon SageMaker Feature Store
-
Python Code
Important
We recommend that you use the IAM AmazonSageMakerFullAccess managed
policy to grant Amazon permission to use Data Wrangler. If you don't use the managed policy, you
can use an IAM policy that gives Data Wrangler access to an Amazon S3 bucket. For more information
on the policy, see Security and Permissions.
When you export your data flow, you're charged for the Amazon resources that you use. You can use cost allocation tags to organize and manage the costs of those resources. You create these tags for your user-profile and Data Wrangler automatically applies them to the resources used to export the data flow. For more information, see Using Cost Allocation Tags.
Export to Amazon S3
Data Wrangler gives you the ability to export your data to a location within an Amazon S3 bucket. You can specify the location using one of the following methods:
-
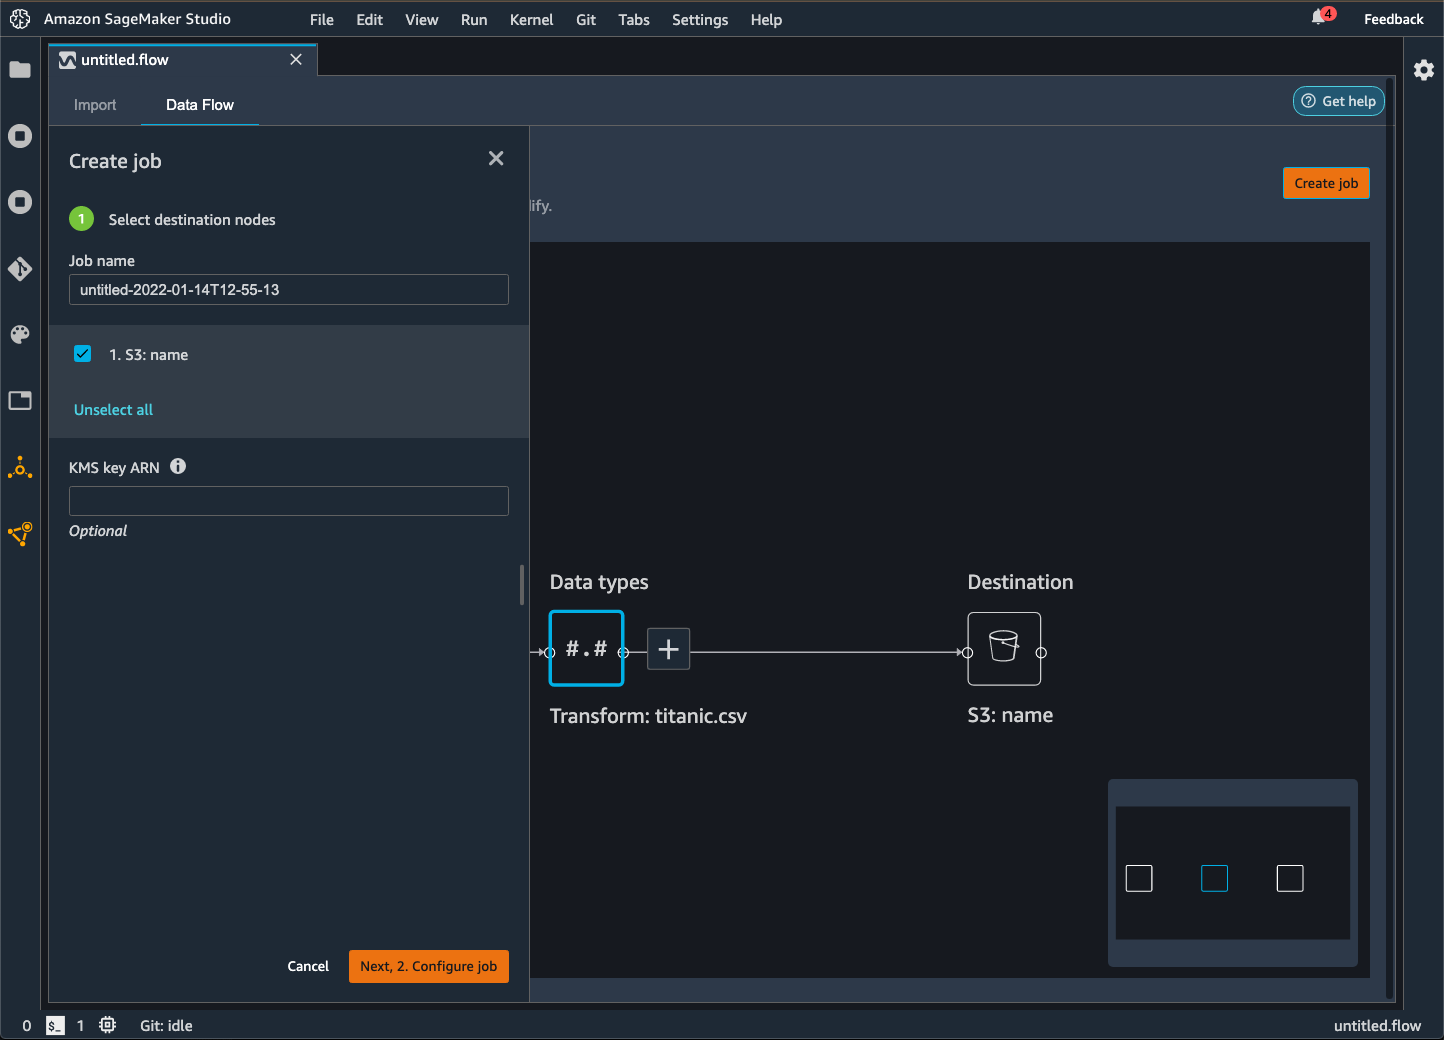
Destination node – Where Data Wrangler stores the data after it has processed it.
-
Export to – Exports the data resulting from a transformation to Amazon S3.
-
Export data – For small datasets, can quickly export the data that you've transformed.
Use the following sections to learn more about each of these methods.


When you export your data flow to an Amazon S3 bucket, Data Wrangler stores a copy of the flow file
in the S3 bucket. It stores the flow file under the data_wrangler_flows prefix. If you use the default Amazon S3 bucket to store
your flow files, it uses the following naming convention:
sagemaker-. For example, if your account number is
111122223333 and you are using Studio Classic in us-east-1, your imported datasets
are stored in region-account
numbersagemaker-us-east-1-111122223333. In this example,
your .flow files created in us-east-1 are stored in
s3://sagemaker-. region-account
number/data_wrangler_flows/
Export to Pipelines
When you want to build and deploy large-scale machine learning (ML) workflows, you can use Pipelines to create workflows that manage and deploy SageMaker AI jobs. With Pipelines, you can build workflows that manage your SageMaker AI data preparation, model training, and model deployment jobs. You can use the first-party algorithms that SageMaker AI offers by using Pipelines. For more information on Pipelines, see SageMaker Pipelines.
When you export one or more steps from your data flow to Pipelines, Data Wrangler creates a Jupyter notebook that you can use to define, instantiate, run, and manage a pipeline.
Use a Jupyter Notebook to Create a Pipeline
Use the following procedure to create a Jupyter notebook to export your Data Wrangler flow to Pipelines.
Use the following procedure to generate a Jupyter notebook and run it to export your Data Wrangler flow to Pipelines.
-
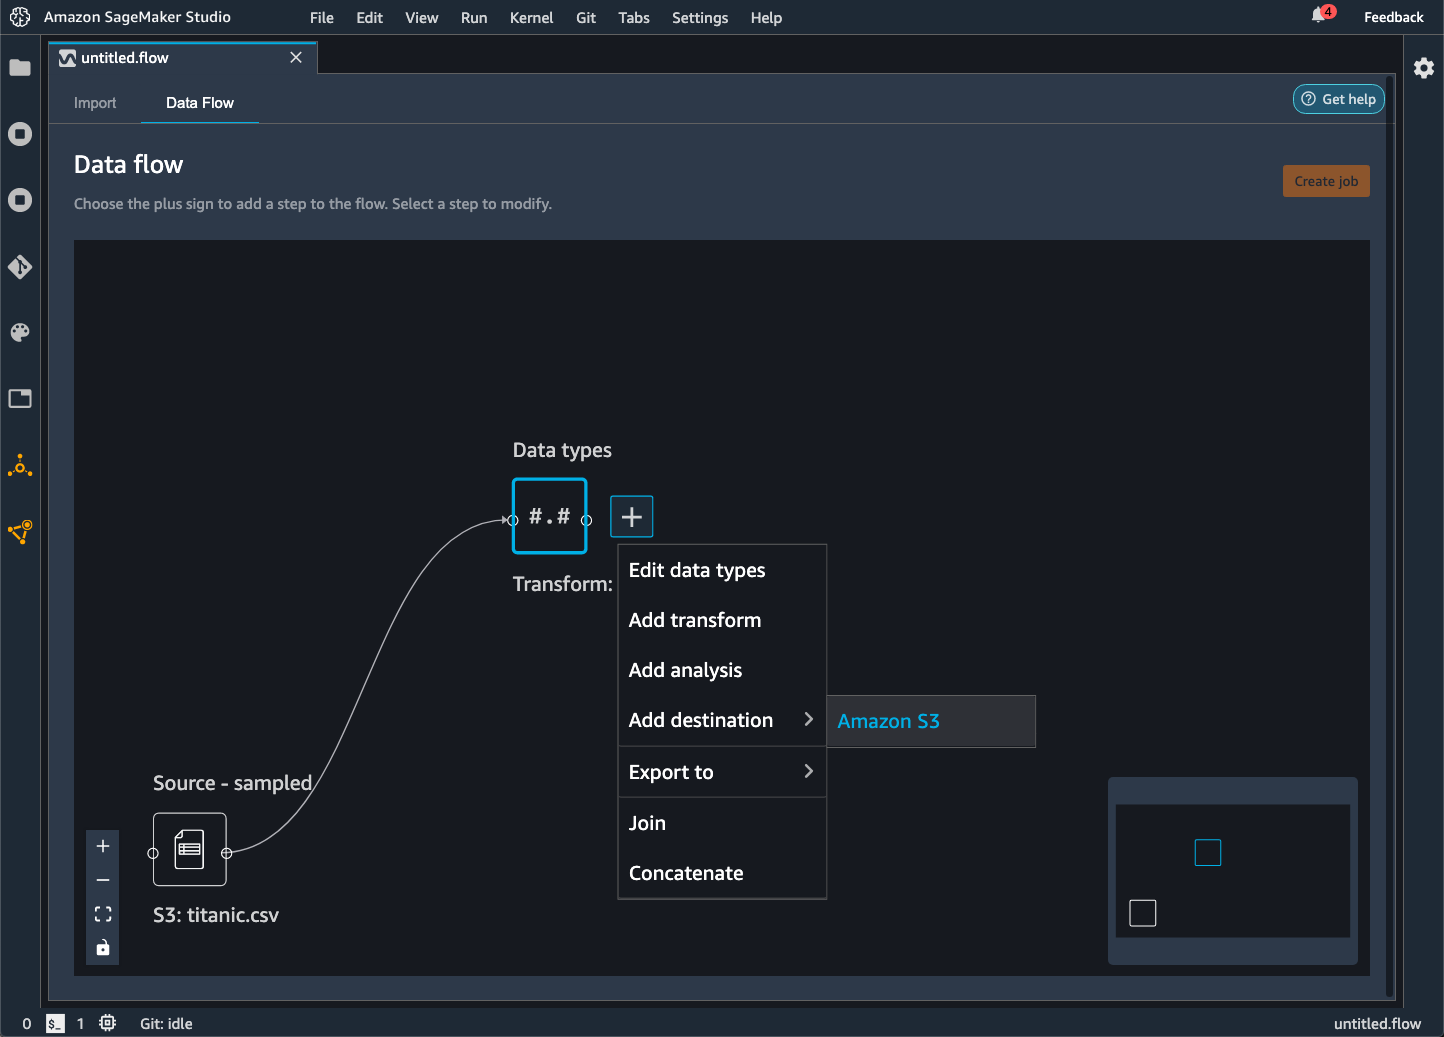
Choose the + next to the node that you want to export.
-
Choose Export to.
-
Choose Pipelines (via Jupyter Notebook).
-
Run the Jupyter notebook.
You can use the Jupyter notebook that Data Wrangler produces to define a pipeline. The pipeline includes the data processing steps that are defined by your Data Wrangler flow.
You can add additional steps to your pipeline by adding steps to the
steps list in the following code in the notebook:
pipeline = Pipeline(
    name=pipeline_name,
    parameters=[instance_type, instance_count],
    steps=[step_process], #Add more steps to this list to run in your Pipeline
)
For more information on defining pipelines, see Define SageMaker AI Pipeline.
Export to an Inference Endpoint
Use your Data Wrangler flow to process data at the time of inference by creating a SageMaker AI serial inference pipeline from your Data Wrangler flow. An inference pipeline is a series of steps that results in a trained model making predictions on new data. A serial inference pipeline within Data Wrangler transforms the raw data and provides it to the machine learning model for a prediction. You create, run, and manage the inference pipeline from a Jupyter notebook within Studio Classic. For more information about accessing the notebook, see Use a Jupyter Notebook to create an inference endpoint.
Within the notebook, you can either train a machine learning model or specify one that you've already trained. You can either use Amazon SageMaker Autopilot or XGBoost to train the model using the data that you've transformed in your Data Wrangler flow.
The pipeline provides the ability to perform either batch or real-time inference. You can also add the Data Wrangler flow to SageMaker Model Registry. For more information about hosting models, see Multi-model endpoints.
Important
You can't export your Data Wrangler flow to an inference endpoint if it has the following transformations:
-
Join
-
Concatenate
-
Group by
If you must use the preceding transforms to prepare your data, use the following procedure.
To prepare your data for inference with unsupported transforms
-
Create a Data Wrangler flow.
-
Apply the preceding transforms that aren't supported.
-
Export the data to an Amazon S3 bucket.
-
Create a separate Data Wrangler flow.
-
Import the data that you've exported from the preceding flow.
-
Apply the remaining transforms.
-
Create a serial inference pipeline using the Jupyter notebook that we provide.
For information about exporting your data to an Amazon S3 bucket see Export to Amazon S3. For information about opening the Jupyter notebook used to create the serial inference pipeline, see Use a Jupyter Notebook to create an inference endpoint.
Data Wrangler ignores transforms that remove data at the time of inference. For example, Data Wrangler ignores the Handle Missing Values transform if you use the Drop missing configuration.
If you've refit transforms to your entire dataset, the transforms carry over to your inference pipeline. For example, if you used the median value to impute missing values, the median value from refitting the transform is applied to your inference requests. You can either refit the transforms from your Data Wrangler flow when you're using the Jupyter notebook or when you're exporting your data to an inference pipeline. For information about refitting transforms, see Refit Transforms to The Entire Dataset and Export Them.
The serial inference pipeline supports the following data types for the input and output strings. Each data type has a set of requirements.
Supported datatypes
-
text/csv– the datatype for CSV strings-
The string can't have a header.
-
Features used for the inference pipeline must be in the same order as features in the training dataset.
-
There must be a comma delimiter between features.
-
Records must be delimited by a newline character.
The following is an example of a validly formatted CSV string that you can provide in an inference request.
abc,0.0,"Doe, John",12345\ndef,1.1,"Doe, Jane",67890 -
-
application/json– the datatype for JSON strings-
The features used in the dataset for the inference pipeline must be in the same order as the features in the training dataset.
-
The data must have a specific schema. You define schema as a single
instancesobject that has a set offeatures. Eachfeaturesobject represents an observation.
The following is an example of a validly formatted JSON string that you can provide in an inference request.
{ "instances": [ { "features": ["abc", 0.0, "Doe, John", 12345] }, { "features": ["def", 1.1, "Doe, Jane", 67890] } ] } -
Use a Jupyter Notebook to create an inference endpoint
Use the following procedure to export your Data Wrangler flow to create an inference pipeline.
To create an inference pipeline using a Jupyter notebook, do the following.
-
Choose the + next to the node that you want to export.
-
Choose Export to.
-
Choose SageMaker AI Inference Pipeline (via Jupyter Notebook).
-
Run the Jupyter notebook.
When you run the Jupyter notebook, it creates an inference flow artifact. An inference flow artifact is a Data Wrangler flow file with additional metadata used to create the serial inference pipeline. The node that you're exporting encompasses all of the transforms from the preceding nodes.
Important
Data Wrangler needs the inference flow artifact to run the inference pipeline. You can't use your own flow file as the artifact. You must create it by using the preceding procedure.
Export to Python Code
To export all steps in your data flow to a Python file that you can manually integrate into any data processing workflow, use the following procedure.
Use the following procedure to generate a Jupyter notebook and run it to export your Data Wrangler flow to Python Code.
-
Choose the + next to the node that you want to export.
-
Choose Export to.
-
Choose Python Code.
-
Run the Jupyter notebook.
You might need to configure the Python script to make it run in your pipeline. For example, if you're running a Spark environment, make sure that you are running the script from an environment that has permission to access Amazon resources.
Export to Amazon SageMaker Feature Store
You can use Data Wrangler to export features you've created to Amazon SageMaker Feature Store. A feature is a column in your dataset. Feature Store is a centralized store for features and their associated metadata. You can use Feature Store to create, share, and manage curated data for machine learning (ML) development. Centralized stores make your data more discoverable and reusable. For more information about Feature Store, see Amazon SageMaker Feature Store.
A core concept in Feature Store is a feature group. A feature group is a collection of features, their records (observations), and associated metadata. It's similar to a table in a database.
You can use Data Wrangler to do one of the following:
-
Update an existing feature group with new records. A record is an observation in the dataset.
-
Create a new feature group from a node in your Data Wrangler flow. Data Wrangler adds the observations from your datasets as records in your feature group.
If you're updating an existing feature group, your dataset's schema must match the schema of the feature group. All the records in the feature group are replaced with the observations in your dataset.
You can use either a Jupyter notebook or a destination node to update your feature group with the observations in the dataset.
If your feature groups with the Iceberg table format have a custom offline store encryption key, make sure you grant the IAM that you're using for the Amazon SageMaker Processing job permissions to use it. At a minimum, you must grant it permissions to encrypt the data that you're writing to Amazon S3. To grant the permissions, give the IAM role the ability to use the GenerateDataKey. For more information about granting IAM roles permissions to use Amazon KMS keys see https://docs.amazonaws.cn/kms/latest/developerguide/key-policies.html

The notebook uses these configurations to create a feature group, process your data at scale, and then ingest the processed data into your online and offline feature stores. To learn more, see Data Sources and Ingestion.
Refit Transforms to The Entire Dataset and Export Them
When you import data, Data Wrangler uses a sample of the data to apply the encodings. By default, Data Wrangler uses the first 50,000 rows as a sample, but you can import the entire dataset or use a different sampling method. For more information, see Import.
The following transformations use your data to create a column in the dataset:
If you used sampling to import your data, the preceding transforms only use the data from the sample to create the column. The transform might not have used all of the relevant data. For example, if you use the Encode Categorical transform, there might have been a category in the entire dataset that wasn't present in the sample.
You can either use a destination node or a Jupyter notebook to refit the transformations to the entire dataset. When Data Wrangler exports the transformations in the flow, it creates a SageMaker Processing job. When the processing job finishes, Data Wrangler saves the following files in either the default Amazon S3 location or an S3 location that you specify:
-
The Data Wrangler flow file that specifies the transformations that are refit to the dataset
-
The dataset with the refit transformations applied to it
You can open a Data Wrangler flow file within Data Wrangler and apply the transformations to a different dataset. For example, if you've applied the transformations to a training dataset, you can open and use the Data Wrangler flow file to apply the transformations to a dataset used for inference.
For a information about using destination nodes to refit transforms and export see the following pages:
Use the following procedure to run a Jupyter notebook to refit the transformations and export the data.
To run a Jupyter notebook and to refit the transformations and export your Data Wrangler flow, do the following.
-
Choose the + next to the node that you want to export.
-
Choose Export to.
-
Choose the location to which you're exporting the data.
-
For the
refit_trained_paramsobject, setrefittoTrue. -
For the
output_flowfield, specify the name of the output flow file with the refit transformations. -
Run the Jupyter notebook.
Create a Schedule to Automatically Process New Data
If you're processing data periodically, you can create a schedule to run the processing job automatically. For example, you can create a schedule that runs a processing job automatically when you get new data. For more information about processing jobs, see Export to Amazon S3 and Export to Amazon SageMaker Feature Store.
When you create a job you must specify an IAM role that has permissions to create
the job. By default, the IAM role that you use to access Data Wrangler is the
SageMakerExecutionRole.
The following permissions allow Data Wrangler to access EventBridge and allow EventBridge to run processing jobs:
-
Add the following Amazon Managed policy to the Amazon SageMaker Studio Classic execution role that provides Data Wrangler with permissions to use EventBridge:
arn:aws:iam::aws:policy/AmazonEventBridgeFullAccessFor more information about the policy, see Amazon managed policies for EventBridge.
-
Add the following policy to the IAM role that you specify when you create a job in Data Wrangler:
If you're using the default IAM role, you add the preceding policy to the Amazon SageMaker Studio Classic execution role.
Add the following trust policy to the role to allow EventBridge to assume it.
{
    "Effect": "Allow",
    "Principal": {
        "Service": "events.amazonaws.com"
    },
    "Action": "sts:AssumeRole"
}
Important
When you create a schedule, Data Wrangler creates an eventRule in EventBridge. You incur charges for both the event rules that you create and the instances used to run the processing job.
For information about EventBridge pricing, see Amazon EventBridge pricing
You can set a schedule using one of the following methods:
-
Note
Data Wrangler doesn't support the following expressions:
-
LW#
-
Abbreviations for days
-
Abbreviations for months
-
-
Recurring – Set an hourly or daily interval to run the job.
-
Specific time – Set specific days and times to run the job.
The following sections provide procedures on creating jobs.
You can use Amazon SageMaker Studio Classic view the jobs that are scheduled to run. Your processing jobs run within Pipelines. Each processing job has its own pipeline. It runs as a processing step within the pipeline. You can view the schedules that you've created within a pipeline. For information about viewing a pipeline, see View the details of a pipeline.
Use the following procedure to view the jobs that you've scheduled.
To view the jobs you've scheduled, do the following.
-
Open Amazon SageMaker Studio Classic.
-
Open Pipelines
-
View the pipelines for the jobs that you've created.
The pipeline running the job uses the job name as a prefix. For example, if you've created a job named
housing-data-feature-enginnering, the name of the pipeline isdata-wrangler-housing-data-feature-engineering. -
Choose the pipeline containing your job.
-
View the status of the pipelines. Pipelines with a Status of Succeeded have run the processing job successfully.
To stop the processing job from running, do the following:
To stop a processing job from running, delete the event rule that specifies the schedule. Deleting an event rule stops all the jobs associated with the schedule from running. For information about deleting a rule, see Disabling or deleting an Amazon EventBridge rule.
You can stop and delete the pipelines associated with the schedules as well. For information about stopping a pipeline, see StopPipelineExecution. For information about deleting a pipeline, see DeletePipeline.