Import
You can use Amazon SageMaker Data Wrangler to import data from the following data sources: Amazon Simple Storage Service (Amazon S3), Amazon Athena, Amazon Redshift, and Snowflake. The dataset that you import can include up to 1000 columns.
Topics
Some data sources allow you to add multiple data connections:
-
You can connect to multiple Amazon Redshift clusters. Each cluster becomes a data source.
-
You can query any Athena database in your account to import data from that database.
When you import a dataset from a data source, it appears in your data flow. Data Wrangler automatically infers the data type of each column in your dataset. To modify these types, select the Data types step and select Edit data types.
When you import data from Athena or Amazon Redshift, the imported data is automatically stored in the default SageMaker AI S3 bucket for the Amazon Region in which you are using Studio Classic. Additionally, Athena stores data you preview in Data Wrangler in this bucket. To learn more, see Imported Data Storage.
Important
The default Amazon S3 bucket may not have the least permissive security settings, such as bucket policy and server-side encryption (SSE). We strongly recommend that you Add a Bucket Policy To Restrict Access to Datasets Imported to Data Wrangler.
Important
In addition, if you use the managed policy for SageMaker AI, we strongly recommend that you scope it down to the most restrictive policy that allows you to perform your use case. For more information, see Grant an IAM Role Permission to Use Data Wrangler.
All data sources except for Amazon Simple Storage Service (Amazon S3) require you to specify a SQL query to import your data. For each query, you must specify the following:
-
Data catalog
-
Database
-
Table
You can specify the name of the database or the data catalog in either the drop down menus or within the query. The following are example queries:
-
select * from– The query doesn't use anything specified in the dropdown menus of the user-interface (UI) to run. It queriesexample-data-catalog-name.example-database-name.example-table-nameexample-table-namewithinexample-database-namewithinexample-data-catalog-name. -
select * from– The query uses the data catalog that you've specified in the Data catalog dropdown menu to run. It queriesexample-database-name.example-table-nameexample-table-namewithinexample-database-namewithin the data catalog that you've specified. -
select * from– The query requires you to select fields for both the Data catalog and Database name dropdown menus. It queriesexample-table-nameexample-table-namewithin the data catalog within the database and data catalog that you've specified.
The link between Data Wrangler and the data source is a connection. You use the connection to import data from your data source.
There are the following types of connections:
-
Direct
-
Cataloged
Data Wrangler always has access to the most recent data in a direct connection. If the data in the data source has been updated, you can use the connection to import the data. For example, if someone adds a file to one of your Amazon S3 buckets, you can import the file.
A cataloged connection is the result of a data transfer. The data in the cataloged connection doesn't necessarily have the most recent data. For example, you might set up a data transfer between Salesforce and Amazon S3. If there's an update to the Salesforce data, you must transfer the data again. You can automate the process of transferring data. For more information about data transfers, see Import Data From Software as a Service (SaaS) Platforms.
Import data from Amazon S3
You can use Amazon Simple Storage Service (Amazon S3) to store and retrieve any amount of data, at any time, from anywhere on the web. You can accomplish these tasks using the Amazon Web Services Management Console, which is a simple and intuitive web interface, and the Amazon S3 API. If you've stored your dataset locally, we recommend that you add it to an S3 bucket for import into Data Wrangler. To learn how, see Uploading an object to a bucket in the Amazon Simple Storage Service User Guide.
Data Wrangler uses S3 Select
Important
If you plan to export a data flow and launch a Data Wrangler job, ingest data into a SageMaker AI feature store, or create a SageMaker AI pipeline, be aware that these integrations require Amazon S3 input data to be located in the same Amazon region.
Important
If you're importing a CSV file, make sure it meets the following requirements:
-
A record in your dataset can't be longer than one line.
-
A backslash,
\, is the only valid escape character. -
Your dataset must use one of the following delimiters:
-
Comma –
, -
Colon –
: -
Semicolon –
; -
Pipe –
| -
Tab –
[TAB]
-
To save space, you can import compressed CSV files.
Data Wrangler gives you the ability to either import the entire dataset or sample a portion of it. For Amazon S3, it provides the following sampling options:
-
None – Import the entire dataset.
-
First K – Sample the first K rows of the dataset, where K is an integer that you specify.
-
Randomized – Takes a random sample of a size that you specify.
-
Stratified – Takes a stratified random sample. A stratified sample preserves the ratio of values in a column.
After you've imported your data, you can also use the sampling transformer to take one or more samples from your entire dataset. For more information about the sampling transformer, see Sampling.
You can use one of the following resource identifiers to import your data:
-
An Amazon S3 URI that uses an Amazon S3 bucket or Amazon S3 access point
-
An Amazon S3 access point alias
-
An Amazon Resource Name (ARN) that uses an Amazon S3 access point or Amazon S3 bucket
Amazon S3 access points are named network endpoints that are attached to the buckets. Each access point has distinct permissions and network controls that you can configure. For more information about access points, see Managing data access with Amazon S3 access points.
Important
If you're using an Amazon Resource Name (ARN) to import your data, it must be for a resource located in the same Amazon Web Services Region that you're using to access Amazon SageMaker Studio Classic.
You can import either a single file or multiple files as a dataset. You can use the multifile import operation when you have a dataset that is partitioned into separate files. It takes all of the files from an Amazon S3 directory and imports them as a single dataset. For information on the types of files that you can import and how to import them, see the following sections.
You can also use parameters to import a subset of files that match a pattern. Parameters help you more selectively pick the files that you're importing. To start using parameters, edit the data source and apply them to the path that you're using to import the data. For more information, see Reusing Data Flows for Different Datasets.
Import data from Athena
Use Amazon Athena to import your data from Amazon Simple Storage Service (Amazon S3) into Data Wrangler. In Athena, you write standard SQL queries to select the data that you're importing from Amazon S3. For more information, see What is Amazon Athena?
You can use the Amazon Web Services Management Console to set up Amazon Athena. You must create at least one database in Athena before you start running queries. For more information about getting started with Athena, see Getting started.
Athena is directly integrated with Data Wrangler. You can write Athena queries without having to leave the Data Wrangler UI.
In addition to writing simple Athena queries in Data Wrangler, you can also use:
-
Athena workgroups for query result management. For more information about workgroups, see Managing query results.
-
Lifecycle configurations for setting data retention periods. For more information about data retention, see Setting data retention periods.
Query Athena within Data Wrangler
Note
Data Wrangler does not support federated queries.
If you use Amazon Lake Formation with Athena, make sure your Lake Formation IAM permissions do not override
IAM permissions for the database sagemaker_data_wrangler.
Data Wrangler gives you the ability to either import the entire dataset or sample a portion of it. For Athena, it provides the following sampling options:
-
None – Import the entire dataset.
-
First K – Sample the first K rows of the dataset, where K is an integer that you specify.
-
Randomized – Takes a random sample of a size that you specify.
-
Stratified – Takes a stratified random sample. A stratified sample preserves the ratio of values in a column.
The following procedure shows how to import a dataset from Athena into Data Wrangler.
To import a dataset into Data Wrangler from Athena
-
Sign into Amazon SageMaker AI Console
. -
Choose Studio.
-
Choose Launch app.
-
From the dropdown list, select Studio.
-
Choose the Home icon.
-
Choose Data.
-
Choose Data Wrangler.
-
Choose Import data.
-
Under Available, choose Amazon Athena.
-
For Data Catalog, choose a data catalog.
-
Use the Database dropdown list to select the database that you want to query. When you select a database, you can preview all tables in your database using the Tables listed under Details.
-
(Optional) Choose Advanced configuration.
-
Choose a Workgroup.
-
If your workgroup hasn't enforced the Amazon S3 output location or if you don't use a workgroup, specify a value for Amazon S3 location of query results.
-
(Optional) For Data retention period, select the checkbox to set a data retention period and specify the number of days to store the data before it's deleted.
-
(Optional) By default, Data Wrangler saves the connection. You can choose to deselect the checkbox and not save the connection.
-
-
For Sampling, choose a sampling method. Choose None to turn off sampling.
-
Enter your query in the query editor and use the Run button to run the query. After a successful query, you can preview your result under the editor.
Note
Salesforce data uses the
timestamptztype. If you're querying the timestamp column that you've imported to Athena from Salesforce, cast the data in the column to thetimestamptype. The following query casts the timestamp column to the correct type.# cast column timestamptz_col as timestamp type, and name it as timestamp_col select cast(timestamptz_col as timestamp) as timestamp_col from table -
To import the results of your query, select Import.
After you complete the preceding procedure, the dataset that you've queried and imported appears in the Data Wrangler flow.
By default, Data Wrangler saves the connection settings as a new connection. When you import your data, the query that you've already specified appears as a new connection. The saved connections store information about the Athena workgroups and Amazon S3 buckets that you're using. When you're connecting to the data source again, you can choose the saved connection.
Managing query results
Data Wrangler supports using Athena workgroups to manage the query results within an Amazon account. You can specify an Amazon S3 output location for each workgroup. You can also specify whether the output of the query can go to different Amazon S3 locations. For more information, see Using Workgroups to Control Query Access and Costs.
Your workgroup might be configured to enforce the Amazon S3 query output location. You can't change the output location of the query results for those workgroups.
If you don't use a workgroup or specify an output location for your queries, Data Wrangler uses the default Amazon S3 bucket in the same Amazon Region in which your Studio Classic
instance is located to store Athena query results. It creates temporary tables in this
database to move the query output to this Amazon S3 bucket. It deletes these tables after
data has been imported; however the database, sagemaker_data_wrangler,
persists. To learn more, see Imported Data Storage.
To use Athena workgroups, set up the IAM policy that gives access to workgroups. If
you're using a SageMaker AI-Execution-Role, we recommend adding the policy to the
role. For more information about IAM policies for workgroups, see IAM
policies for accessing workgroups. For example workgroup policies, see
Workgroup example policies.
Setting data retention periods
Data Wrangler automatically sets a data retention period for the query results. The results are deleted after the length of the retention period. For example, the default retention period is five days. The results of the query are deleted after five days. This configuration is designed to help you clean up data that you're no longer using. Cleaning up your data prevents unauthorized users from gaining access. It also helps control the costs of storing your data on Amazon S3.
If you don't set a retention period, the Amazon S3 lifecycle configuration determines the duration that the objects are stored. The data retention policy that you've specified for the lifecycle configuration removes any query results that are older than the lifecycle configuration that you've specified. For more information, see Setting lifecycle configuration on a bucket.
Data Wrangler uses Amazon S3 lifecycle configurations to manage data retention and expiration. You must give your Amazon SageMaker Studio Classic IAM execution role permissions to manage bucket lifecycle configurations. Use the following procedure to give permissions.
To give permissions to manage the lifecycle configuration do the following.
-
Sign in to the Amazon Web Services Management Console and open the IAM console at https://console.amazonaws.cn/iam/
. -
Choose Roles.
-
In the search bar, specify the Amazon SageMaker AI execution role that Amazon SageMaker Studio Classic is using.
-
Choose the role.
-
Choose Add permissions.
-
Choose Create inline policy.
-
For Service, specify S3 and choose it.
-
Under the Read section, choose GetLifecycleConfiguration.
-
Under the Write section, choose PutLifecycleConfiguration.
-
For Resources, choose Specific.
-
For Actions, select the arrow icon next to Permissions management.
-
Choose PutResourcePolicy.
-
For Resources, choose Specific.
-
Choose the checkbox next to Any in this account.
-
Choose Review policy.
-
For Name, specify a name.
-
Choose Create policy.
Import data from Amazon Redshift
Amazon Redshift is a fully managed, petabyte-scale data warehouse service in the cloud. The first step to create a data warehouse is to launch a set of nodes, called an Amazon Redshift cluster. After you provision your cluster, you can upload your dataset and then perform data analysis queries.
You can connect to and query one or more Amazon Redshift clusters in Data Wrangler. To use this import option, you must create at least one cluster in Amazon Redshift. To learn how, see Getting started with Amazon Redshift.
You can output the results of your Amazon Redshift query in one of the following locations:
-
The default Amazon S3 bucket
-
An Amazon S3 output location that you specify
You can either import the entire dataset or sample a portion of it. For Amazon Redshift, it provides the following sampling options:
-
None – Import the entire dataset.
-
First K – Sample the first K rows of the dataset, where K is an integer that you specify.
-
Randomized – Takes a random sample of a size that you specify.
-
Stratified – Takes a stratified random sample. A stratified sample preserves the ratio of values in a column.
The default Amazon S3 bucket is in the same Amazon Region in which your Studio Classic instance is located to store Amazon Redshift query results. For more information, see Imported Data Storage.
For either the default Amazon S3 bucket or the bucket that you specify, you have the following encryption options:
-
The default Amazon service-side encryption with an Amazon S3 managed key (SSE-S3)
-
An Amazon Key Management Service (Amazon KMS) key that you specify
An Amazon KMS key is an encryption key that you create and manage. For more information on KMS keys, see Amazon Key Management Service.
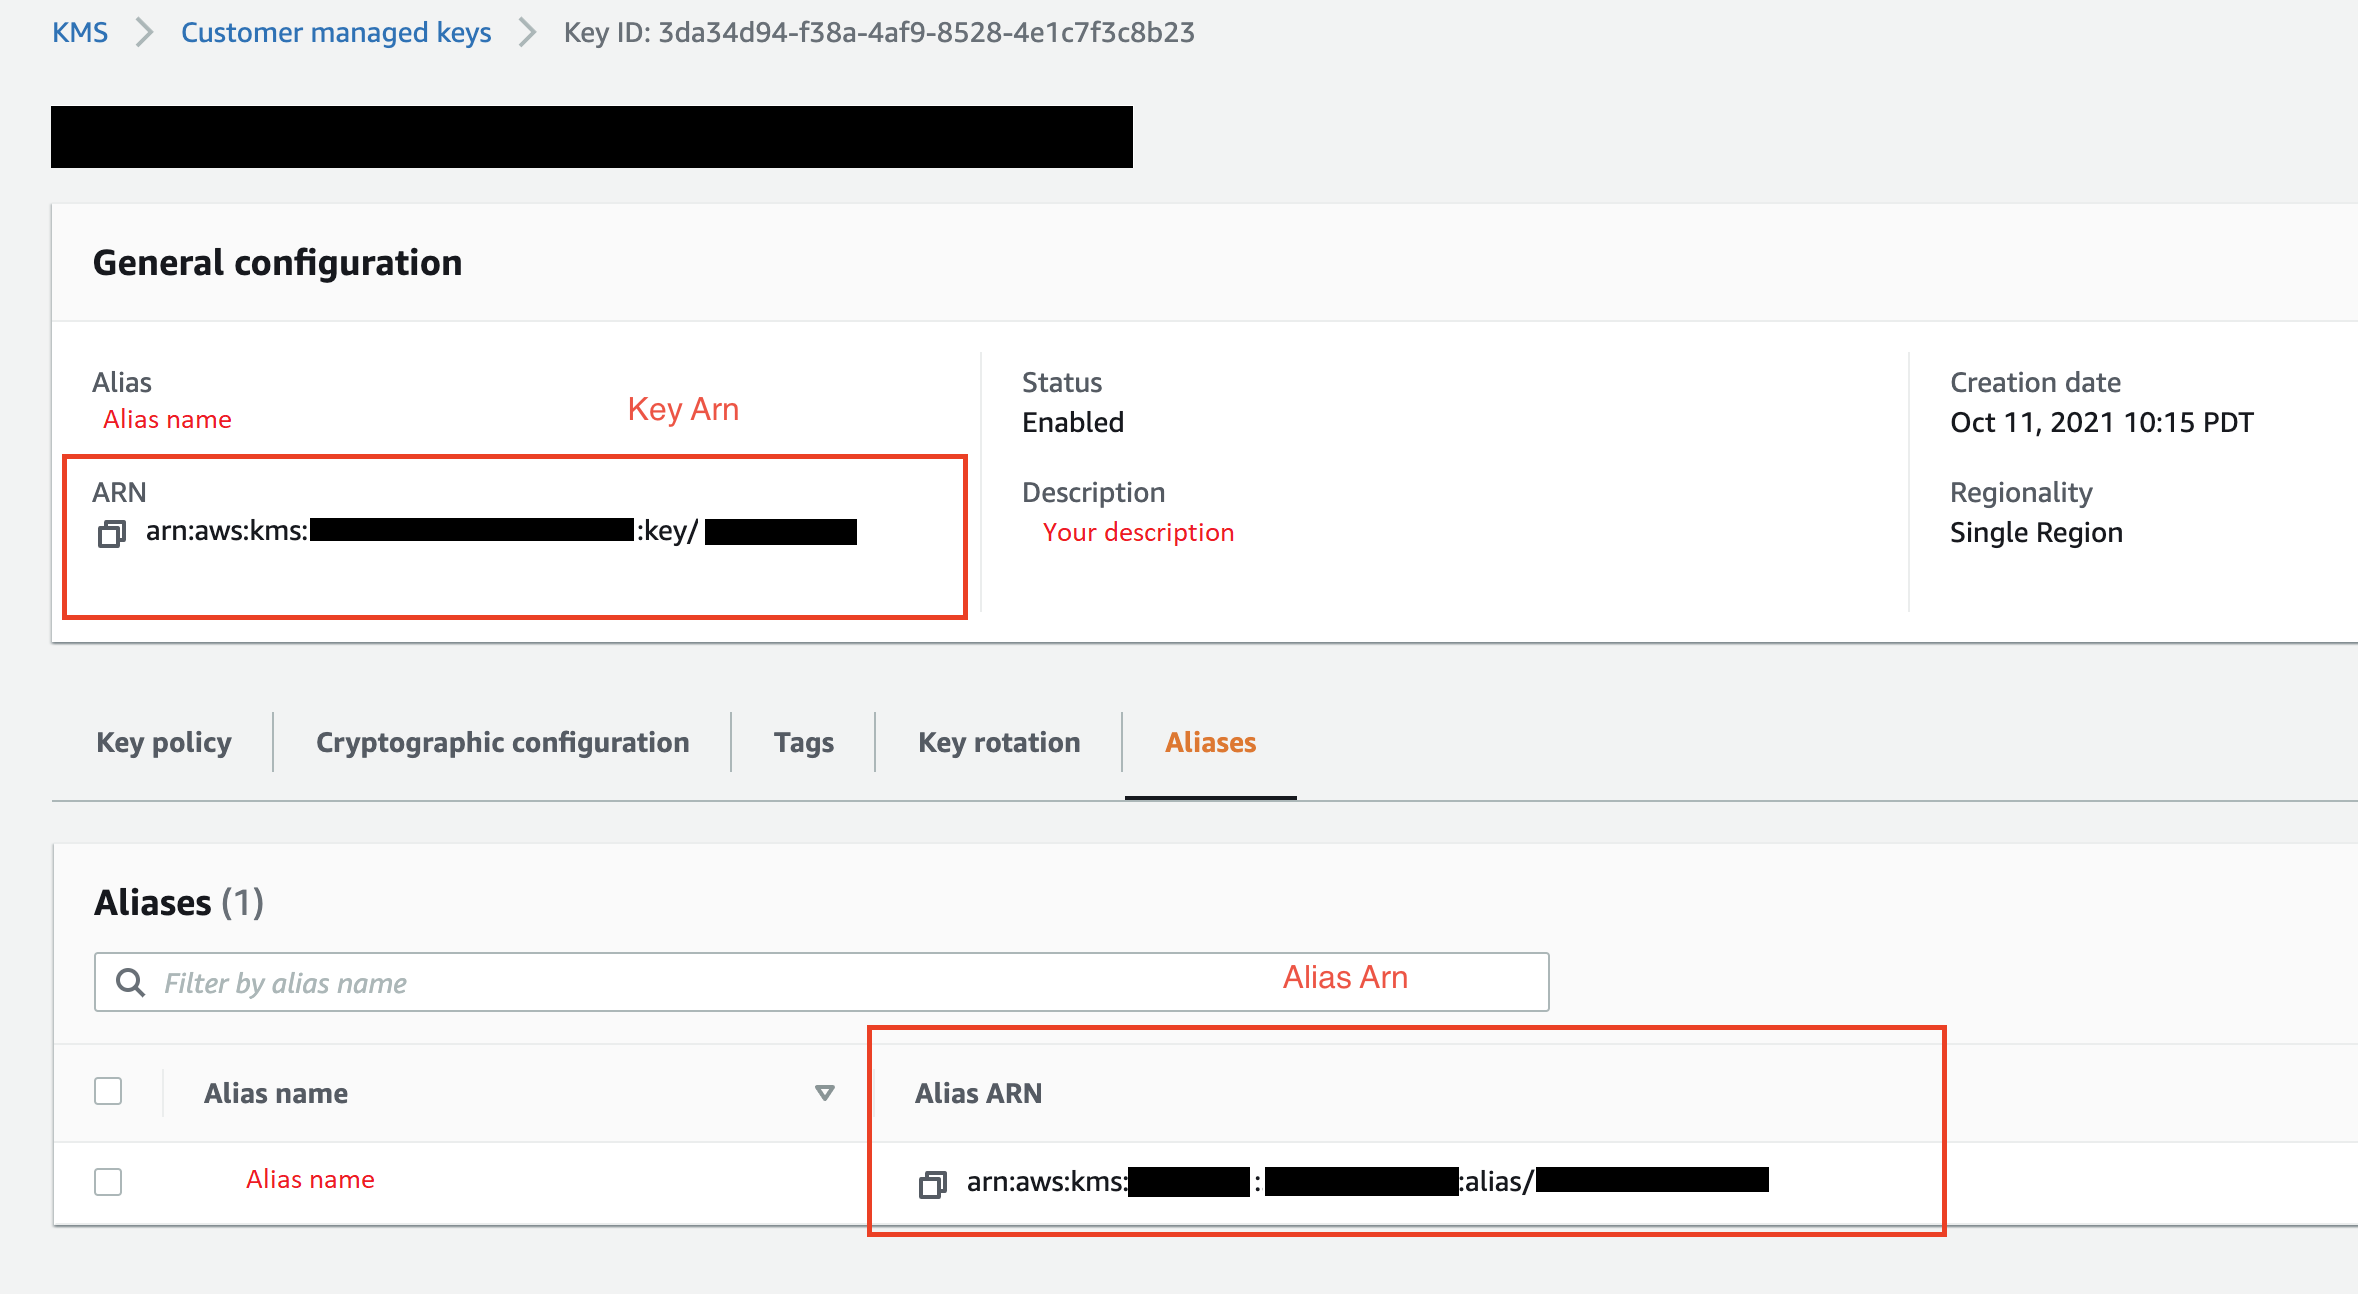
You can specify an Amazon KMS key using either the key ARN or the ARN of your Amazon account.
If you use the IAM managed policy, AmazonSageMakerFullAccess, to grant
a role permission to use Data Wrangler in Studio Classic, your Database User
name must have the prefix sagemaker_access.
Use the following procedures to learn how to add a new cluster.
Note
Data Wrangler uses the Amazon Redshift Data API with temporary credentials. To learn more about this API, refer to Using the Amazon Redshift Data API in the Amazon Redshift Management Guide.
To connect to a Amazon Redshift cluster
-
Sign into Amazon SageMaker AI Console
. -
Choose Studio.
-
Choose Launch app.
-
From the dropdown list, select Studio.
-
Choose the Home icon.
-
Choose Data.
-
Choose Data Wrangler.
-
Choose Import data.
-
Under Available, choose Amazon Athena.
-
Choose Amazon Redshift.
-
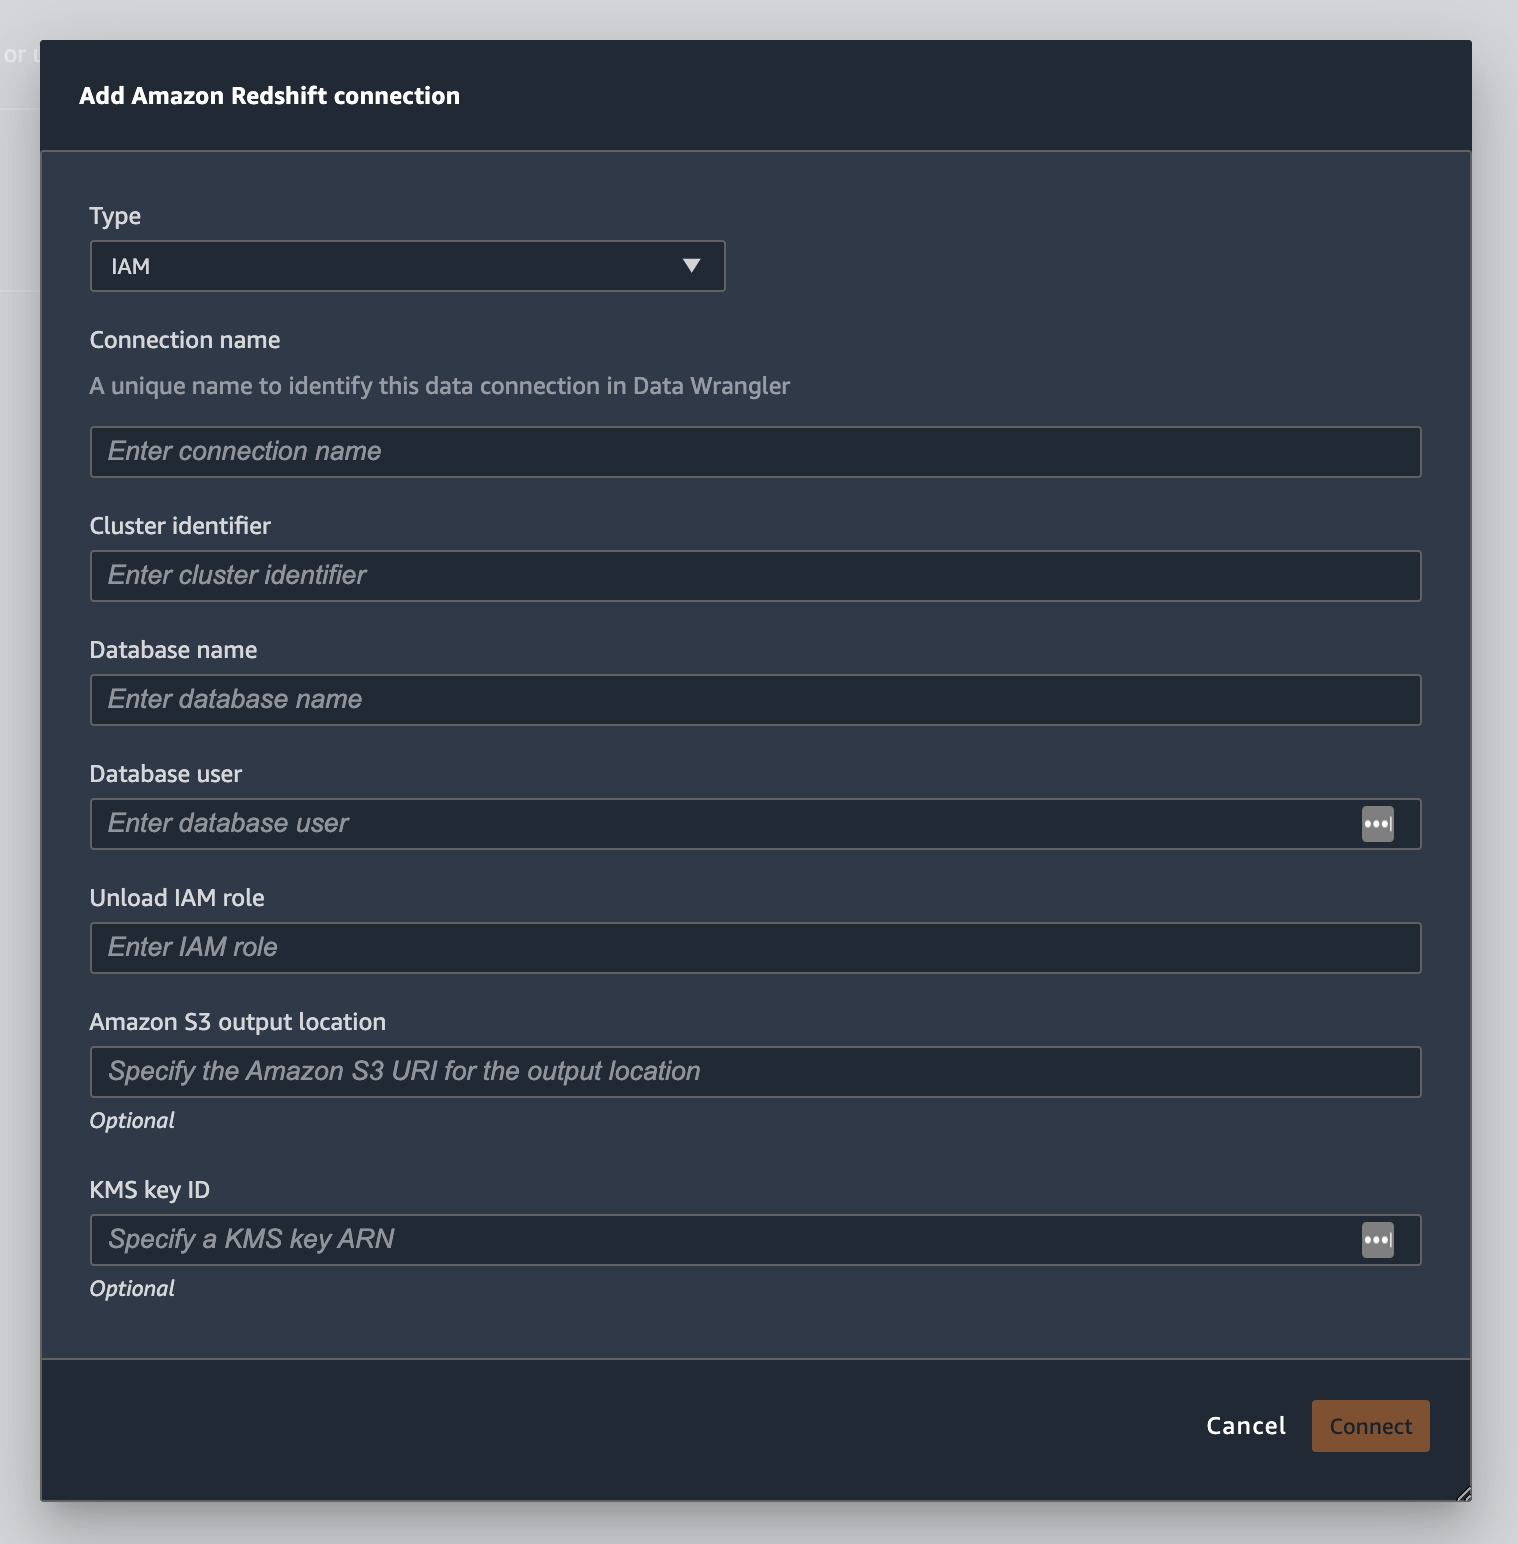
Choose Temporary credentials (IAM) for Type.
-
Enter a Connection Name. This is a name used by Data Wrangler to identify this connection.
-
Enter the Cluster Identifier to specify to which cluster you want to connect. Note: Enter only the cluster identifier and not the full endpoint of the Amazon Redshift cluster.
-
Enter the Database Name of the database to which you want to connect.
-
Enter a Database User to identify the user you want to use to connect to the database.
-
For UNLOAD IAM Role, enter the IAM role ARN of the role that the Amazon Redshift cluster should assume to move and write data to Amazon S3. For more information about this role, see Authorizing Amazon Redshift to access other Amazon services on your behalf in the Amazon Redshift Management Guide.
-
Choose Connect.
-
(Optional) For Amazon S3 output location, specify the S3 URI to store the query results.
-
(Optional) For KMS key ID, specify the ARN of the Amazon KMS key or alias. The following image shows you where you can find either key in the Amazon Web Services Management Console.
The following image shows all the fields from the preceding procedure.
After your connection is successfully established, it appears as a data source under Data Import. Select this data source to query your database and import data.
To query and import data from Amazon Redshift
-
Select the connection that you want to query from Data Sources.
-
Select a Schema. To learn more about Amazon Redshift Schemas, see Schemas in the Amazon Redshift Database Developer Guide.
-
(Optional) Under Advanced configuration, specify the Sampling method that you'd like to use.
-
Enter your query in the query editor and choose Run to run the query. After a successful query, you can preview your result under the editor.
-
Select Import dataset to import the dataset that has been queried.
-
Enter a Dataset name. If you add a Dataset name that contains spaces, these spaces are replaced with underscores when your dataset is imported.
-
Choose Add.
To edit a dataset, do the following.
-
Navigate to your Data Wrangler flow.
-
Choose the + next to Source - Sampled.
-
Change the data that you're importing.
-
Choose Apply
Import data from Amazon EMR
You can use Amazon EMR as a data source for your Amazon SageMaker Data Wrangler flow. Amazon EMR is a managed cluster platform that you can use process and analyze large amounts of data. For more information about Amazon EMR, see What is Amazon EMR?. To import a dataset from EMR, you connect to it and query it.
Important
You must meet the following prerequisites to connect to an Amazon EMR cluster:
Prerequisites
-
Network configurations
-
You have an Amazon VPC in the Region that you're using to launch Amazon SageMaker Studio Classic and Amazon EMR.
-
Both Amazon EMR and Amazon SageMaker Studio Classic must be launched in private subnets. They can be in the same subnet or in different ones.
-
Amazon SageMaker Studio Classic must be in VPC-only mode.
For more information about creating a VPC, see Create a VPC.
For more information about creating a VPC, see Connect SageMaker Studio Classic Notebooks in a VPC to External Resources.
-
The Amazon EMR clusters that you're running must be in the same Amazon VPC.
-
The Amazon EMR clusters and the Amazon VPC must be in the same Amazon account.
-
Your Amazon EMR clusters are running Hive or Presto.
-
Hive clusters must allow inbound traffic from Studio Classic security groups on port 10000.
-
Presto clusters must allow inbound traffic from Studio Classic security groups on port 8889.
Note
The port number is different for Amazon EMR clusters using IAM roles. Navigate to the end of the prerequisites section for more information.
-
-
-
SageMaker Studio Classic
-
Amazon SageMaker Studio Classic must run Jupyter Lab Version 3. For information about updating the Jupyter Lab Version, see View and update the JupyterLab version of an application from the console.
-
Amazon SageMaker Studio Classic has an IAM role that controls user access. The default IAM role that you're using to run Amazon SageMaker Studio Classic doesn't have policies that can give you access to Amazon EMR clusters. You must attach the policy granting permissions to the IAM role. For more information, see Configure listing Amazon EMR clusters.
-
The IAM role must also have the following policy attached
secretsmanager:PutResourcePolicy. -
If you're using a Studio Classic domain that you've already created, make sure that its
AppNetworkAccessTypeis in VPC-only mode. For information about updating a domain to use VPC-only mode, see Shut Down and Update Amazon SageMaker Studio Classic.
-
-
Amazon EMR clusters
-
You must have Hive or Presto installed on your cluster.
-
The Amazon EMR release must be version 5.5.0 or later.
Note
Amazon EMR supports auto termination. Auto termination stops idle clusters from running and prevents you from incurring costs. The following are the releases that support auto termination:
-
For 6.x releases, version 6.1.0 or later.
-
For 5.x releases, version 5.30.0 or later.
-
-
-
Amazon EMR clusters using IAM runtime roles
-
Use the following pages to set up IAM runtime roles for the Amazon EMR cluster. You must enable in-transit encryption when you're using runtime roles:
-
You must Lake Formation as a governance tool for the data within your databases. You must also use external data filtering for access control.
-
For more information about Lake Formation, see What is Amazon Lake Formation?
-
For more information about integrating Lake Formation into Amazon EMR, see Integrating third-party services with Lake Formation.
-
-
The version of your cluster must be 6.9.0 or later.
-
Access to Amazon Secrets Manager. For more information about Secrets Manager see What is Amazon Secrets Manager?
-
Hive clusters must allow inbound traffic from Studio Classic security groups on port 10000.
-
An Amazon VPC is a virtual network that is logically isolated from other networks on the Amazon cloud. Amazon SageMaker Studio Classic and your Amazon EMR cluster only exist within the Amazon VPC.
Use the following procedure to launch Amazon SageMaker Studio Classic in an Amazon VPC.
To launch Studio Classic within a VPC, do the following.
-
Navigate to the SageMaker AI console at https://console.amazonaws.cn/sagemaker/
. -
Choose Launch SageMaker Studio Classic.
-
Choose Standard setup.
-
For Default execution role, choose the IAM role to set up Studio Classic.
-
Choose the VPC where you've launched the Amazon EMR clusters.
-
For Subnet, choose a private subnet.
-
For Security group(s), specify the security groups that you're using to control between your VPC.
-
Choose VPC Only.
-
(Optional) Amazon uses a default encryption key. You can specify an Amazon Key Management Service key to encrypt your data.
-
Choose Next.
-
Under Studio settings, choose the configurations that are best suited to you.
-
Choose Next to skip the SageMaker Canvas settings.
-
Choose Next to skip the RStudio settings.
If you don't have an Amazon EMR cluster ready, you can use the following procedure to create one. For more information about Amazon EMR, see What is Amazon EMR?
To create a cluster, do the following.
-
Navigate to the Amazon Web Services Management Console.
-
In the search bar, specify
Amazon EMR. -
Choose Create cluster.
-
For Cluster name, specify the name of your cluster.
-
For Release, select the release version of the cluster.
Note
Amazon EMR supports auto termination for the following releases:
-
For 6.x releases, releases 6.1.0 or later
-
For 5.x releases, releases 5.30.0 or later
Auto termination stops idle clusters from running and prevents you from incurring costs.
-
-
(Optional) For Applications, choose Presto.
-
Choose the application that you're running on the cluster.
-
Under Networking, for Hardware configuration, specify the hardware configuration settings.
Important
For Networking, choose the VPC that is running Amazon SageMaker Studio Classic and choose a private subnet.
-
Under Security and access, specify the security settings.
-
Choose Create.
For a tutorial about creating an Amazon EMR cluster, see Getting started with Amazon EMR. For information about best practices for configuring a cluster, see Considerations and best practices.
Note
For security best practices, Data Wrangler can only connect to VPCs on private subnets.
You can't connect to the master node unless you use Amazon Systems Manager for your Amazon EMR instances. For more information, see Securing access to EMR clusters using Amazon Systems Manager
You can currently use the following methods to access an Amazon EMR cluster:
-
No authentication
-
Lightweight Directory Access Protocol (LDAP)
-
IAM (Runtime role)
Not using authentication or using LDAP can require you to create multiple clusters and Amazon EC2 instance profiles. If you’re an administrator, you might need to provide groups of users with different levels of access to the data. These methods can result in administrative overhead that makes it more difficult to manage your users.
We recommend using an IAM runtime role that gives multiple users the ability to connect to the same Amazon EMR cluster. A runtime role is an IAM role that you can assign to a user who is connecting to an Amazon EMR cluster. You can configure the runtime IAM role to have permissions that are specific to each group of users.
Use the following sections to create a Presto or Hive Amazon EMR cluster with LDAP activated.
Use the following sections to use LDAP authentication for Amazon EMR clusters that you've already created.
Use the following procedure to import data from a cluster.
To import data from a cluster, do the following.
-
Open a Data Wrangler flow.
-
Choose Create Connection.
-
Choose Amazon EMR.
-
Do one of the following.
-
(Optional) For Secrets ARN, specify the Amazon Resource Number (ARN) of the database within the cluster. Secrets provide additional security. For more information about secrets, see What is Amazon Secrets Manager? For information about creating a secret for your cluster, see Creating a Amazon Secrets Manager secret for your cluster.
Important
You must specify a secret if you're using an IAM runtime role for authentication.
-
From the dropdown table, choose a cluster.
-
-
Choose Next.
-
For Select an endpoint for
example-cluster-namecluster, choose a query engine. -
(Optional) Select Save connection.
-
Choose Next, select login and choose one of the following:
-
No authentication
-
LDAP
-
IAM
-
-
For Login into
example-cluster-namecluster, specify the Username and Password for the cluster. -
Choose Connect.
-
In the query editor specify a SQL query.
-
Choose Run.
-
Choose Import.
Creating a Amazon Secrets Manager secret for your cluster
If you're using an IAM runtime role to access your Amazon EMR cluster, you must store the credentials that you're using to access the Amazon EMR as a Secrets Manager secret. You store all the credentials that you use to access the cluster within the secret.
You must store the following information in the secret:
-
JDBC endpoint –
jdbc:hive2:// -
DNS name – The DNS name of your Amazon EMR cluster. It's either the endpoint for the primary node or the hostname.
-
Port –
8446
You can also store the following additional information within the secret:
-
IAM role – The IAM role that you're using to access the cluster. Data Wrangler uses your SageMaker AI execution role by default.
-
Truststore path – By default, Data Wrangler creates a truststore path for you. You can also use your own truststore path. For more information about truststore paths, see In-transit encryption in HiveServer2.
-
Truststore password – By default, Data Wrangler creates a truststore password for you. You can also use your own truststore path. For more information about truststore paths, see In-transit encryption in HiveServer2.
Use the following procedure to store the credentials within a Secrets Manager secret.
To store your credentials as a secret, do the following.
-
Navigate to the Amazon Web Services Management Console.
-
In the search bar, specify Secrets Manager.
-
Choose Amazon Secrets Manager.
-
Choose Store a new secret.
-
For Secret type, choose Other type of secret.
-
Under Key/value pairs, select Plaintext.
-
For clusters running Hive, you can use the following template for IAM authentication.
{"jdbcURL": ""
 "iam_auth": {"endpoint": "jdbc:hive2://", #required
                "dns": "ip-xx-x-xxx-xxx.ec2.internal", #required
                "port": "10000", #required
              "cluster_id": "j-xxxxxxxxx", #required
              "iam_role": "arn:aws:iam::xxxxxxxx:role/xxxxxxxxxxxx", #optional
              "truststore_path": "/etc/alternatives/jre/lib/security/cacerts", #optional
              "truststore_password": "changeit" #optional

              }}
Note
After you import your data, you apply transformations to them. You then export the data that you've transformed to a specific location. If you're using a Jupyter notebook to export your transformed data to Amazon S3, you must use the truststore path specified in the preceding example.
A Secrets Manager secret stores the JDBC URL of the Amazon EMR cluster as a secret. Using a secret is more secure than directly entering in your credentials.
Use the following procedure to store the JDBC URL as a secret.
To store the JDBC URL as a secret, do the following.
-
Navigate to the Amazon Web Services Management Console.
-
In the search bar, specify Secrets Manager.
-
Choose Amazon Secrets Manager.
-
Choose Store a new secret.
-
For Secret type, choose Other type of secret.
-
For Key/value pairs, specify
jdbcURLas the key and a valid JDBC URL as the value.The format of a valid JDBC URL depends on whether you use authentication and whether you use Hive or Presto as the query engine. The following list shows the valid JBDC URL formats for the different possible configurations.
-
Hive, no authentication –
jdbc:hive2://emr-cluster-master-public-dns:10000/; -
Hive, LDAP authentication –
jdbc:hive2://emr-cluster-master-public-dns-name:10000/;AuthMech=3;UID=david;PWD=welcome123; -
For Hive with SSL enabled, the JDBC URL format depends on whether you use a Java Keystore File for the TLS configuration. The Java Keystore File helps verify the identity of the master node of the Amazon EMR cluster. To use a Java Keystore File, generate it on an EMR cluster and upload it to Data Wrangler. To generate a file, use the following command on the Amazon EMR cluster,
keytool -genkey -alias hive -keyalg RSA -keysize 1024 -keystore hive.jks. For information about running commands on an Amazon EMR cluster, see Securing access to EMR clusters using Amazon Systems Manager. To upload a file, choose the upward arrow on the left-hand navigation of the Data Wrangler UI. The following are the valid JDBC URL formats for Hive with SSL enabled:
-
Without a Java Keystore File –
jdbc:hive2://emr-cluster-master-public-dns:10000/;AuthMech=3;UID=user-name;PWD=password;SSL=1;AllowSelfSignedCerts=1; -
With a Java Keystore File –
jdbc:hive2://emr-cluster-master-public-dns:10000/;AuthMech=3;UID=user-name;PWD=password;SSL=1;SSLKeyStore=/home/sagemaker-user/data/Java-keystore-file-name;SSLKeyStorePwd=Java-keystore-file-passsword;
-
-
Presto, no authentication – jdbc:presto://
emr-cluster-master-public-dns:8889/; -
For Presto with LDAP authentication and SSL enabled, the JDBC URL format depends on whether you use a Java Keystore File for the TLS configuration. The Java Keystore File helps verify the identity of the master node of the Amazon EMR cluster. To use a Java Keystore File, generate it on an EMR cluster and upload it to Data Wrangler. To upload a file, choose the upward arrow on the left-hand navigation of the Data Wrangler UI. For information about creating a Java Keystore File for Presto, see Java Keystore File for TLS
. For information about running commands on an Amazon EMR cluster, see Securing access to EMR clusters using Amazon Systems Manager . -
Without a Java Keystore File –
jdbc:presto://emr-cluster-master-public-dns:8889/;SSL=1;AuthenticationType=LDAP Authentication;UID=user-name;PWD=password;AllowSelfSignedServerCert=1;AllowHostNameCNMismatch=1; -
With a Java Keystore File –
jdbc:presto://emr-cluster-master-public-dns:8889/;SSL=1;AuthenticationType=LDAP Authentication;SSLTrustStorePath=/home/sagemaker-user/data/Java-keystore-file-name;SSLTrustStorePwd=Java-keystore-file-passsword;UID=user-name;PWD=password;
-
-
Throughout the process of importing data from an Amazon EMR cluster, you might run into issues. For information about troubleshooting them, see Troubleshooting issues with Amazon EMR.
Import data from Databricks (JDBC)
You can use Databricks as a data source for your Amazon SageMaker Data Wrangler flow. To import a dataset from Databricks, use the JDBC (Java Database Connectivity) import functionality to access to your Databricks database. After you access the database, specify a SQL query to get the data and import it.
We assume that you have a running Databricks cluster and that you've configured your JDBC driver to it. For more information, see the following Databricks documentation pages:
Data Wrangler stores your JDBC URL in Amazon Secrets Manager. You must give your Amazon SageMaker Studio Classic IAM execution role permissions to use Secrets Manager. Use the following procedure to give permissions.
To give permissions to Secrets Manager, do the following.
-
Sign in to the Amazon Web Services Management Console and open the IAM console at https://console.amazonaws.cn/iam/
. -
Choose Roles.
-
In the search bar, specify the Amazon SageMaker AI execution role that Amazon SageMaker Studio Classic is using.
-
Choose the role.
-
Choose Add permissions.
-
Choose Create inline policy.
-
For Service, specify Secrets Manager and choose it.
-
For Actions, select the arrow icon next to Permissions management.
-
Choose PutResourcePolicy.
-
For Resources, choose Specific.
-
Choose the checkbox next to Any in this account.
-
Choose Review policy.
-
For Name, specify a name.
-
Choose Create policy.
You can use partitions to import your data more quickly. Partitions give Data Wrangler the ability to process the data in parallel. By default, Data Wrangler uses 2 partitions. For most use cases, 2 partitions give you near-optimal data processing speeds.
If you choose to specify more than 2 partitions, you can also specify a column to partition the data. The type of the values in the column must be numeric or date.
We recommend using partitions only if you understand the structure of the data and how it's processed.
You can either import the entire dataset or sample a portion of it. For a Databricks database, it provides the following sampling options:
-
None – Import the entire dataset.
-
First K – Sample the first K rows of the dataset, where K is an integer that you specify.
-
Randomized – Takes a random sample of a size that you specify.
-
Stratified – Takes a stratified random sample. A stratified sample preserves the ratio of values in a column.
Use the following procedure to import your data from a Databricks database.
To import data from Databricks, do the following.
-
Sign into Amazon SageMaker AI Console
. -
Choose Studio.
-
Choose Launch app.
-
From the dropdown list, select Studio.
-
From the Import data tab of your Data Wrangler flow, choose Databricks.
-
Specify the following fields:
-
Dataset name – A name that you want to use for the dataset in your Data Wrangler flow.
-
Driver – com.simba.spark.jdbc.Driver.
-
JDBC URL – The URL of the Databricks database. The URL formatting can vary between Databricks instances. For information about finding the URL and the specifying the parameters within it, see JDBC configuration and connection parameters
. The following is an example of how a URL can be formatted: jdbc:spark://aws-sagemaker-datawrangler.cloud.databricks.com:443/default;transportMode=http;ssl=1;httpPath=sql/protocolv1/o/3122619508517275/0909-200301-cut318;AuthMech=3;UID= token;PWD=personal-access-token.Note
You can specify a secret ARN that contains the JDBC URL instead of specifying the JDBC URL itself. The secret must contain a key-value pair with the following format:
jdbcURL:. For more information, see What is Secrets Manager?.JDBC-URL
-
-
Specify a SQL SELECT statement.
Note
Data Wrangler doesn't support Common Table Expressions (CTE) or temporary tables within a query.
-
For Sampling, choose a sampling method.
-
Choose Run.
-
(Optional) For the PREVIEW, choose the gear to open the Partition settings.
-
Specify the number of partitions. You can partition by column if you specify the number of partitions:
-
Enter number of partitions – Specify a value greater than 2.
-
(Optional) Partition by column – Specify the following fields. You can only partition by a column if you've specified a value for Enter number of partitions.
-
Select column – Select the column that you're using for the data partition. The data type of the column must be numeric or date.
-
Upper bound – From the values in the column that you've specified, the upper bound is the value that you're using in the partition. The value that you specify doesn't change the data that you're importing. It only affects the speed of the import. For the best performance, specify an upper bound that's close to the column's maximum.
-
Lower bound – From the values in the column that you've specified, the lower bound is the value that you're using in the partition. The value that you specify doesn't change the data that you're importing. It only affects the speed of the import. For the best performance, specify a lower bound that's close to the column's minimum.
-
-
-
-
Choose Import.
Import data from Salesforce Data Cloud
You can use Salesforce Data Cloud as a data source in Amazon SageMaker Data Wrangler to prepare the data in your Salesforce Data Cloud for machine learning.
With Salesforce Data Cloud as a data source in Data Wrangler, you can quickly connect to your Salesforce data without writing a single line of code. You can join your Salesforce data with data from any other data source in Data Wrangler.
After you connect to the data cloud, you can do the following:
-
Visualize your data with built-in visualizations
-
Understand data and identify potential errors and extreme values
-
Transform data with more than 300 built-in transformations
-
Export the data that you've transformed
Administrator setup
Important
Before you get started, make sure that your users are running Amazon SageMaker Studio Classic version 1.3.0 or later. For information about checking the version of Studio Classic and updating it, see Prepare ML Data with Amazon SageMaker Data Wrangler.
When you're setting up access to Salesforce Data Cloud, you must complete the following tasks:
-
Getting your Salesforce Domain URL. Salesforce also refers to the Domain URL as your org's URL.
-
Getting OAuth credentials from Salesforce.
-
Getting the authorization URL and token URL for your Salesforce Domain.
-
Creating a Amazon Secrets Manager secret with the OAuth configuration.
-
Creating a lifecycle configuration that Data Wrangler uses to read the credentials from the secret.
-
Giving Data Wrangler permissions to read the secret.
After you perform the preceding tasks, your users can log into the Salesforce Data Cloud using OAuth.
Note
Your users might run into issues after you've set everything up. For information about troubleshooting, see Troubleshooting with Salesforce.
Use the following procedure to get the Domain URL.
-
Navigate to the Salesforce login page.
-
For Quick find, specify My Domain.
-
Copy the value of Current My Domain URL to a text file.
-
Add
https://to the beginning of the URL.
After you get the Salesforce Domain URL, you can use the following procedure to get the login credentials from Salesforce and allow Data Wrangler to access your Salesforce data.
To get the log in credentials from Salesforce and provide access to Data Wrangler, do the following.
-
Navigate to your Salesforce Domain URL and log into your account.
-
Choose the gear icon.
-
In the search bar that appears, specify App Manager.
-
Select New Connected App.
-
Specify the following fields:
-
Connected App Name – You can specify any name, but we recommend choosing a name that includes Data Wrangler. For example, you can specify Salesforce Data Cloud Data Wrangler Integration.
-
API name – Use the default value.
-
Contact Email – Specify your email address.
-
Under API heading (Enable OAuth Settings), select the checkbox to activate OAuth settings.
-
For Callback URL specify the Amazon SageMaker Studio Classic URL. To get the URL for Studio Classic, access it from the Amazon Web Services Management Console and copy the URL.
-
-
Under Selected OAuth Scopes, move the following from the Available OAuth Scopes to Selected OAuth Scopes:
-
Manage user data via APIs (
api) -
Perform requests at any time (
refresh_token,offline_access) -
Perform ANSI SQL queries on Salesforce Data Cloud data (
cdp_query_api) -
Manage Salesforce Customer Data Platform profile data (
cdp_profile_api)
-
-
Choose Save. After you save your changes, Salesforce opens a new page.
-
Choose Continue
-
Navigate to Consumer Key and Secret.
-
Choose Manage Consumer Details. Salesforce redirects you to a new page where you might have to pass two-factor authentication.
-
Important
Copy the Consumer Key and Consumer Secret to a text editor. You need this information to connect the data cloud to Data Wrangler.
-
Navigate back to Manage Connected Apps.
-
Navigate to Connected App Name and the name of your application.
-
Choose Manage.
-
Select Edit Policies.
-
Change IP Relaxation to Relax IP restrictions.
-
Choose Save.
-
After you provide access to your Salesforce Data Cloud, you need to provide permissions for your users. Use the following procedure to provide them with permissions.
To provide your users with permissions, do the following.
-
Navigate to the setup home page.
-
On the left-hand navigation, search for Users and choose the Users menu item.
-
Choose the hyperlink with your user name.
-
Navigate to Permission Set Assignments.
-
Choose Edit Assignments.
-
Add the following permissions:
-
Customer Data Platform Admin
-
Customer Data Platform Data Aware Specialist
-
-
Choose Save.
After you get the information for your Salesforce Domain, you must get the authorization URL and the token URL for the Amazon Secrets Manager secret that you're creating.
Use the following procedure to get the authorization URL and the token URL.
To get the authorization URL and token URL
-
Navigate to your Salesforce Domain URL.
-
Use one of the following methods to get the URLs. If you are on a Linux distribution with
curlandjqinstalled, we recommend using the method that only works on Linux.-
(Linux only) Specify the following command in your terminal.
curlsalesforce-domain-URL/.well-known/openid-configuration | \ jq '. | { authorization_url: .authorization_endpoint, token_url: .token_endpoint }' | \ jq '. += { identity_provider: "SALESFORCE", client_id: "example-client-id", client_secret: "example-client-secret" }' -
-
Navigate to
example-org-URL/.well-known/openid-configuration -
Copy the
authorization_endpointandtoken_endpointto a text editor. -
Create the following JSON object:
{
  "identity_provider": "SALESFORCE",
  "authorization_url": "example-authorization-endpoint",
  "token_url": "example-token-endpoint",
  "client_id": "example-consumer-key",
  "client_secret": "example-consumer-secret"
}
-
-
After you create the OAuth configuration object, you can create a Amazon Secrets Manager secret that stores it. Use the following procedure to create the secret.
To create a secret, do the following.
-
Navigate to the Amazon Secrets Manager console
. -
Choose Store a secret.
-
Select Other type of secret.
-
Under Key/value pairs select Plaintext.
-
Replace the empty JSON with the following configuration settings.
{ "identity_provider": "SALESFORCE", "authorization_url": "example-authorization-endpoint", "token_url": "example-token-endpoint", "client_id": "example-consumer-key", "client_secret": "example-consumer-secret" } -
Choose Next.
-
For Secret Name, specify the name of the secret.
-
Under Tags, choose Add.
-
For the Key, specify sagemaker:partner. For Value, we recommend specifying a value that might be useful for your use case. However, you can specify anything.
Important
You must create the key. You can't import your data from Salesforce if you don't create it.
-
-
Choose Next.
-
Choose Store.
-
Choose the secret you've created.
-
Make a note of the following fields:
-
The Amazon Resource Number (ARN) of the secret
-
The name of the secret
-
After you've created the secret, you must add permissions for Data Wrangler to read the secret. Use the following procedure to add permissions.
To add read permissions for Data Wrangler, do the following.
-
Navigate to the Amazon SageMaker AI console
. -
Choose domains.
-
Choose the domain that you're using to access Data Wrangler.
-
Choose your User Profile.
-
Under Details, find the Execution role. Its ARN is in the following format:
arn:aws:iam::111122223333:role/. Make a note of the SageMaker AI execution role. Within the ARN, it's everything afterexample-rolerole/. -
Navigate to the IAM console
. -
In the Search IAM search bar, specify the name of the SageMaker AI execution role.
-
Choose the role.
-
Choose Add permissions.
-
Choose Create inline policy.
-
Choose the JSON tab.
-
Specify the following policy within the editor.
-
Choose Review Policy.
-
For Name, specify a name.
-
Choose Create policy.
After you've given Data Wrangler permissions to read the secret, you must add a Lifecycle Configuration that uses your Secrets Manager secret to your Amazon SageMaker Studio Classic user profile.
Use the following procedure to create a lifecycle configuration and add it to the Studio Classic profile.
To create a lifecycle configuration and add it to the Studio Classic profile, do the following.
-
Navigate to the Amazon SageMaker AI console.
-
Choose domains.
-
Choose the domain that you're using to access Data Wrangler.
-
Choose your User Profile.
-
If you see the following applications, delete them:
-
KernelGateway
-
JupyterKernel
Note
Deleting the applications updates Studio Classic. It can take a while for the updates to happen.
-
-
While you're waiting for updates to happen, choose Lifecycle configurations.
-
Make sure the page you're on says Studio Classic Lifecycle configurations.
-
Choose Create configuration.
-
Make sure Jupyter server app has been selected.
-
Choose Next.
-
For Name, specify a name for the configuration.
-
For Scripts, specify the following script:
#!/bin/bash set -eux cat > ~/.sfgenie_identity_provider_oauth_config <<EOL { "secret_arn": "secrets-arn-containing-salesforce-credentials" } EOL -
Choose Submit.
-
On the left hand navigation, choose domains.
-
Choose your domain.
-
Choose Environment.
-
Under Lifecycle configurations for personal Studio Classic apps, choose Attach.
-
Select Existing configuration.
-
Under Studio Classic Lifecycle configurations select the lifecycle configuration that you've created.
-
Choose Attach to domain.
-
Select the checkbox next to the lifecycle configuration that you've attached.
-
Select Set as default.
You might run into issues when you set up your lifecycle configuration. For information about debugging them, see Debug Lifecycle Configurations in Amazon SageMaker Studio Classic.
Data Scientist Guide
Use the following to connect Salesforce Data Cloud and access your data in Data Wrangler.
Important
Your administrator needs to use the information in the preceding sections to set up Salesforce Data Cloud. If you're running into issues, contact them for troubleshooting help.
To open Studio Classic and check its version, see the following procedure.
-
Use the steps in Prerequisites to access Data Wrangler through Amazon SageMaker Studio Classic.
-
Next to the user you want to use to launch Studio Classic, select Launch app.
-
Choose Studio.
To create a dataset in Data Wrangler with data from the Salesforce Data Cloud
-
Sign into Amazon SageMaker AI Console
. -
Choose Studio.
-
Choose Launch app.
-
From the dropdown list, select Studio.
-
Choose the Home icon.
-
Choose Data.
-
Choose Data Wrangler.
-
Choose Import data.
-
Under Available, choose Salesforce Data Cloud.
-
For Connection name, specify a name for your connection to the Salesforce Data Cloud.
-
For Org URL, specify the organization URL in your Salesforce account. You can get the URL from your administrator.s
-
Choose Connect.
-
Specify your credentials to log into Salesforce.
You can begin creating a dataset using data from Salesforce Data Cloud after you've connected to it.
After you select a table, you can write queries and run them. The output of your query shows under Query results.
After you have settled on the output of your query, you can then import the output of your query into a Data Wrangler flow to perform data transformations.
After you've created a dataset, navigate to the Data flow screen to start transforming your data.
Import data from Snowflake
You can use Snowflake as a data source in SageMaker Data Wrangler to prepare data in Snowflake for machine learning.
With Snowflake as a data source in Data Wrangler, you can quickly connect to Snowflake without writing a single line of code. You can join your data in Snowflake with data from any other data source in Data Wrangler.
Once connected, you can interactively query data stored in Snowflake, transform data with more than 300 preconfigured data transformations, understand data and identify potential errors and extreme values with a set of robust preconfigured visualization templates, quickly identify inconsistencies in your data preparation workflow, and diagnose issues before models are deployed into production. Finally, you can export your data preparation workflow to Amazon S3 for use with other SageMaker AI features such as Amazon SageMaker Autopilot, Amazon SageMaker Feature Store and Amazon SageMaker Pipelines.
You can encrypt the output of your queries using an Amazon Key Management Service key that you've created. For more information about Amazon KMS, see Amazon Key Management Service.
Administrator Guide
Important
To learn more about granular access control and best practices, see Security Access Control
This section is for Snowflake administrators who are setting up access to Snowflake from within SageMaker Data Wrangler.
Important
You are responsible for managing and monitoring the access control within Snowflake. Data Wrangler does not add a layer of access control with respect to Snowflake.
Access control includes the following:
-
The data that a user accesses
-
(Optional) The storage integration that provides Snowflake the ability to write query results to an Amazon S3 bucket
-
The queries that a user can run
(Optional) Configure Snowflake Data Import Permissions
By default, Data Wrangler queries the data in Snowflake without creating a copy of it in an Amazon S3 location. Use the following information if you're configuring a storage integration with Snowflake. Your users can use a storage integration to store their query results in an Amazon S3 location.
Your users might have different levels of access of sensitive data. For optimal data security, provide each user with their own storage integration. Each storage integration should have its own data governance policy.
This feature is currently not available in the opt-in Regions.
Snowflake requires the following permissions on an S3 bucket and directory to be able to access files in the directory:
-
s3:GetObject -
s3:GetObjectVersion -
s3:ListBucket -
s3:ListObjects -
s3:GetBucketLocation
Create an IAM policy
You must create an IAM policy to configure access permissions for Snowflake to load and unload data from an Amazon S3 bucket.
The following is the JSON policy document that you use to create the policy:
# Example policy for S3 write access
# This needs to be updated
{
"Version": "2012-10-17",
"Statement": [
  {
    "Effect": "Allow",
    "Action": [
        "s3:PutObject",
        "s3:GetObject",
        "s3:GetObjectVersion",
        "s3:DeleteObject",
        "s3:DeleteObjectVersion"
    ],
    "Resource": "arn:aws:s3:::bucket/prefix/*"
  },
  {
    "Effect": "Allow",
    "Action": [
        "s3:ListBucket"
    ],
    "Resource": "arn:aws:s3:::bucket/",
    "Condition": {
        "StringLike": {
            "s3:prefix": ["prefix/*"]
        }
    }
  }
 ]
}
For information and procedures about creating policies with policy documents, see Creating IAM policies.
For documentation that provides an overview of using IAM permissions with Snowflake, see the following resources:
To grant the data scientist's Snowflake role usage permission to the
storage integration, you must run GRANT USAGE ON INTEGRATION
integration_name TO snowflake_role;.
-
integration_nameis the name of your storage integration. -
snowflake_roleis the name of the default Snowflake rolegiven to the data scientist user.
Setting up Snowflake OAuth Access
Instead of having your users directly enter their credentials into Data Wrangler, you can have them use an identity provider to access Snowflake. The following are links to the Snowflake documentation for the identity providers that Data Wrangler supports.
Use the documentation from the preceding links to set up access to your identity provider. The information and procedures in this section help you understand how to properly use the documentation to access Snowflake within Data Wrangler.
Your identity provider needs to recognize Data Wrangler as an application. Use the following procedure to register Data Wrangler as an application within the identity provider:
-
Select the configuration that starts the process of registering Data Wrangler as an application.
-
Provide the users within the identity provider access to Data Wrangler.
-
Turn on OAuth client authentication by storing the client credentials as an Amazon Secrets Manager secret.
-
Specify a redirect URL using the following format: https://
domain-ID.studio.Amazon Web Services Region.sagemaker.aws/jupyter/default/labImportant
You're specifying the Amazon SageMaker AI domain ID and Amazon Web Services Region that you're using to run Data Wrangler.
Important
You must register a URL for each Amazon SageMaker AI domain and Amazon Web Services Region where you're running Data Wrangler. Users from a domain and Amazon Web Services Region that don't have redirect URLs set up for them won't be able to authenticate with the identity provider to access the Snowflake connection.
-
Make sure that the authorization code and refresh token grant types are allowed for the Data Wrangler application.
Within your identity provider, you must set up a server that sends OAuth tokens to Data Wrangler at the user level. The server sends the tokens with Snowflake as the audience.
Snowflake uses the concept of roles that are distinct role the IAM roles used in Amazon. You must configure the identity provider to use any role to use the default role associated with the Snowflake account. For example, if a user has systems administrator as the default role in their Snowflake profile, the connection from Data Wrangler to Snowflake uses systems administrator as the role.
Use the following procedure to set up the server.
To set up the server, do the following. You're working within Snowflake for all steps except the last one.
-
Start setting up the server or API.
-
Configure the authorization server to use the authorization code and refresh token grant types.
-
Specify the lifetime of the access token.
-
Set the refresh token idle timeout. The idle timeout is the time that the refresh token expires if it's not used.
Note
If you're scheduling jobs in Data Wrangler, we recommend making the idle timeout time greater than the frequency of the processing job. Otherwise, some processing jobs might fail because the refresh token expired before they could run. When the refresh token expires, the user must re-authenticate by accessing the connection that they've made to Snowflake through Data Wrangler.
-
Specify
session:role-anyas the new scope.Note
For Azure AD, copy the unique identifier for the scope. Data Wrangler requires you to provide it with the identifier.
-
Important
Within the External OAuth Security Integration for Snowflake, enable
external_oauth_any_role_mode.
Important
Data Wrangler doesn't support rotating refresh tokens. Using rotating refresh tokens might result in access failures or users needing to log in frequently.
Important
If the refresh token expires, your users must reauthenticate by accessing the connection that they've made to Snowflake through Data Wrangler.
After you've set up the OAuth provider, you provide Data Wrangler with the information it needs to connect to the provider. You can use the documentation from your identity provider to get values for the following fields:
-
Token URL – The URL of the token that the identity provider sends to Data Wrangler.
-
Authorization URL – The URL of the authorization server of the identity provider.
-
Client ID – The ID of the identity provider.
-
Client secret – The secret that only the authorization server or API recognizes.
-
(Azure AD only) The OAuth scope credentials that you've copied.
You store the fields and values in a Amazon Secrets Manager secret and add it to the Amazon SageMaker Studio Classic lifecycle configuration that you're using for Data Wrangler. A Lifecycle Configuration is a shell script. Use it to make the Amazon Resource Name (ARN) of the secret accessible to Data Wrangler. For information about creating secrets see Move hardcoded secrets to Amazon Secrets Manager. For information about using lifecycle configurations in Studio Classic, see Use Lifecycle Configurations to Customize Amazon SageMaker Studio Classic.
Important
Before you create a Secrets Manager secret, make sure that the SageMaker AI execution role that you're using for Amazon SageMaker Studio Classic has permissions to create and update secrets in Secrets Manager. For more information about adding permissions, see Example: Permission to create secrets.
For Okta and Ping Federate, the following is the format of the secret:
{
    "token_url":"https://identityprovider.com/oauth2/example-portion-of-URL-path/v2/token",
    "client_id":"example-client-id",
    "client_secret":"example-client-secret",
    "identity_provider":"OKTA"|"PING_FEDERATE",
    "authorization_url":"https://identityprovider.com/oauth2/example-portion-of-URL-path/v2/authorize"
}
For Azure AD, the following is the format of the secret:
{
    "token_url":"https://identityprovider.com/oauth2/example-portion-of-URL-path/v2/token",
    "client_id":"example-client-id",
    "client_secret":"example-client-secret",
    "identity_provider":"AZURE_AD",
    "authorization_url":"https://identityprovider.com/oauth2/example-portion-of-URL-path/v2/authorize",
    "datasource_oauth_scope":"api://appuri/session:role-any)"
}
You must have a lifecycle configuration that uses the Secrets Manager secret that you've created. You can either create the lifecycle configuration or modify one that has already been created. The configuration must use the following script.
#!/bin/bash

set -eux

## Script Body

cat > ~/.snowflake_identity_provider_oauth_config <<EOL
{
    "secret_arn": "example-secret-arn"
}
EOL
For information about setting up lifecycle configurations, see Create and Associate a Lifecycle Configuration with Amazon SageMaker Studio Classic. When you're going through the process of setting up, do the following:
-
Set the application type of the configuration to
Jupyter Server. -
Attach the configuration to the Amazon SageMaker AI domain that has your users.
-
Have the configuration run by default. It must run every time a user logs into Studio Classic. Otherwise, the credentials saved in the configuration won't be available to your users when they're using Data Wrangler.
-
The lifecycle configuration creates a file with the name,
snowflake_identity_provider_oauth_configin the user's home folder. The file contains the Secrets Manager secret. Make sure that it's in the user's home folder every time the Jupyter Server's instance is initialized.
Private Connectivity between Data Wrangler and Snowflake via Amazon PrivateLink
This section explains how to use Amazon PrivateLink to establish a private connection between Data Wrangler and Snowflake. The steps are explained in the following sections.
Create a VPC
If you do not have a VPC set up, then follow the Create a new VPC
Once you have a chosen VPC you would like to use for establishing a private connection, provide the following credentials to your Snowflake Administrator to enable Amazon PrivateLink:
-
VPC ID
-
Amazon Account ID
-
Your corresponding account URL you use to access Snowflake
Important
As described in Snowflake's documentation, enabling your Snowflake account can take up to two business days.
Set up Snowflake Amazon PrivateLink Integration
After Amazon PrivateLink is activated, retrieve the Amazon PrivateLink configuration for
your Region by running the following command in a Snowflake worksheet.
Log
into your Snowflake console and enter the following under
Worksheets: select
SYSTEM$GET_PRIVATELINK_CONFIG();
-
Retrieve the values for the following:
privatelink-account-name,privatelink_ocsp-url,privatelink-account-url, andprivatelink_ocsp-urlfrom the resulting JSON object. Examples of each value are shown in the following snippet. Store these values for later use.privatelink-account-name: xxxxxxxx.region.privatelink privatelink-vpce-id: com.amazonaws.vpce.region.vpce-svc-xxxxxxxxxxxxxxxxx privatelink-account-url: xxxxxxxx.region.privatelink.snowflakecomputing.com privatelink_ocsp-url: ocsp.xxxxxxxx.region.privatelink.snowflakecomputing.com -
Switch to your Amazon Console and navigate to the VPC menu.
-
From the left side panel, choose the Endpoints link to navigate to the VPC Endpoints setup.
Once there, choose Create Endpoint.
-
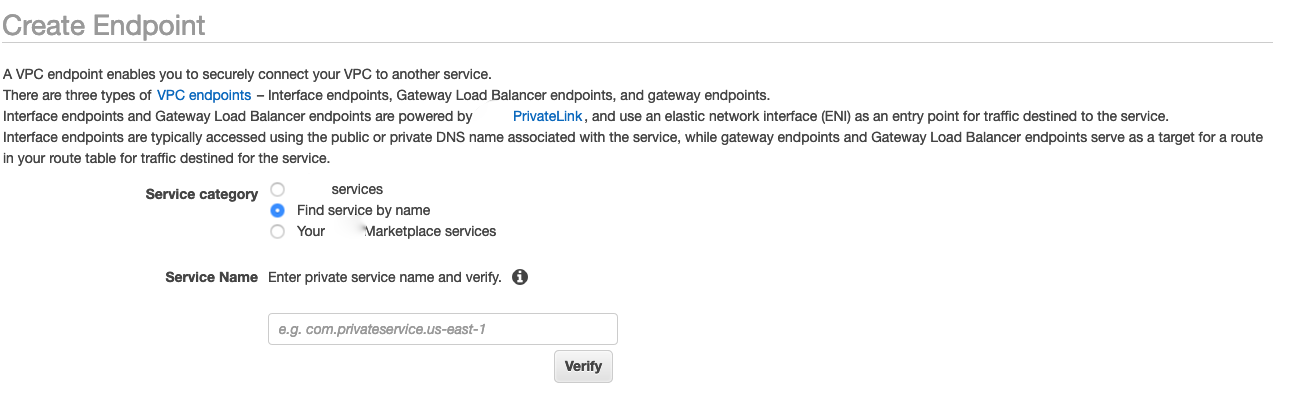
Select the radio button for Find service by name, as shown in the following screenshot.
-
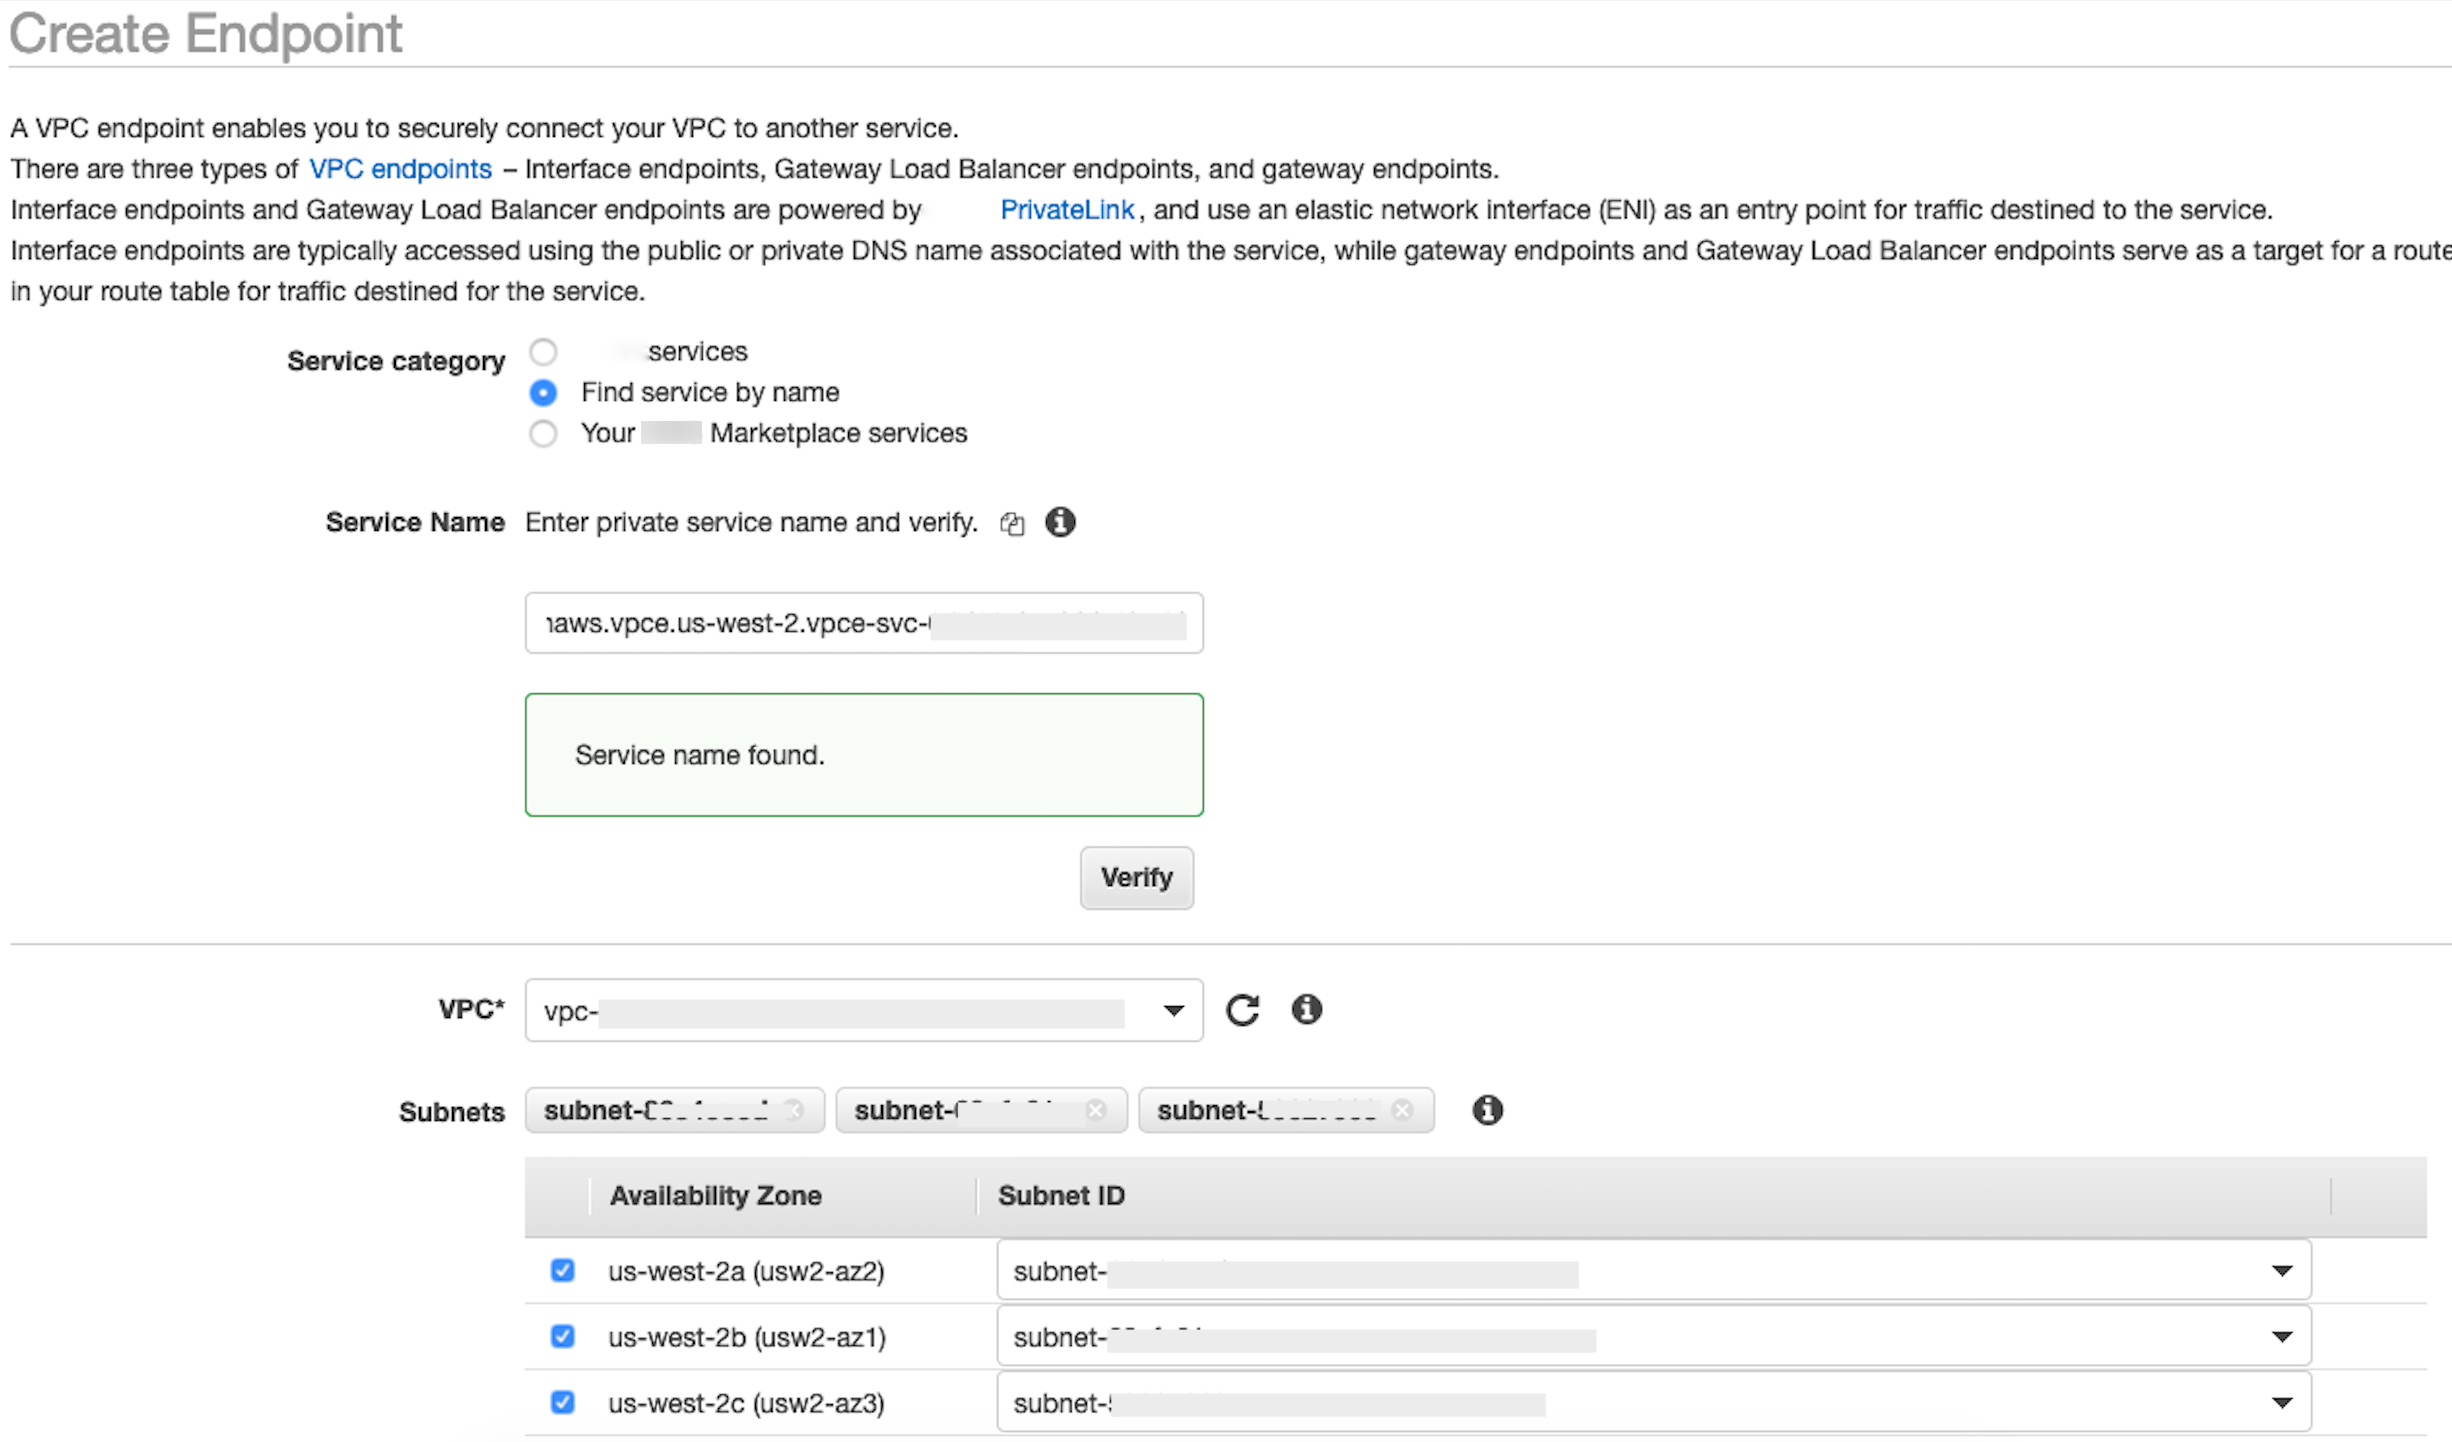
In the Service Name field, paste in the value for
privatelink-vpce-idthat you retrieved in the preceding step and choose Verify.If the connection is successful, a green alert saying Service name found appears on your screen and the VPC and Subnet options automatically expand, as shown in the following screenshot. Depending on your targeted Region, your resulting screen may show another Amazon Region name.
-
Select the same VPC ID that you sent to Snowflake from the VPC dropdown list.
-
If you have not yet created a subnet, then perform the following set of instructions on creating a subnet.
-
Select Subnets from the VPC dropdown list. Then select Create subnet and follow the prompts to create a subset in your VPC. Ensure you select the VPC ID you sent Snowflake.
-
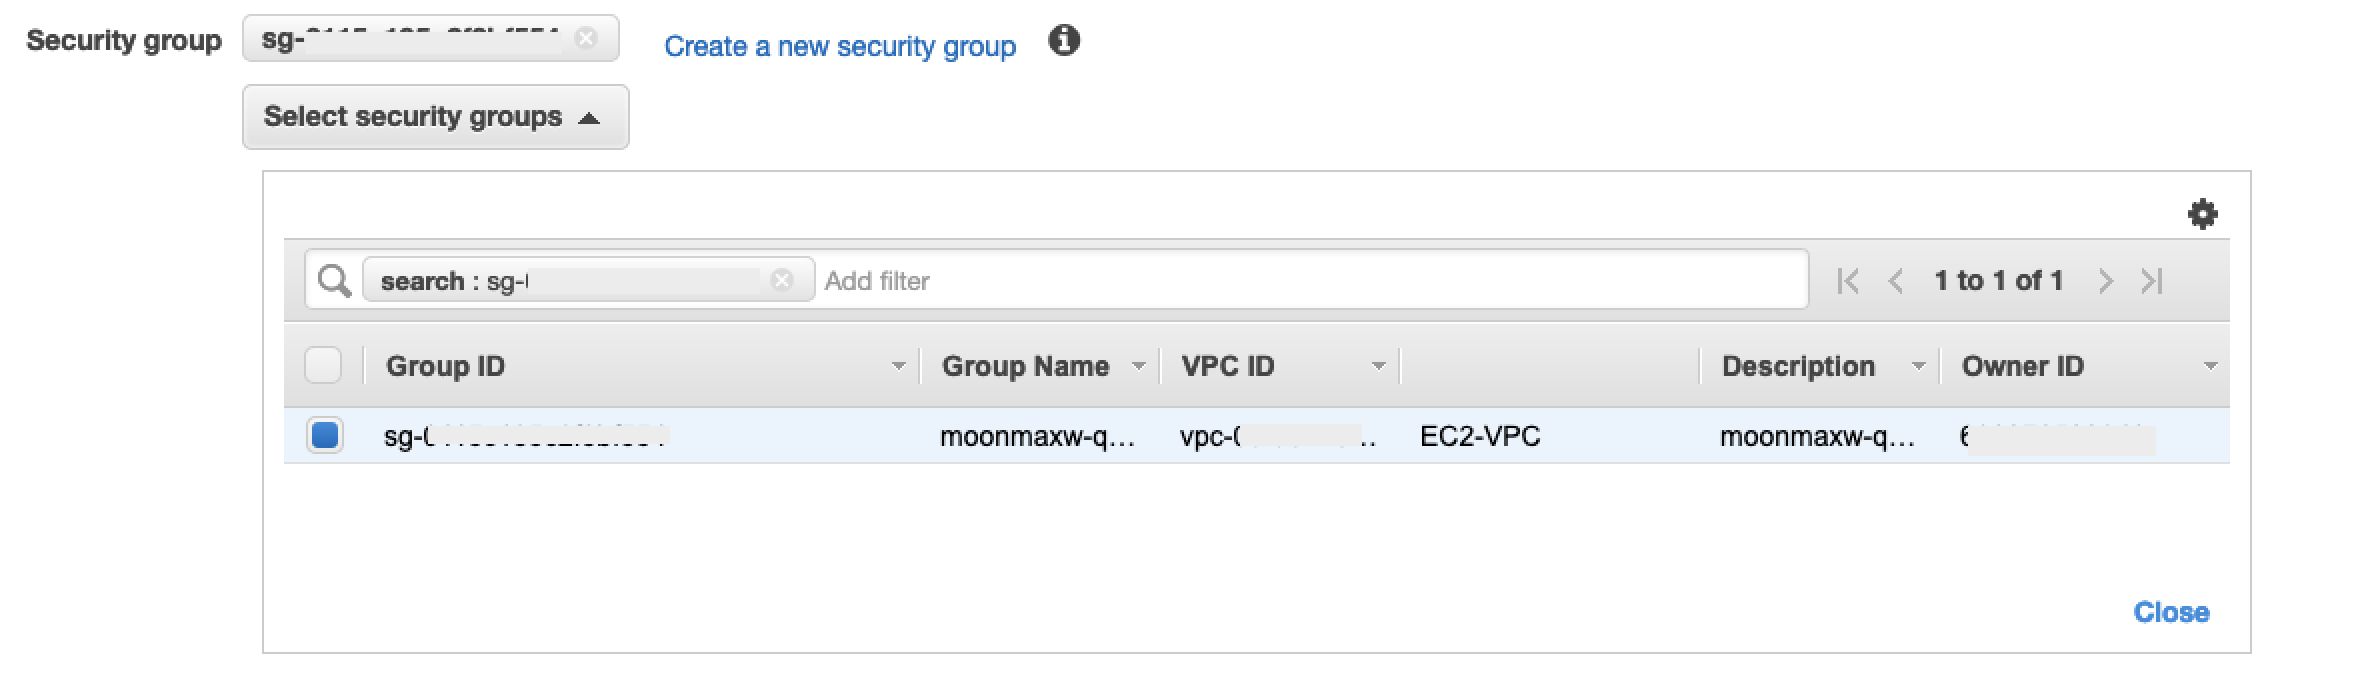
Under Security Group Configuration, select Create New Security Group to open the default Security Group screen in a new tab. In this new tab, select tCreate Security Group.
-
Provide a name for the new security group (such as
datawrangler-doc-snowflake-privatelink-connection) and a description. Be sure to select the VPC ID you have used in previous steps. -
Add two rules to allow traffic from within your VPC to this VPC endpoint.
Navigate to your VPC under Your VPCs in a separate tab, and retrieve your CIDR block for your VPC. Then choose Add Rule in the Inbound Rules section. Select
HTTPSfor the type, leave the Source as Custom in the form, and paste in the value retrieved from the precedingdescribe-vpcscall (such as10.0.0.0/16). -
Choose Create Security Group. Retrieve the Security Group ID from the newly created security group (such as
sg-xxxxxxxxxxxxxxxxx). -
In the VPC Endpoint configuration screen, remove the default security group. Paste in the security group ID in the search field and select the checkbox.
-
Select Create Endpoint.
-
If the endpoint creation is successful, you see a page that has a link to your VPC endpoint configuration, specified by the VPC ID. Select the link to view the configuration in full.
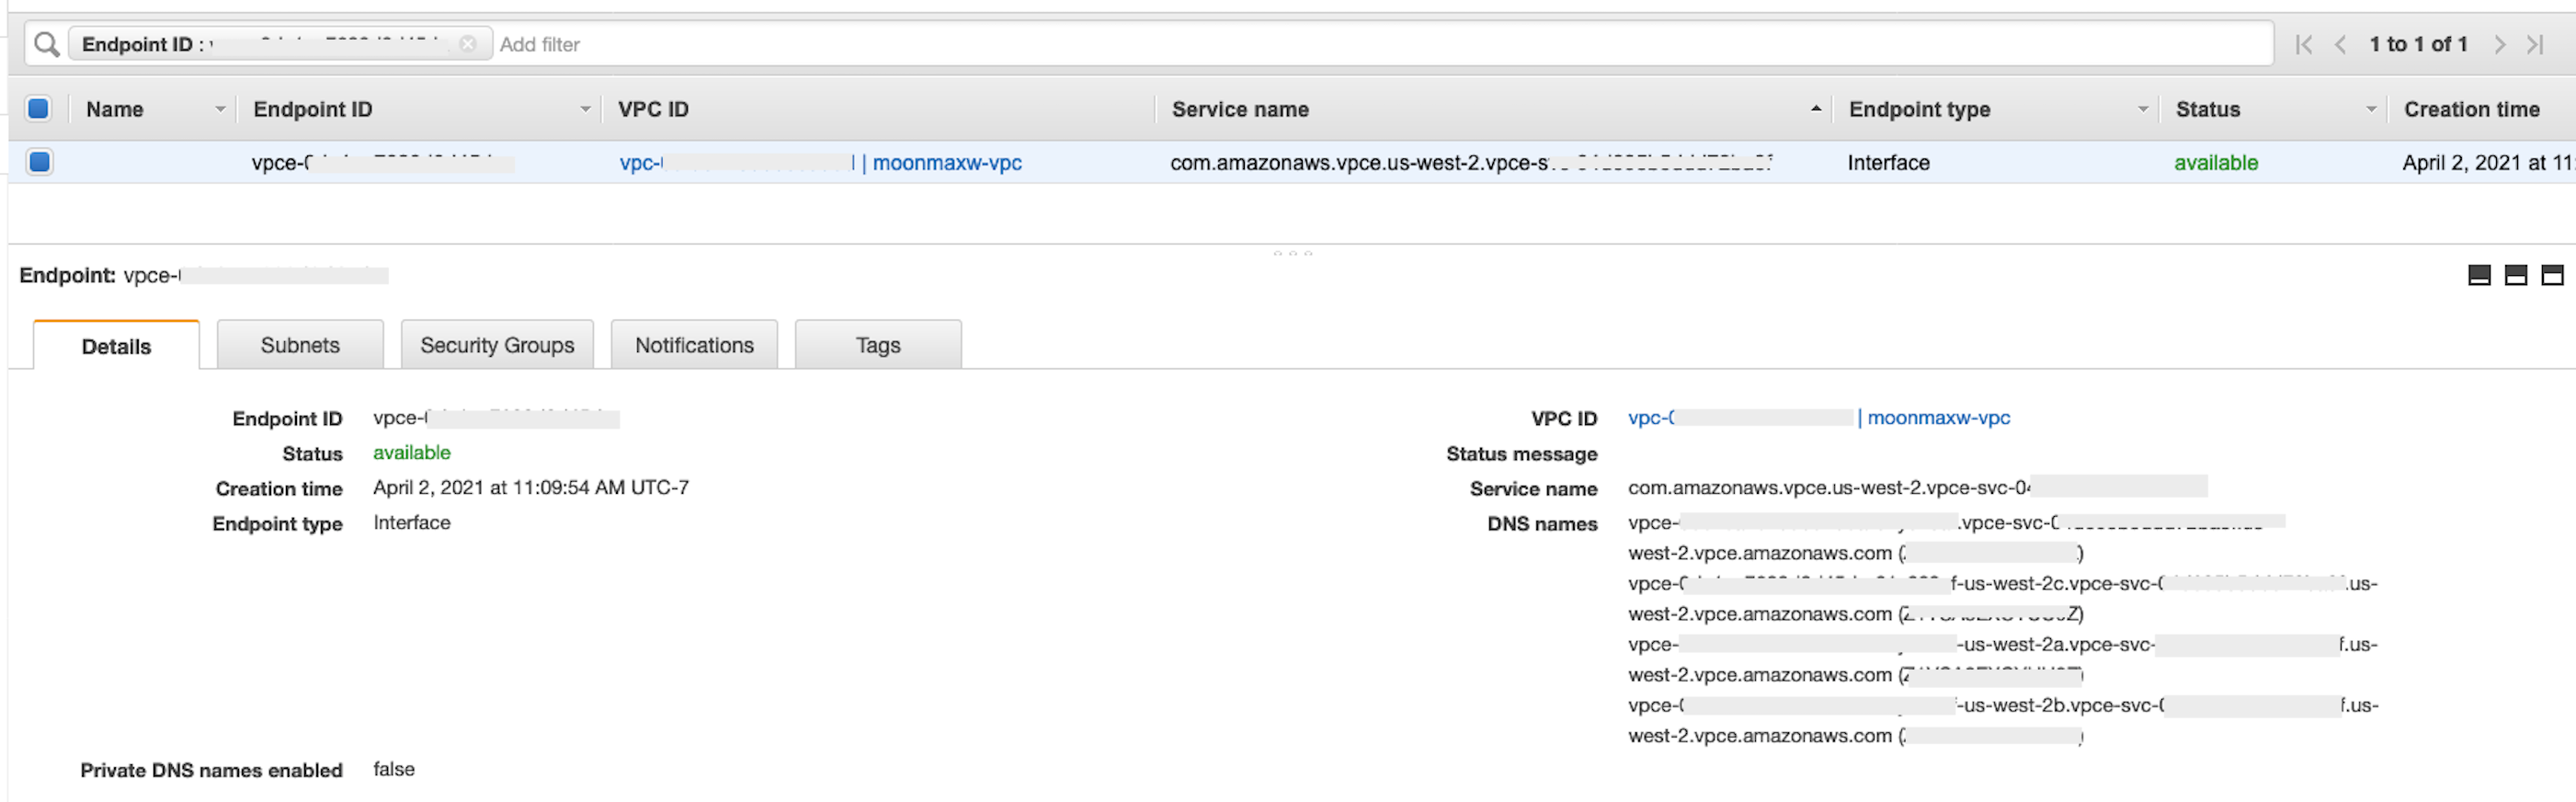
Retrieve the topmost record in the DNS names list. This can be differentiated from other DNS names because it only includes the Region name (such as
us-west-2), and no Availability Zone letter notation (such asus-west-2a). Store this information for later use.
Configure DNS for Snowflake Endpoints in your VPC
This section explains how to configure DNS for Snowflake endpoints in your VPC. This allows your VPC to resolve requests to the Snowflake Amazon PrivateLink endpoint.
-
Navigate to the Route 53 menu
within your Amazon console. -
Select the Hosted Zones option (if necessary, expand the left-hand menu to find this option).
-
Choose Create Hosted Zone.
-
In the Domain name field, reference the value that was stored for
privatelink-account-urlin the preceding steps. In this field, your Snowflake account ID is removed from the DNS name and only uses the value starting with the Region identifier. A Resource Record Set is also created later for the subdomain, such as,region.privatelink.snowflakecomputing.com. -
Select the radio button for Private Hosted Zone in the Type section. Your Region code may not be
us-west-2. Reference the DNS name returned to you by Snowflake.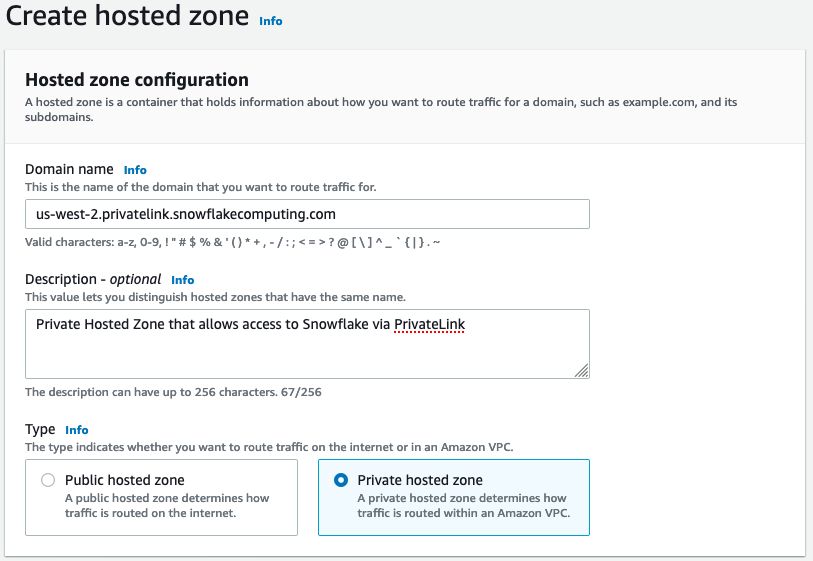
-
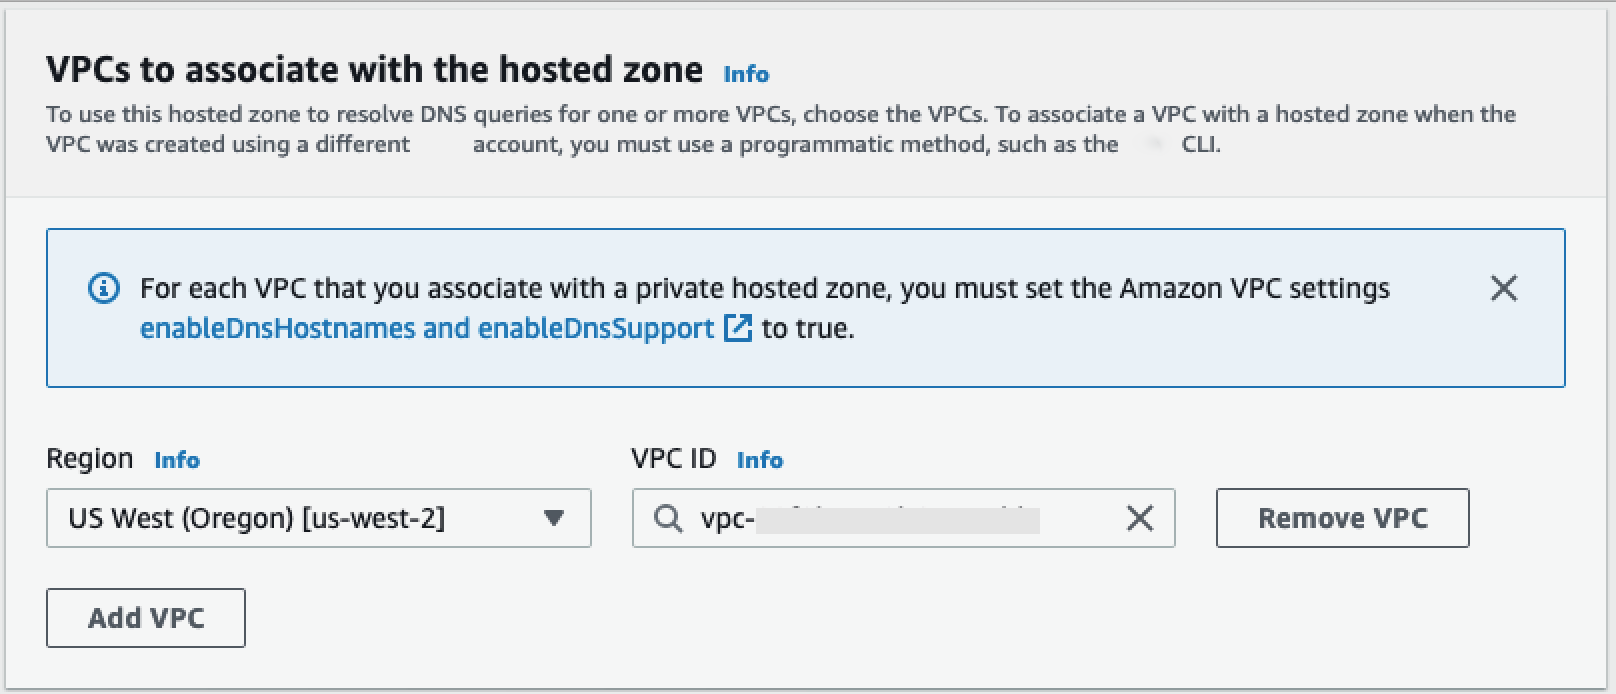
In the VPCs to associate with the hosted zone section, select the Region in which your VPC is located and the VPC ID used in previous steps.
-
Choose Create hosted zone.
-
-
Next, create two records, one for
privatelink-account-urland one forprivatelink_ocsp-url.-
In the Hosted Zone menu, choose Create Record Set.
-
Under Record name, enter your Snowflake Account ID only (the first 8 characters in
privatelink-account-url). -
Under Record type, select CNAME.
-
Under Value, enter the DNS name for the regional VPC endpoint you retrieved in the last step of the Set up the Snowflake Amazon PrivateLink Integration section.

-
Choose Create records.
-
Repeat the preceding steps for the OCSP record we notated as
privatelink-ocsp-url, starting withocspthrough the 8-character Snowflake ID for the record name (such asocsp.xxxxxxxx).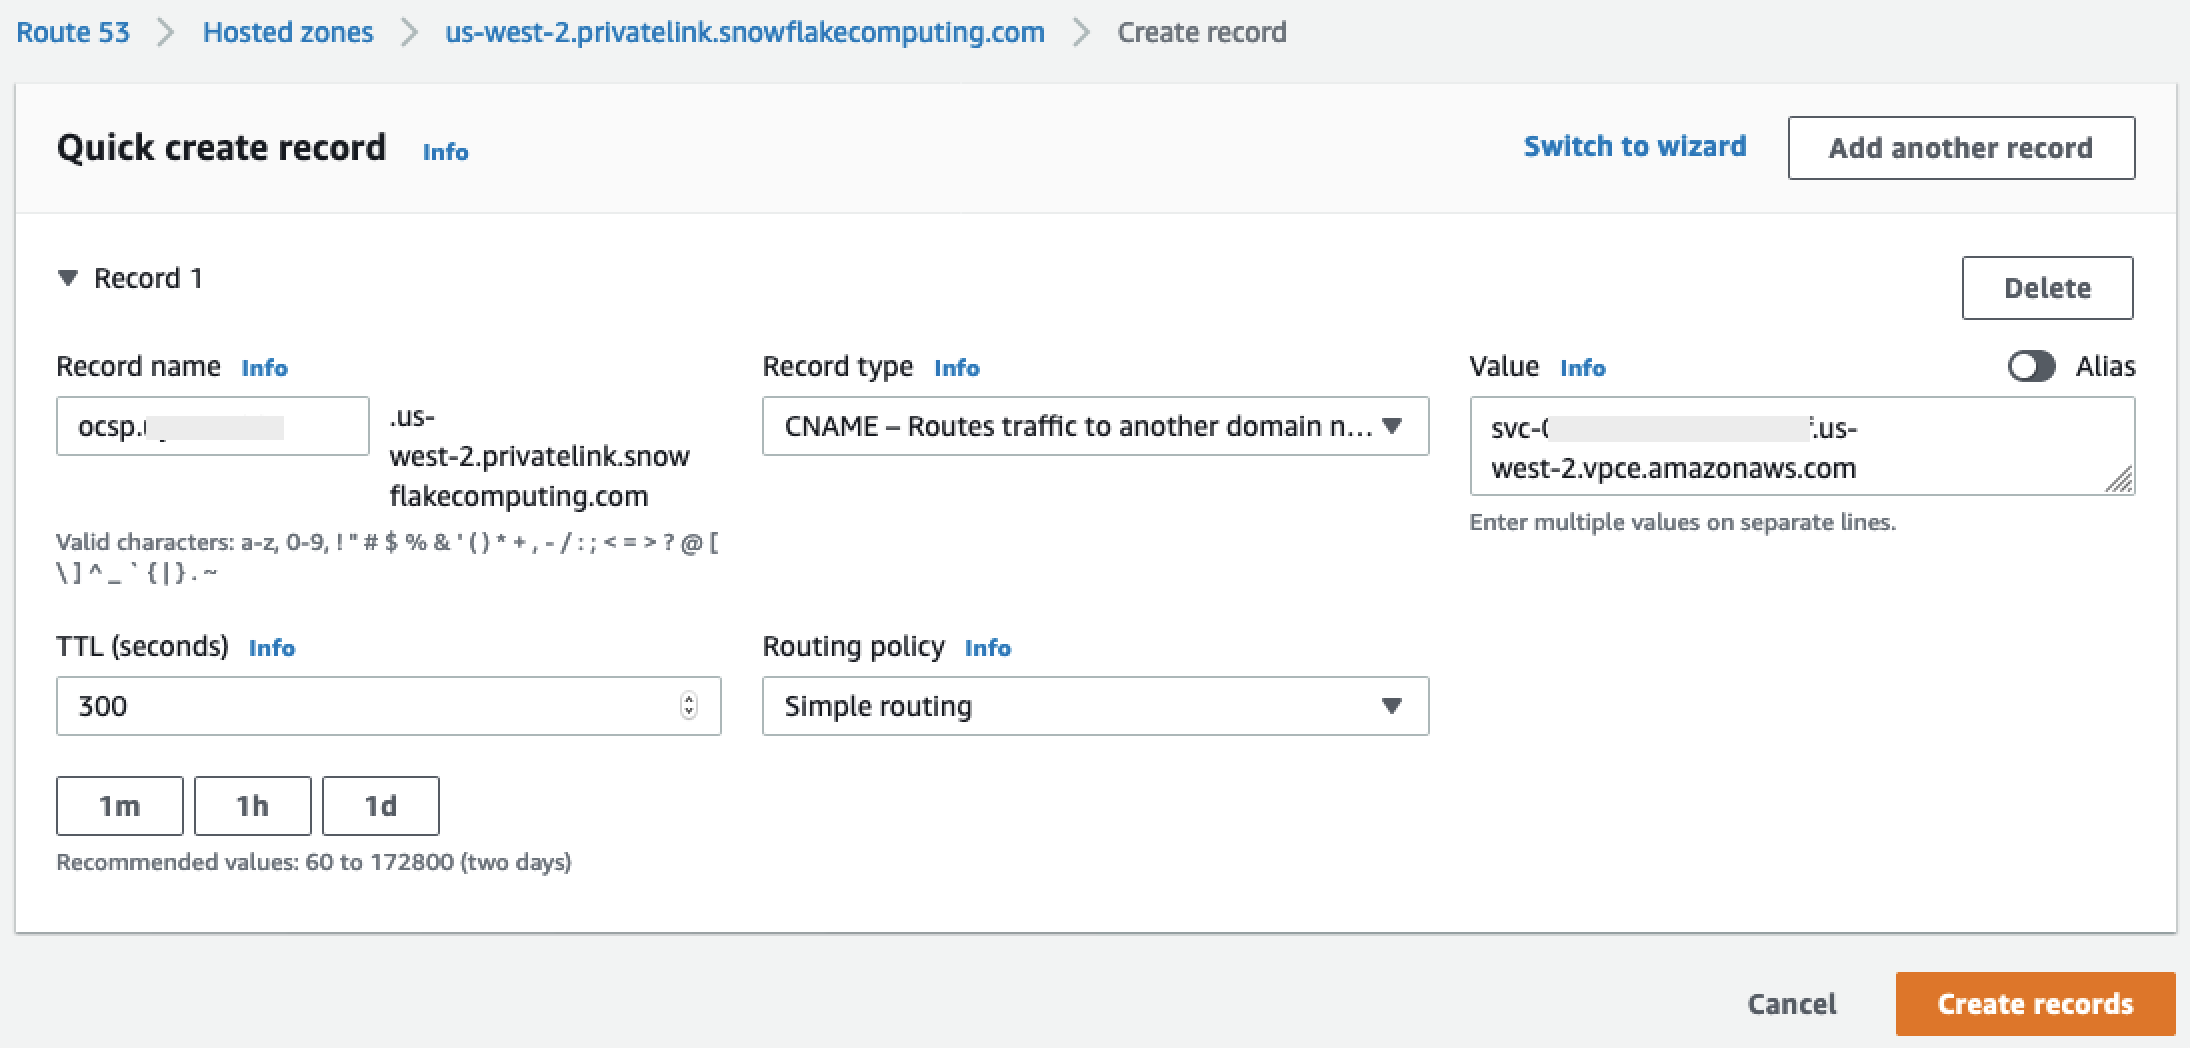
-
-
Configure Route 53 Resolver Inbound Endpoint for your VPC
This section explains how to configure Route 53 resolvers inbound endpoints for your VPC.
-
Navigate to the Route 53 menu
within your Amazon console. -
In the left hand panel in the Security section, select the Security Groups option.
-
-
Choose Create Security Group.
-
Provide a name for your security group (such as
datawranger-doc-route53-resolver-sg) and a description. -
Select the VPC ID used in previous steps.
-
Create rules that allow for DNS over UDP and TCP from within the VPC CIDR block.

-
Choose Create Security Group. Note the Security Group ID because adds a rule to allow traffic to the VPC endpoint security group.
-
-
Navigate to the Route 53 menu
within your Amazon console. -
In the Resolver section, select the Inbound Endpoint option.
-
-
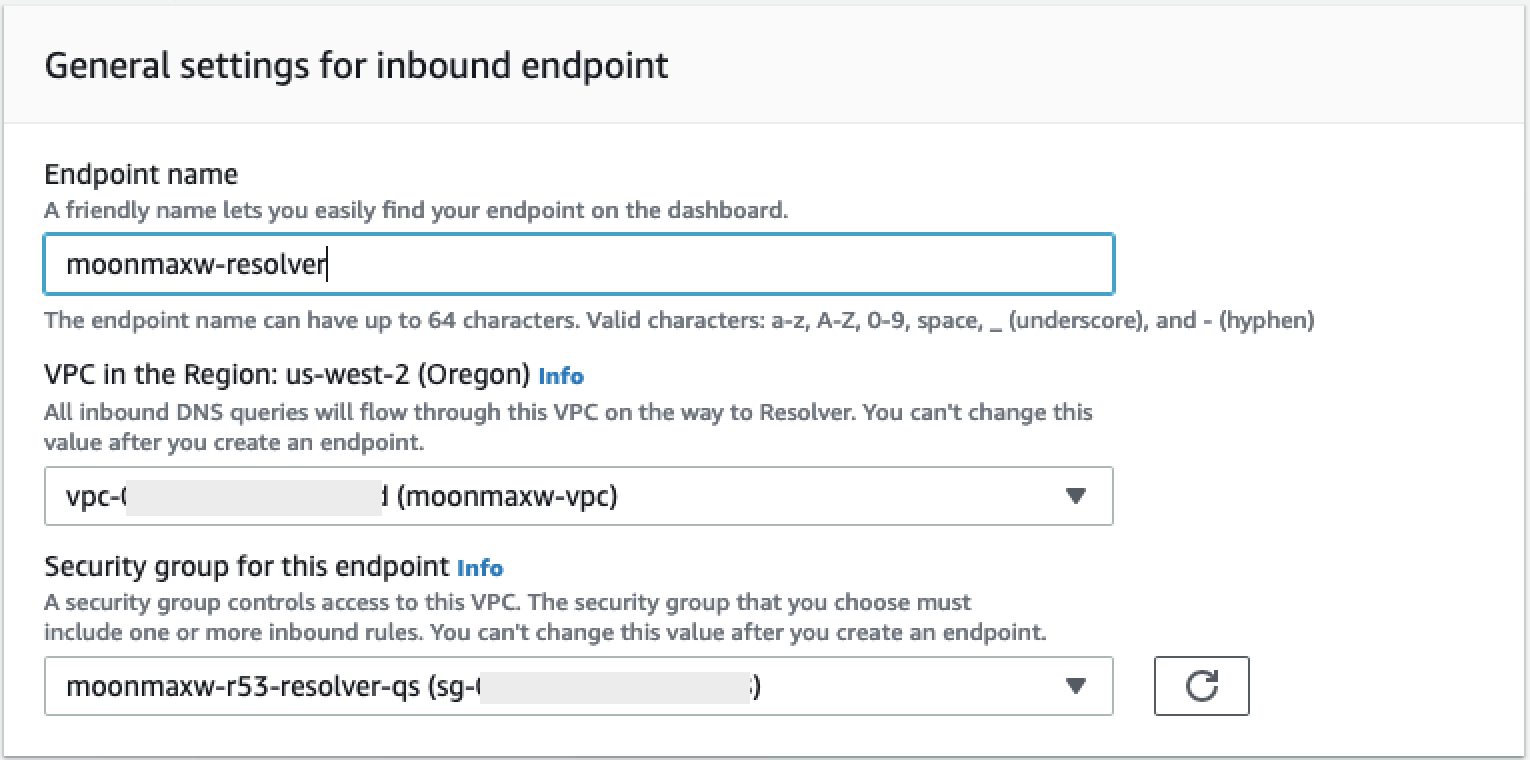
Choose Create Inbound Endpoint.
-
Provide an endpoint name.
-
From the VPC in the Region dropdown list, select the VPC ID you have used in all previous steps.
-
In the Security group for this endpoint dropdown list, select the security group ID from Step 2 in this section.
-
In the IP Address section, select an Availability Zones, select a subnet, and leave the radio selector for Use an IP address that is selected automatically selected for each IP address.
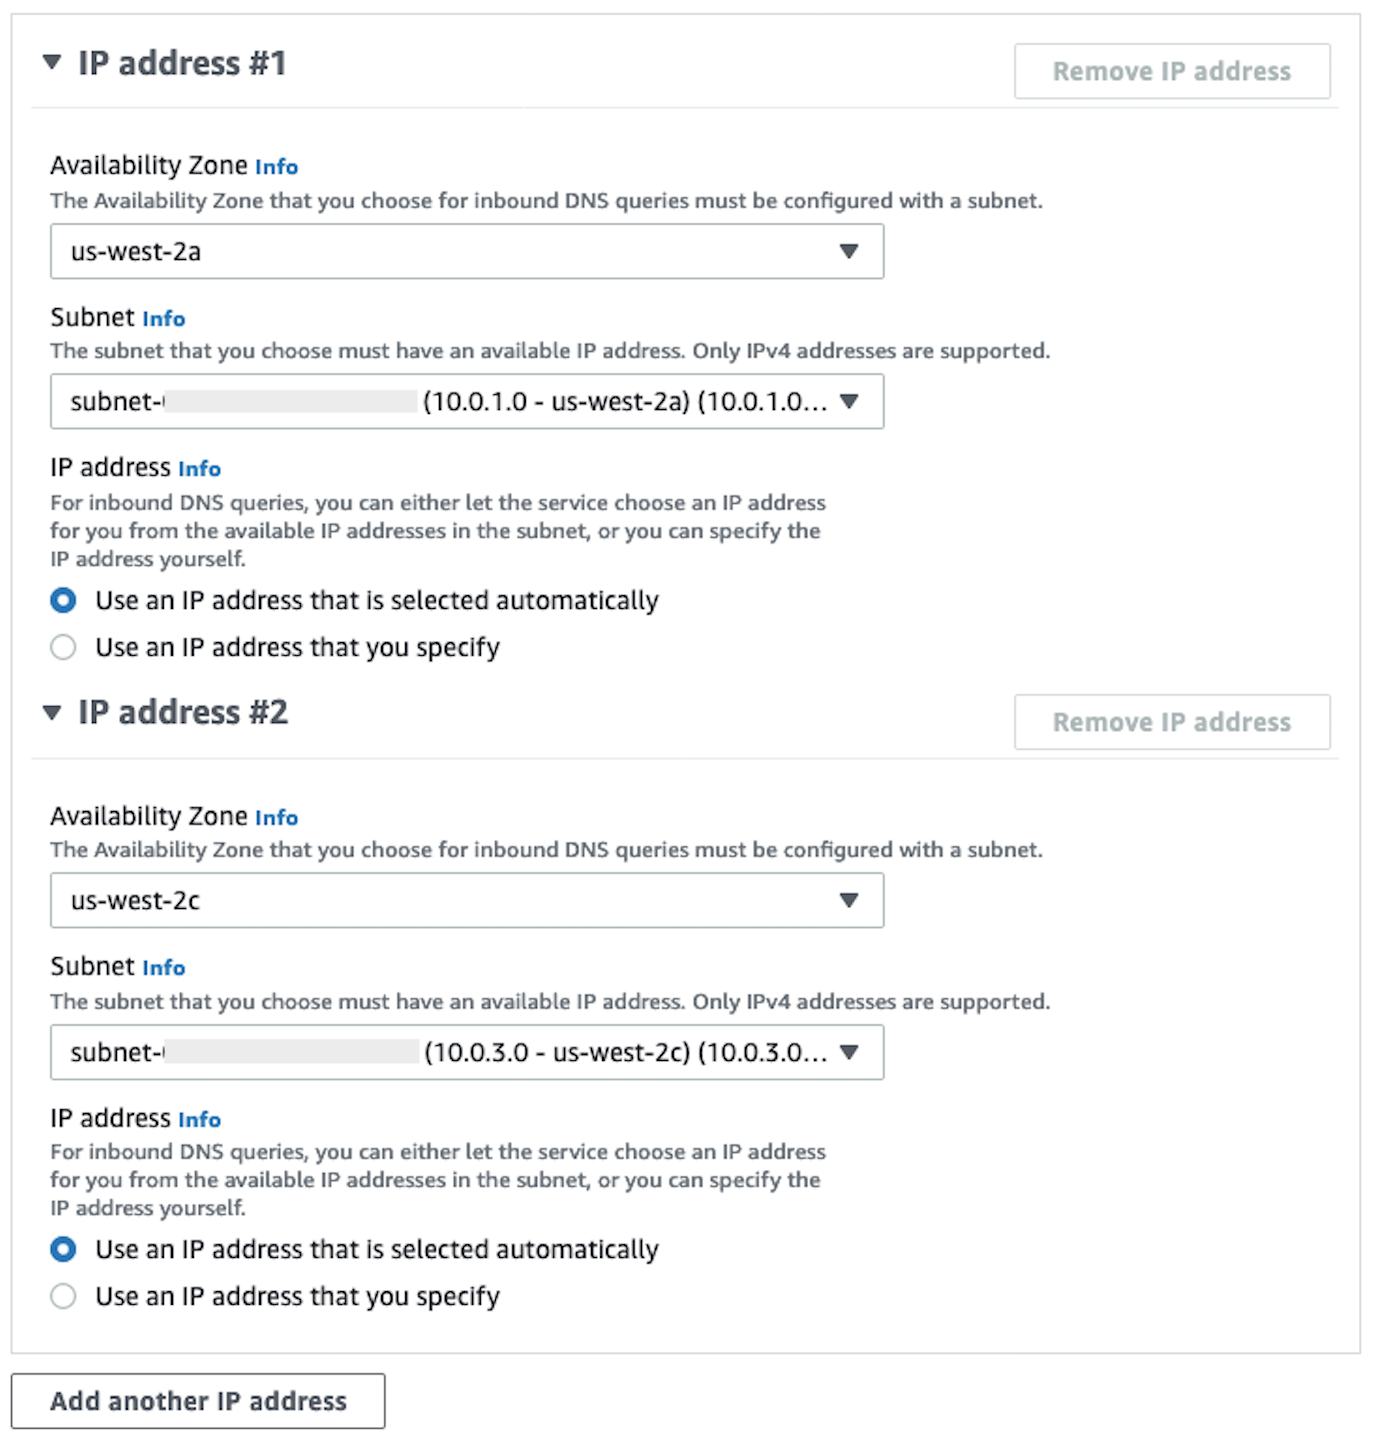
-
Choose Submit.
-
-
Select the Inbound endpoint after it has been created.
-
Once the inbound endpoint is created, note the two IP addresses for the resolvers.

SageMaker AI VPC Endpoints
This section explains how to create VPC endpoints for the following: Amazon SageMaker Studio Classic, SageMaker Notebooks, the SageMaker API, SageMaker Runtime Runtime, and Amazon SageMaker Feature Store Runtime.
Create a security group that is applied to all endpoints.
-
Navigate to the EC2 menu
in the Amazon Console. -
In the Network & Security section, select the Security groups option.
-
Choose Create security group.
-
Provide a security group name and description (such as
datawrangler-doc-sagemaker-vpce-sg). A rule is added later to allow traffic over HTTPS from SageMaker AI to this group.
Creating the endpoints
-
Navigate to the VPC menu
in the Amazon console. -
Select the Endpoints option.
-
Choose Create Endpoint.
-
Search for the service by entering its name in the Search field.
-
From the VPC dropdown list, select the VPC in which your Snowflake Amazon PrivateLink connection exists.
-
In the Subnets section, select the subnets which have access to the Snowflake PrivateLink connection.
-
Leave the Enable DNS Name checkbox selected.
-
In the Security Groups section, select the security group you created in the preceding section.
-
Choose Create Endpoint.
Configure Studio Classic and Data Wrangler
This section explains how to configure Studio Classic and Data Wrangler.
-
Configure the security group.
-
Navigate to the Amazon EC2 menu in the Amazon Console.
-
Select the Security Groups option in the Network & Security section.
-
Choose Create Security Group.
-
Provide a name and description for your security group (such as
datawrangler-doc-sagemaker-studio). -
Create the following inbound rules.
-
The HTTPS connection to the security group you provisioned for the Snowflake PrivateLink connection you created in the Set up the Snowflake PrivateLink Integration step.
-
The HTTP connection to the security group you provisioned for the Snowflake PrivateLink connection you created in the Set up the Snowflake PrivateLink Integration step.
-
The UDP and TCP for DNS (port 53) to Route 53 Resolver Inbound Endpoint security group you create in step 2 of Configure Route 53 Resolver Inbound Endpoint for your VPC.
-
-
Choose Create Security Group button in the lower right hand corner.
-
-
Configure Studio Classic.
-
Navigate to the SageMaker AI menu in the Amazon console.
-
From the left hand console, Select the SageMaker AI Studio Classic option.
-
If you do not have any domains configured, the Get Started menu is present.
-
Select the Standard Setup option from the Get Started menu.
-
Under Authentication method, select Amazon Identity and Access Management (IAM).
-
From the Permissions menu, you can create a new role or use a pre-existing role, depending on your use case.
-
If you choose Create a new role, you are presented the option to provide an S3 bucket name, and a policy is generated for you.
-
If you already have a role created with permissions for the S3 buckets to which you require access, select the role from the dropdown list. This role should have the
AmazonSageMakerFullAccesspolicy attached to it.
-
-
Select the Network and Storage dropdown list to configure the VPC, security, and subnets SageMaker AI uses.
-
Under VPC, select the VPC in which your Snowflake PrivateLink connection exists.
-
Under Subnet(s), select the subnets which have access to the Snowflake PrivateLink connection.
-
Under Network Access for Studio Classic, select VPC Only.
-
Under Security Group(s), select the security group you created in step 1.
-
-
Choose Submit.
-
-
Edit the SageMaker AI security group.
-
Create the following inbound rules:
-
Port 2049 to the inbound and outbound NFS Security Groups created automatically by SageMaker AI in step 2 (the security group names contain the Studio Classic domain ID).
-
Access to all TCP ports to itself (required for SageMaker AI for VPC Only).
-
-
-
Edit the VPC Endpoint Security Groups:
-
Navigate to the Amazon EC2 menu in the Amazon console.
-
Locate the security group you created in a preceding step.
-
Add an inbound rule allowing for HTTPS traffic from the security group created in step 1.
-
-
Create a user profile.
-
From the SageMaker Studio Classic Control Panel , choose Add User.
-
Provide a user name.
-
For the Execution Role, choose to create a new role or to use a pre-existing role.
-
If you choose Create a new role, you are presented the option to provide an Amazon S3 bucket name, and a policy is generated for you.
-
If you already have a role created with permissions to the Amazon S3 buckets to which you require access, select the role from the dropdown list. This role should have the
AmazonSageMakerFullAccesspolicy attached to it.
-
-
Choose Submit.
-
-
Create a data flow (follow the data scientist guide outlined in a preceding section).
-
When adding a Snowflake connection, enter the value of
privatelink-account-name(from the Set up Snowflake PrivateLink Integration step) into the Snowflake account name (alphanumeric) field, instead of the plain Snowflake account name. Everything else is left unchanged.
-
Provide information to the data scientist
Provide the data scientist with the information that they need to access Snowflake from Amazon SageMaker AI Data Wrangler.
Important
Your users need to run Amazon SageMaker Studio Classic version 1.3.0 or later. For information about checking the version of Studio Classic and updating it, see Prepare ML Data with Amazon SageMaker Data Wrangler.
-
To allow your data scientist to access Snowflake from SageMaker Data Wrangler, provide them with one of the following:
-
For Basic Authentication, a Snowflake account name, user name, and password.
-
For OAuth, a user name and password in the identity provider.
-
For ARN, the Secrets Manager secret Amazon Resource Name (ARN).
-
A secret created with Amazon Secrets Manager and the ARN of the secret. Use the following procedure below to create the secret for Snowflake if you choose this option.
Important
If your data scientists use the Snowflake Credentials (User name and Password) option to connect to Snowflake, you can use Secrets Manager to store the credentials in a secret. Secrets Manager rotates secrets as part of a best practice security plan. The secret created in Secrets Manager is only accessible with the Studio Classic role configured when you set up a Studio Classic user profile. This requires you to add this permission,
secretsmanager:PutResourcePolicy, to the policy that is attached to your Studio Classic role.We strongly recommend that you scope the role policy to use different roles for different groups of Studio Classic users. You can add additional resource-based permissions for the Secrets Manager secrets. See Manage Secret Policy for condition keys you can use.
For information about creating a secret, see Create a secret. You're charged for the secrets that you create.
-
-
(Optional) Provide the data scientist with the name of the storage integration that you created using the following procedure Create a Cloud Storage Integration in Snowflake
. This is the name of the new integration and is called integration_namein theCREATE INTEGRATIONSQL command you ran, which is shown in the following snippet:CREATE STORAGE INTEGRATION integration_name TYPE = EXTERNAL_STAGE STORAGE_PROVIDER = S3 ENABLED = TRUE STORAGE_AWS_ROLE_ARN = 'iam_role' [ STORAGE_AWS_OBJECT_ACL = 'bucket-owner-full-control' ] STORAGE_ALLOWED_LOCATIONS = ('s3://bucket/path/', 's3://bucket/path/') [ STORAGE_BLOCKED_LOCATIONS = ('s3://bucket/path/', 's3://bucket/path/') ]
Data Scientist Guide
Use the following to connect Snowflake and access your data in Data Wrangler.
Important
Your administrator needs to use the information in the preceding sections to set up Snowflake. If you're running into issues, contact them for troubleshooting help.
You can connect to Snowflake in one of the following ways:
-
Specifying your Snowflake credentials (account name, user name, and password) in Data Wrangler.
-
Providing an Amazon Resource Name (ARN) of a secret containing the credentials.
-
Using an open standard for access delegation (OAuth) provider that connects to Snowflake. Your administrator can give you access to one of the following OAuth providers:
Talk to your administrator about the method that you need to use to connect to Snowflake.
The following sections have information about how you can connect to Snowflake using the preceding methods.
You can begin the process of importing your data from Snowflake after you've connected to it.
Within Data Wrangler, you can view your data warehouses, databases, and schemas, along with the eye icon with which you can preview your table. After you select the Preview Table icon, the schema preview of that table is generated. You must select a warehouse before you can preview a table.
Important
If you're importing a dataset with columns of type
TIMESTAMP_TZ or TIMESTAMP_LTZ, add
::string to the column names of your query. For more
information, see How To: Unload TIMESTAMP_TZ and TIMESTAMP_LTZ data to a Parquet
file
After you select a data warehouse, database and schema, you can now write queries and run them. The output of your query shows under Query results.
After you have settled on the output of your query, you can then import the output of your query into a Data Wrangler flow to perform data transformations.
After you've imported your data, navigate to your Data Wrangler flow and start adding transformations to it. For a list of available transforms, see Transform Data.
Import Data From Software as a Service (SaaS) Platforms
You can use Data Wrangler to import data from more than forty software as a service (SaaS) platforms. To import your data from your SaaS platform, you or your administrator must use Amazon AppFlow to transfer the data from the platform to Amazon S3 or Amazon Redshift. For more information about Amazon AppFlow, see What is Amazon AppFlow? If you don't need to use Amazon Redshift, we recommend transferring the data to Amazon S3 for a simpler process.
Data Wrangler supports transferring data from the following SaaS platforms:
The preceding list has links to more information about setting up your data source. You or your administrator can refer to the preceding links after you've read the following information.
When you navigate to the Import tab of your Data Wrangler flow, you see data sources under the following sections:
-
Available
-
Set up data sources
You can connect to data sources under Available without needing additional configuration. You can choose the data source and import your data.
Data sources under Set up data sources, require you or your administrator to use Amazon AppFlow to transfer the data from the SaaS platform to Amazon S3 or Amazon Redshift. For information about performing a transfer, see Using Amazon AppFlow to transfer your data.
After you perform the data transfer, the SaaS platform appears as a data source under Available. You can choose it and import the data that you've transferred into Data Wrangler. The data that you've transferred appears as tables that you can query.
Using Amazon AppFlow to transfer your data
Amazon AppFlow is a platform that you can use to transfer data from your SaaS platform to Amazon S3 or Amazon Redshift without having to write any code. To perform a data transfer, you use the Amazon Web Services Management Console.
Important
You must make sure you've set up the permissions to perform a data transfer. For more information, see Amazon AppFlow Permissions.
After you've added permissions, you can transfer the data. Within Amazon AppFlow, you create a flow to transfer the data. A flow is a series of configurations. You can use it to specify whether you're running the data transfer on a schedule or whether you're partitioning the data into separate files. After you've configured the flow, you run it to transfer the data.
For information about creating a flow, see Creating flows in Amazon AppFlow. For information about running a flow, see Activate an Amazon AppFlow flow.
After the data has been transferred, use the following procedure to access the data in Data Wrangler.
Important
Before you try to access your data, make sure your IAM role has the following policy:
By default, the IAM role that you use to access Data Wrangler is the SageMakerExecutionRole. For more information about adding policies, see Adding IAM identity permissions (console).
To connect to a data source, do the following.
-
Sign into Amazon SageMaker AI Console
. -
Choose Studio.
-
Choose Launch app.
-
From the dropdown list, select Studio.
-
Choose the Home icon.
-
Choose Data.
-
Choose Data Wrangler.
-
Choose Import data.
-
Under Available, choose the data source.
-
For the Name field, specify the name of the connection.
-
(Optional) Choose Advanced configuration.
-
Choose a Workgroup.
-
If your workgroup hasn't enforced the Amazon S3 output location or if you don't use a workgroup, specify a value for Amazon S3 location of query results.
-
(Optional) For Data retention period, select the checkbox to set a data retention period and specify the number of days to store the data before it's deleted.
-
(Optional) By default, Data Wrangler saves the connection. You can choose to deselect the checkbox and not save the connection.
-
-
Choose Connect.
-
Specify a query.
Note
To help you specify a query, you can choose a table on the left-hand navigation panel. Data Wrangler shows the table name and a preview of the table. Choose the icon next to the table name to copy the name. You can use the table name in the query.
-
Choose Run.
-
Choose Import query.
-
For Dataset name, specify the name of the dataset.
-
Choose Add.
When you navigate to the Import data screen, you can see the connection that you've created. You can use the connection to import more data.
Imported Data Storage
Important
We strongly recommend that you follow the best practices around protecting your Amazon S3 bucket by following Security best practices.
When you query data from Amazon Athena or Amazon Redshift, the queried dataset is automatically stored in Amazon S3. Data is stored in the default SageMaker AI S3 bucket for the Amazon Region in which you are using Studio Classic.
Default S3 buckets have the following naming convention:
sagemaker-. For example, if your account number is
111122223333 and you are using Studio Classic in region-account
numberus-east-1, your
imported datasets are stored in sagemaker-us-east-1-111122223333.
Data Wrangler flows depend on this Amazon S3 dataset location, so you should not modify this
dataset in Amazon S3 while you are using a dependent flow. If you do modify this S3 location,
and you want to continue using your data flow, you must remove all objects in
trained_parameters in your .flow file. To do this, download the .flow
file from Studio Classic and for each instance of trained_parameters, delete
all entries. When you are done, trained_parameters should be an empty JSON
object:
"trained_parameters": {}
When you export and use your data flow to process your data, the .flow file you export refers to this dataset in Amazon S3. Use the following sections to learn more.
Amazon Redshift Import Storage
Data Wrangler stores the datasets that result from your query in a Parquet file in your default SageMaker AI S3 bucket.
This file is stored under the following prefix (directory):
redshift/uuid/data/, where
uuid is a unique identifier that gets created for
each query.
For example, if your default bucket is
sagemaker-us-east-1-111122223333, a single dataset
queried from Amazon Redshift is located in
s3://sagemaker-us-east-1-111122223333/redshift/uuid/data/.
Amazon Athena Import Storage
When you query an Athena database and import a dataset, Data Wrangler stores the dataset, as well as a subset of that dataset, or preview files, in Amazon S3.
The dataset you import by selecting Import dataset is stored in Parquet format in Amazon S3.
Preview files are written in CSV format when you select Run on the Athena import screen, and contain up to 100 rows from your queried dataset.
The dataset you query is located under the prefix (directory):
athena/uuid/data/, where
uuid is a unique identifier that gets created for
each query.
For example, if your default bucket is
sagemaker-us-east-1-111122223333, a single dataset
queried from Athena is located in
s3://sagemaker-us-east-1-111122223333/athena/uuid/data/example_dataset.parquet.
The subset of the dataset that is stored to preview dataframes in Data Wrangler is stored under the prefix: athena/.