What is Step Functions?
Managing state and transforming data
Learn about Passing data between states with variables and Transforming data with JSONata.
With Amazon Step Functions, you can create workflows, also called State machines, to build distributed applications, automate processes, orchestrate microservices, and create data and machine learning pipelines.
Step Functions is based on state machines and tasks. In Step Functions, state machines are called workflows, which are a series of event-driven steps. Each step in a workflow is called a state. For example, a Task state represents a unit of work that another Amazon service performs, such as calling another Amazon Web Services service or API. Instances of running workflows performing tasks are called executions in Step Functions.
The work in your state machine tasks can also be done using Activities which are workers that exist outside of Step Functions.
In the Step Functions' console, you can visualize, edit, and debug your application’s workflow. You can examine the state of each step in your workflow to make sure that your application runs in order and as expected.
Depending on your use case, you can have Step Functions call Amazon services, such as Lambda, to perform tasks. You can have Step Functions control Amazon services, such as Amazon Glue, to create extract, transform, and load workflows. You also can create long-running, automated workflows for applications that require human interaction.
For a complete list of Amazon Regions where Step Functions is available, see the Amazon
Region Table
Learn how to use Step Functions
Start with the Getting started tutorial in this guide. For advanced topics and use cases, see the modules in The Step Functions Workshop
Standard and Express workflows types
Step Functions has two workflow types:
-
Standard workflows are ideal for long-running, auditable workflows, as they show execution history and visual debugging.
Standard workflows have exactly-once workflow execution and can run for up to one year. This means that each step in a Standard workflow will execute exactly once.
-
Express workflows are ideal for high-event-rate workloads, such as streaming data processing and IoT data ingestion.
Express workflows have at-least-once workflow execution and can run for up to five minutes. This means that one or more steps in an Express Workflow can potentially run more than once, while each step in the workflow executes at least once.
| Standard workflows | Express workflows |
|---|---|
| 2,000 per second execution rate | 100,000 per second execution rate |
| 4,000 per second state transition rate | Nearly unlimited state transition rate |
| Priced by state transition | Priced by number and duration of executions |
| Show execution history and visual debugging | Show execution history and visual debugging based on log level |
| See execution history in Step Functions |
Send execution history to CloudWatch |
| Support integrations with all services. Support optimized integrations with some services. |
Support integrations with all services. |
| Support Request Response
pattern for all services
Support Run a Job and/or Wait for Callback patterns in specific services (see following section for details) |
Support Request Response pattern for all services |
For more information on Step Functions pricing and choosing workflow type, see the following:
Integrating with other services
Step Functions integrates with multiple Amazon services. To call other Amazon services, you can use two integration types:
-
Amazon SDK integrations provide a way to call any Amazon service directly from your state machine, giving you access to thousands of API actions.
-
Optimized integrations provide custom options for using those services in your state machines.
To combine Step Functions with other services, there are three service integration patterns:
-
Call a service, and let Step Functions progress to the next state after it gets an HTTP response.
-
Call a service, and have Step Functions wait for a job to complete.
-
Wait for a callback with a task token (.waitForTaskToken)
Call a service with a task token, and have Step Functions wait until the task token returns with a callback.
Standard Workflows and Express Workflows support the same integrations but not the same integration patterns.
-
Standard Workflows support Request Response integrations. Certain services support Run a Job (.sync), or Wait for Callback (.waitForTaskToken) , and both in some cases. See the following optimized integrations table for details.
-
Express Workflows only support Request Response integrations.
To help decide between the two types, see Choosing workflow type in Step Functions.
Amazon SDK integrations in Step Functions
| Integrated service | Request Response | Run a Job - .sync | Wait for Callback - .waitForTaskToken |
|---|---|---|---|
| Over two hundred services | Standard & Express | Not supported | Standard |
Optimized integrations in Step Functions
| Integrated service | Request Response | Run a Job - .sync | Wait for Callback - .waitForTaskToken |
|---|---|---|---|
| Amazon API Gateway | Standard & Express | Not supported | Standard |
| Amazon Athena | Standard & Express | Standard | Not supported |
| Amazon Batch | Standard & Express | Standard | Not supported |
| Amazon Bedrock | Standard & Express | Standard | Standard |
| Amazon CodeBuild | Standard & Express | Standard | Not supported |
| Amazon DynamoDB | Standard & Express | Not supported | Not supported |
| Amazon ECS/Fargate | Standard & Express | Standard | Standard |
| Amazon EKS | Standard & Express | Standard | Standard |
| Amazon EMR | Standard & Express | Standard | Not supported |
| Amazon EMR on EKS | Standard & Express | Standard | Not supported |
| Amazon EMR Serverless | Standard & Express | Standard | Not supported |
| Amazon EventBridge | Standard & Express | Not supported | Standard |
| Amazon Glue | Standard & Express | Standard | Not supported |
| Amazon Glue DataBrew | Standard & Express | Standard | Not supported |
| Amazon Lambda | Standard & Express | Not supported | Standard |
| AWS Elemental MediaConvert | Standard & Express | Standard | Not supported |
| Amazon SageMaker AI | Standard & Express | Standard | Not supported |
| Amazon SNS | Standard & Express | Not supported | Standard |
| Amazon SQS | Standard & Express | Not supported | Standard |
| Amazon Step Functions | Standard & Express | Standard | Standard |
Example use cases for workflows
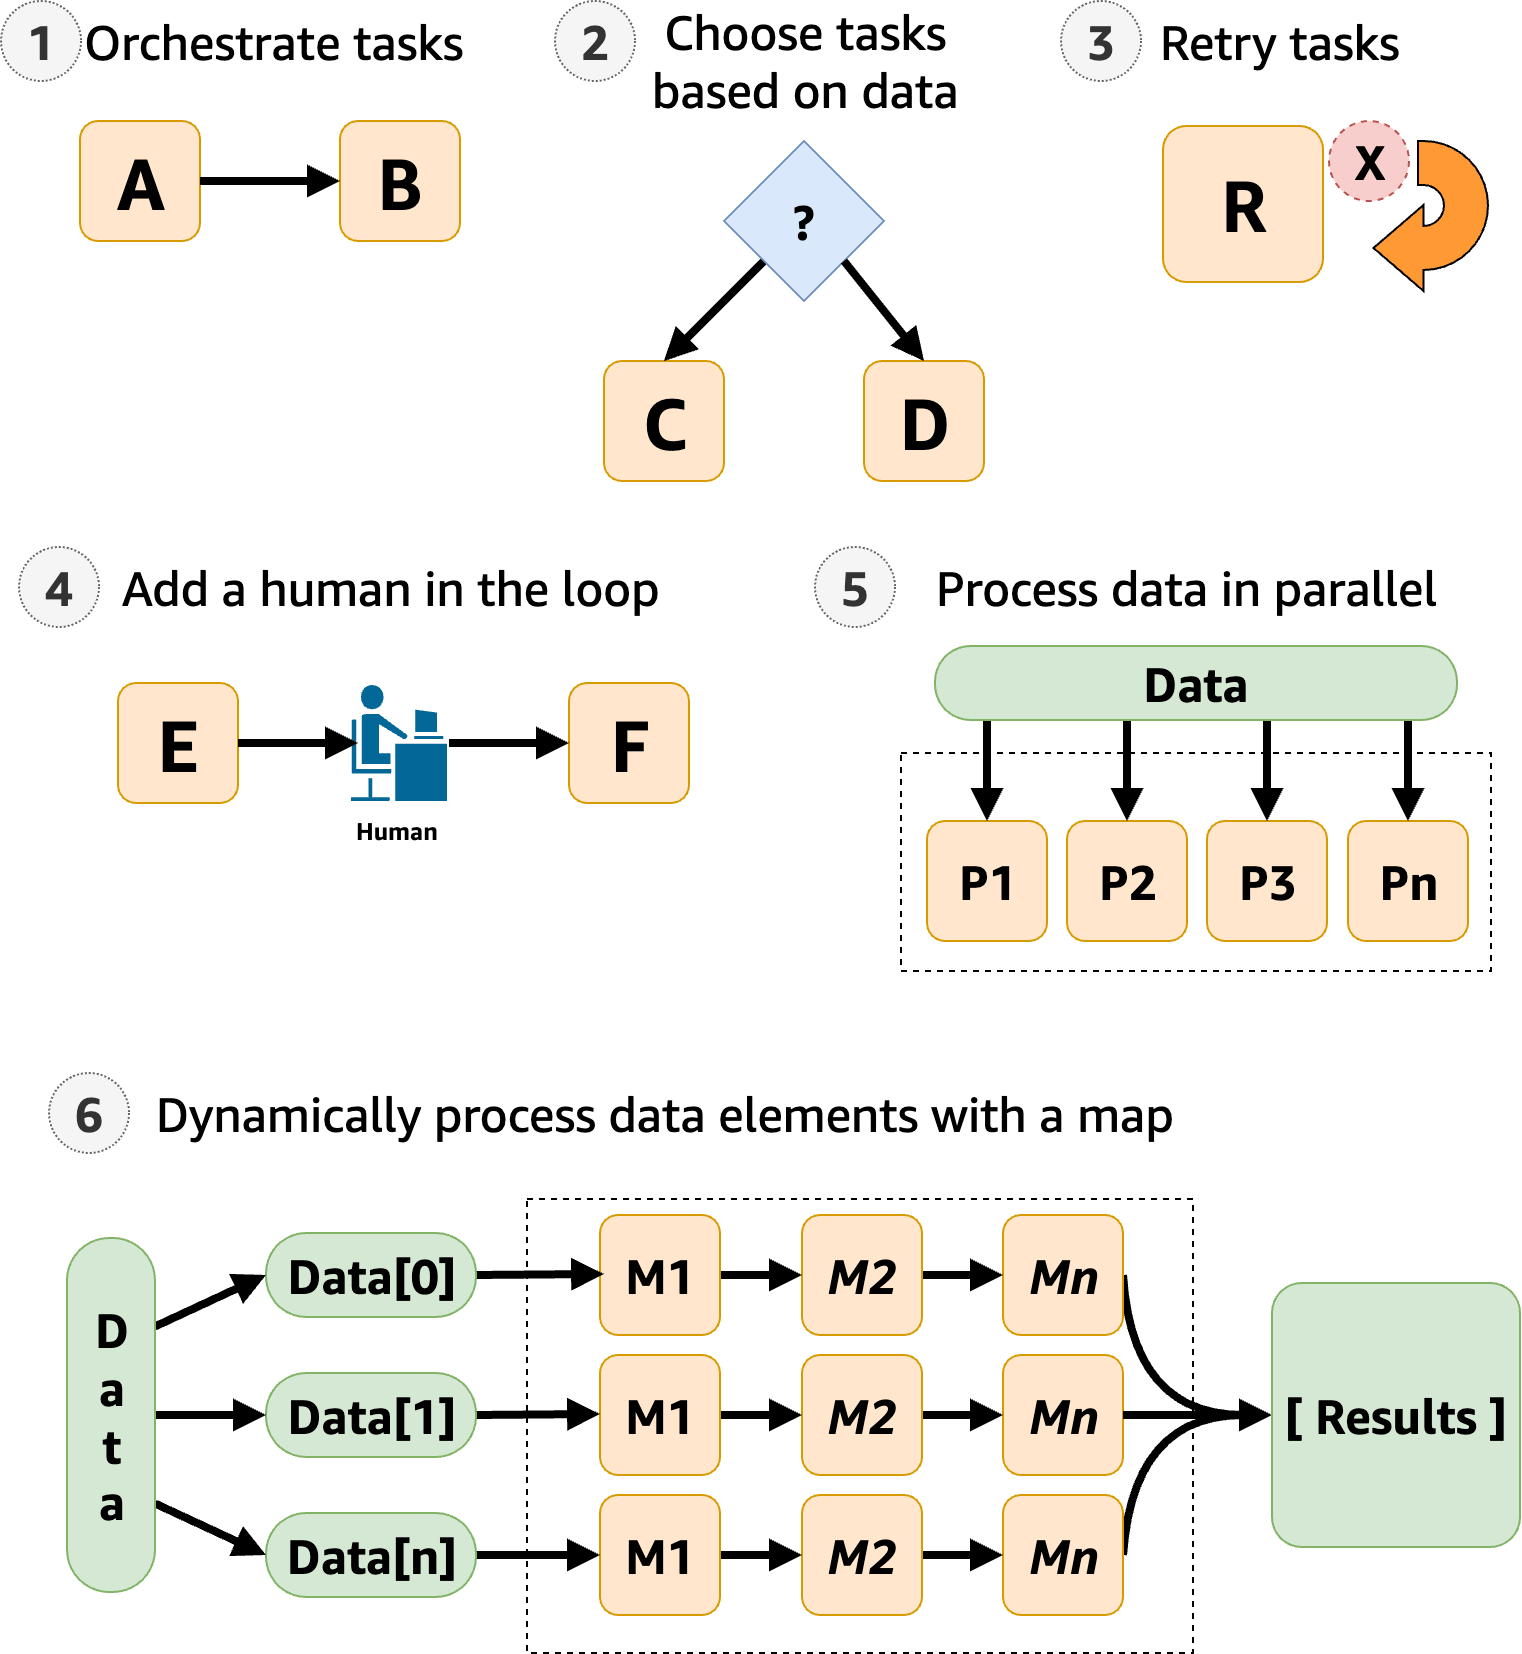
Step Functions manages your application's components and logic, so you can write less code and focus on building and updating your application quickly. The following image shows six use cases for Step Functions workflows.
-
Orchestrate tasks – You can create workflows that orchestrate a series of tasks, or steps, in a specific order. For example, Task A might be a Lambda function which provides inputs for another Lambda function in Task B. The last step in your workflow provides the final result.
-
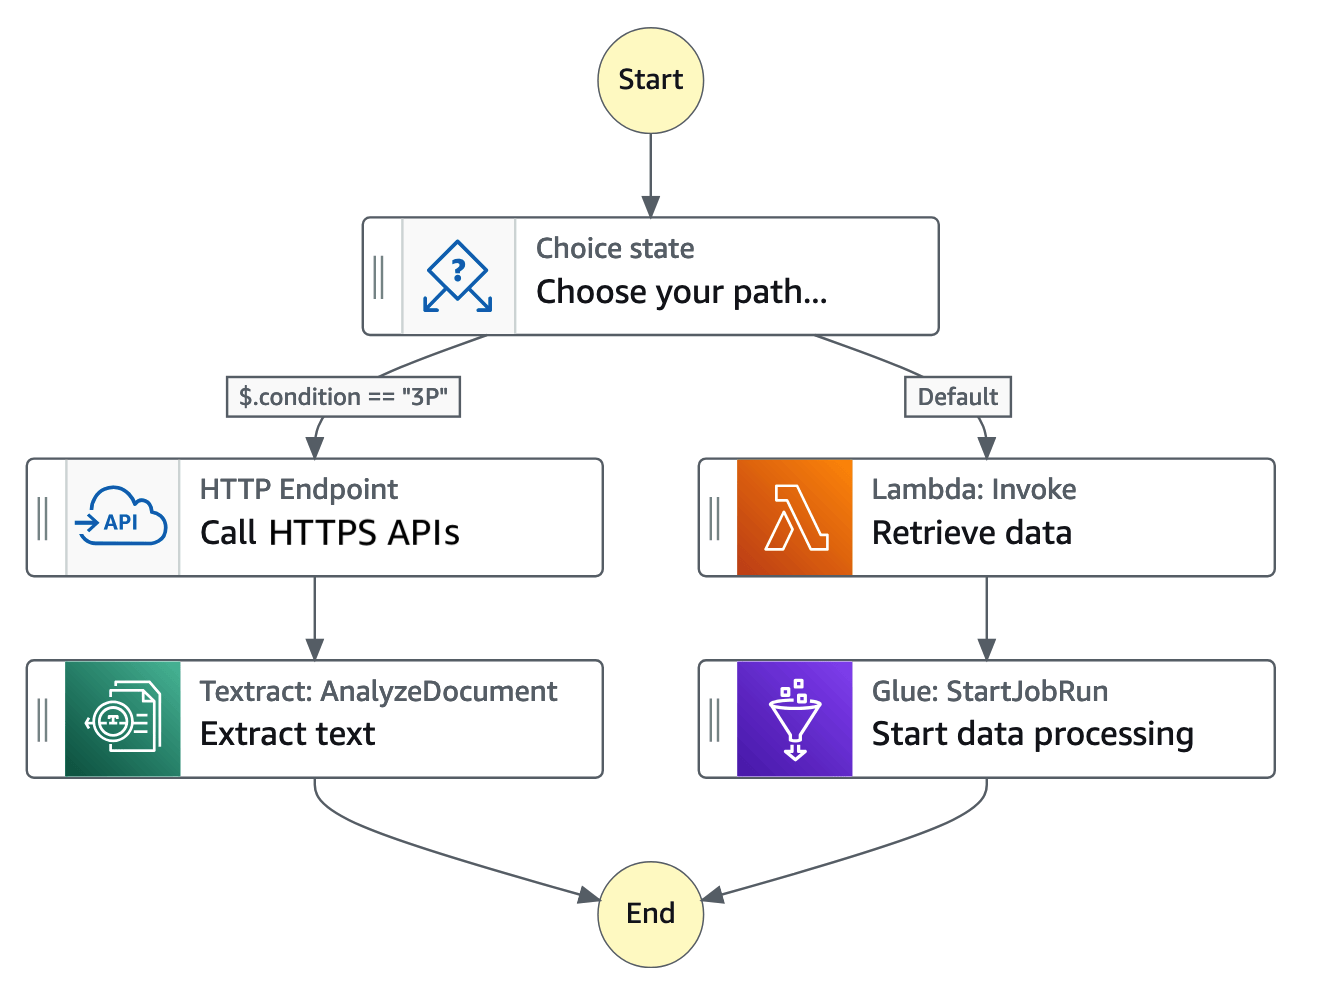
Choose tasks based on data – Using a
Choicestate, you can have Step Functions make decisions based on the state’s input. For example, imagine that a customer requests a credit limit increase. If the request is more than your customer’s pre-approved credit limit, you can have Step Functions send your customer's request to a manager for sign-off. If the request is less than your customer’s pre-approved credit limit, you can have Step Functions approve the request automatically. -
Error handling (
Retry/Catch) – You can retry failed tasks, or catch failed tasks and automatically run alternative steps.For example, after a customer requests a username, perhaps the first call to your validation service fails, so your workflow may retry the request. When the second request is successful, the workflow can proceed.
Or, perhaps the customer requested a username that is invalid or unavailable, a
Catchstatement could lead to a Step Functions workflow step that suggests an alternative username.For examples of
RetryandCatch, see Handling errors in Step Functions workflows. -
Human in the loop – Step Functions can include human approval steps in the workflow. For example, imagine a banking customer attempts to send funds to a friend. With a callback and a task token, you can have Step Functions wait until the customers friend confirms the transfer, and then Step Functions will continue the workflow to notify the banking customer that the transfer has completed.
For an example, see Create a callback pattern example with Amazon SQS, Amazon SNS, and Lambda.
-
Process data in parallel steps – Using a
Parallelstate, Step Functions can process input data in parallel steps. For example, a customer might need to convert a video file into several display resolutions, so viewers can watch the video on multiple devices. Your workflow could send the original video file to several Lambda functions or use the optimized AWS Elemental MediaConvert integration to process a video into multiple display resolutions at the same time. -
Dynamically process data elements – Using a
Mapstate, Step Functions can run a set of workflow steps on each item in a dataset. The iterations run in parallel, which makes it possible to process a dataset quickly. For example, when your customer orders thirty items, your system needs to apply the same workflow to prepare each item for delivery. After all items have been gathered and packaged for delivery, the next step might be to quickly send your customer a confirmation email with tracking information.For an example starter template, see Process data with a Map.